People are laughing at me because I’ve decided I like soup. For years I’ve been very picky about hot bowls of liquid masquerading as meals letting only those involving noodles, wontons or chunky bits into my life. It’s a texture thing; I can’t stand anything that’s devoid of chew or crunch and there’s only so much bread one can justify eating in a single sitting. I say this as a professional-level carb-consumer.

Recently I’ve relaxed the rules a little but still require plenty of vegetables and garnish to keep my soups from the dreaded one-note drab fest. This soup was originally destined to remain a stock but evolved over a couple of days into a rich, meaty number with a warming background heat from the scotch bonnet chillies. People asked for the recipe after watching me make it on Instagram Stories, so here it is.

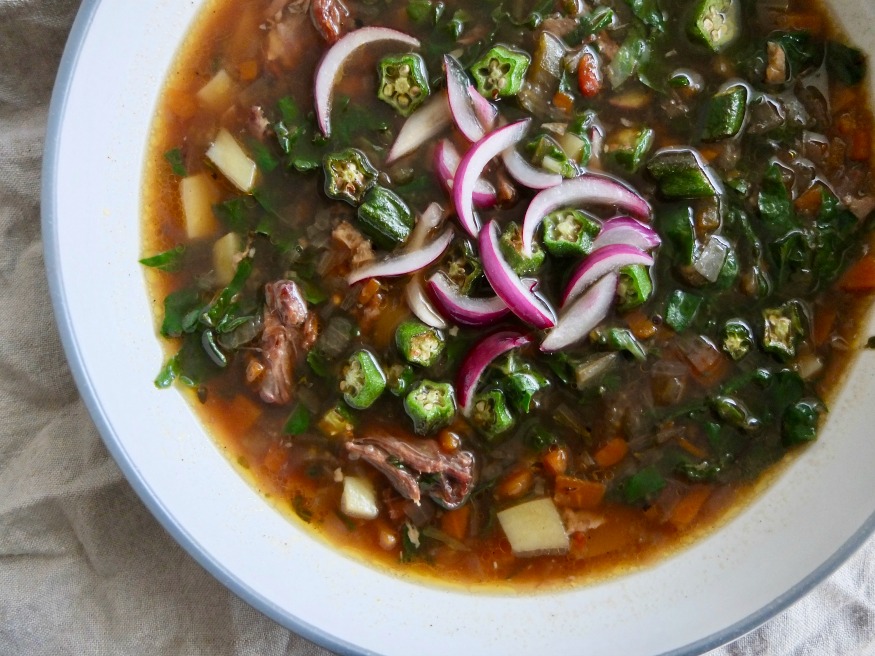
I quick-pickled some red onions because I thought the soup would want something to cut the richness. It didn’t. The crispy okra is important, however, adding a bright, fresh flavour and of course, another all-important texture. It’s going to be a long winter filled with warming bowlfuls in this house. Yeah I know, you’re all doing it already. Maybe I can tackle another traditionally shunned one-texture food next? Polenta perhaps. Or mashed potato that isn’t 70% butter.

Oxtail Soup with Scotch Bonnet, Potatoes and Crispy Okra Recipe

This soup is a bit of a time investment but you will be rewarded. You need to start it the day before you want to eat it as oxtail is very fatty and leaving it overnight in the fridge means you can easily remove the fat which sets on top. I also used a pressure cooker to cook the oxtail which makes the process faster but you could simmer the stew for 3 hours until tender. This makes around 6 servings.

1 oxtail (around 9 pieces – ask your butcher to chop it for you)
2 litres good beef stock
500ml Guinness
1 carrot, finely diced
2 stalks celery, finely diced
1 large onion, finely diced
6 cloves garlic, chopped
3 scotch bonnet chillies, split but left whole
1 thumb ginger, peeled and sliced thickly
8 stalks thyme
4 waxy potatoes, diced
A good handful chard or other sturdy greens, sliced
Around 10 okra, sliced
Flour and oil, for frying the oxtail

Heat a couple of tablespoons of oil in a frying pan or skillet. Toss the oxtail in seasoned flour and brown it really well in a pan. A lot of fat will come out which you may need to drain off as you fry. Set aside.

Remove all but a tablespoon of the fat from the pan and fry the onion, carrot and celery until soft and starting to colour golden. You want to get them nice and soft as this forms a sweet base for the soup. Add the garlic and fry for a minute or so.

Add the mixture to a pressure cooker along with the beef stock, Guinness, chillies, thyme, ginger and some salt and pepper. Cook for 1 hour and 15 minutes or until the oxtail is very soft. Cool, cover and refrigerate overnight.

The next day, remove from the fridge and take the layer of fat off the top. Pull the meat off the oxtail and add back to the soup. Pick out any pieces you don’t want like thyme stalks and the whole bonnets (you could leave the chillies in if that’s your thing!) then reheat the soup.

Add the diced potatoes. Fry the okra slices in a couple of tablespoons of oil until crisp and drain on kitchen paper. When the potatoes are cooked, add the chard and bring back to the boil. Check seasoning and serve, garnished with the okra.

This recipe was developed as part of a paid partnership with Marks & Spencer.

I used to find the festive season quite difficult. It raised my anxiety levels which, to be honest, are pretty much consistently set to gnarly anyway. I know some people have a terrible time at Christmas but I think many of us have a sort of mid-level stressy time. I’ve learned to enjoy myself more by employing a cluster of coping strategies and one of them is taking a deep-dive into the festive food pool.

Entertaining a group of pals is part of the fun but I think we’ve all been in a situation where that too becomes more of a hair-pulling exercise than the free and easy social event it should be. I’ve definitely come a cropper thanks to an overly ambitious menu, spending the whole morning freaking out when I should be prepping a relaxed lunch with a glass in my hand. It is very easily done.

So this recipe is all about serving something a little bit different without giving yourself too much to do. I know it seems daunting baking something in a salt crust but it’s just a case of timings which I’ve already worked out for you. To remove any element of doubt use a probe thermometer – you can poke right through the crust with no issues.

M&S got in touch asking me to create a recipe using ingredients from their food hall as they’ve just opened a branch near me in East Dulwich. We’ve all done a mad dash around one on the way home from work but I was amazed at how much they stock after having a good root around for ingredients. I should say however that the fillet of beef I’ve used here needed to be ordered in advance via their website as it’s larger than the fillet steak they normally keep in store, so do bear this in mind as it took a few days to arrive.

Why cook something inside a salt crust at all? Well, it’s fun and dramatic at the table as you crack it open and the fragrant steam puffs forth. Whatever flavours you choose to rub onto the meat are trapped inside and the salt from the crust seasons everything beautifully. You’re probably more familiar with cooking fish this way but it’s fun to try with meat, I think, and I’ve had great success with a salt crusted leg of lamb too.

I rubbed the beef with dried mushrooms and pepper but you could use a combination of woody herbs like rosemary and thyme or pretty much anything, to be honest. I await your reports of freeze-dried raspberry rubbed beef with great anticipation. On the side, I served some potatoes roasted simply with lots of olive oil and salt (parboil, lightly squish and roast with 6 tbsp oil and 2 tsp salt at 180C for 20 minutes) plus buttered greens, carrots and prepared horseradish from a jar. We drank M&S Delacort champagne while cooking, which is impressively rich and biscuity for £35 – it’s great value and would also go very well with my crab vols-au-vent. With the beef, we drank a Gigondas from Perrin Pere et Fils (also from M&S) –  a wintry wine with spicy red fruit and plenty of body yet soft tannins which won’t fight against the fillet.

So there we go – maximum impact, minimal stress. What will I salt crust next?

Salt Crusted Fillet of Beef Recipe

You will need a probe thermometer for this recipe.

250g plain flour
200g rock salt
5 egg whites
1 x 750g fillet of beef
5g dried porcini mushrooms (not from M&S)
12 black peppercorns

Preheat the oven to 200C fan/220C no fan and put a baking tray in there to heat up.

Make the crust by mixing the egg whites, salt and flour. When smooth (apart from the rocks of salt) wrap in cling film and put in the fridge for 20 minutes.

Remove the beef from the fridge (don’t let it come to room temp first). Heat a little oil in a heavy-based skillet or frying pan and sear the beef really well on all sides to get a nice brown crust on it because you won’t get the browning from pan cooking as usual.

Wrap the beef in foil then set it aside for 15 minutes. Blitz the porcini mushrooms and peppercorns to a powder and rub it all over the meat.

Roll out the salt crust, remove the foil from the beef and lay it on top then wrap the salt crust around it, sealing the edges. Make sure the seal is on the bottom.

Remove the baking tray from the oven and put the beef on it. Cook for 18 minutes then probe it – you are looking for a temperature of 46C for rare meat (obviously pop it back in if it hasn’t reached that temperature). Once it is 46C remove it from the oven and let it sit until it’s 50C, around 4 minutes. Carve it right away at the table as the beef will keep on cooking inside if you don’t.

Regular readers will know I have much love for retro and unfashionable food. I warmly recall hastily scoffed Findus Crispy Pancakes after-school, hot, greasy pasties on holidays in Cornwall and cold rice salad eaten curled up in Dad’s armchair, glued to Ready Steady Cook. These are, of course, comfort foods for me but I think they have merits in the taste department too and I often find myself defending the likes of the steak slice and cod in parsley sauce. They are basic yet satisfying dishes which seem to warm me until I glow like the Ready Brek Man. They hark back to times when my tastebuds were simpler to please and a sausage roll with a takeaway packet of ketchup followed by a snail bun from the school canteen really was the highlight of my day. Still sounds pretty rad, to be honest.

In a slightly different category of retro foods, you’ll find the vol-au-vent. These were not consumed at home but appeared at family events by which I mean weddings or funerals. Here one would encounter what I (and I think, probably, most people) call the ‘brown buffet.’ A trestle table is laid with platters of triangular sandwiches (ham, cheese, chicken, prawn mayo, tuna, that kind of thing), those tiny wrinkly sausages, tiny wrinkly sausage rolls, mini (wrinkly) quiches, pork pies etc. And so we come to vols-au-vent.

I’ve always adored vols-au-vent because what you have is pastry + creamy savoury filling which is an objectively good combination. The most common flavours were 1) creamy chicken and 2) creamy mushroom but I occasionally encountered a slightly leftfield creation involving fish or perhaps even a brown, steak-appropriate sauce. In recent years, the vol-au-vent made a comeback and I’ve had some decadent snackette versions in restaurants filled with soft, pudgy garlic snails (yes, yes and thrice yes!) or lip-coating braised oxtail.

You’re probably not too surprised to see crab filling mine (again, regulars will smile or groan) which I’ve combined with creme fraiche, lemon and curry powder, for extra throwback points. They’re so easy to make too: cut pastry, bake pastry, cut pastry again, combine filling and dollop into pastry. The perfect party snack (there’s no denying the festive bellyache season is nearly upon us) or just a way to show off at your next brown food buffet.

Curried Crab Vols-au-vent Recipe

Makes around 15

500g ready-made puff pastry
1 egg, beaten
1 dressed crab (this will give you white and brown meat)
1 heaped tablespoon creme fraiche
A squeeze of lemon juice
1/2 – 1 teaspoon medium hot curry powder (these vary wildly so it’s best to add a little then taste)
1/2 teaspoon paprika

You’ll need two pastry cutters (or in my case, two glasses) which are a few cms different in size. So one cutter (glass) had an 8cm rim and the other had a 4cm rim.

Preheat the oven to 190C

Roll out the pastry to a thickness of approx 5mm. Cut circles using the larger cutter then, use the smaller cutter to partially cut smaller circles in the centre of each large circle – don’t cut all the way through the pastry. You can reroll the remaining pastry but it won’t rise as well so try to be economical in the way you cut the circles.

Place the circles on two large baking trays and brush with the beaten egg. Bake for 15 minutes, or until risen and golden. When cool enough to handle, cut the centre circle out, leaving the base intact.

Combine the crab, creme fraiche, lemon juice, curry powder and paprika. Taste and adjust the amount of lemon juice, seasoning or curry powder as necessary. Divide between the pastry cases and top with a sprinkle of the chives.

You can forget your apple sauce, pal – quince and scotch bonnet is where it’s at. I’ve combined them in a hot sauce before but this is more of a quince mush with chilli in it, which is a lot nicer than I’ve just made it sound. It’s a fruit sauce for pork, south London style. The quinces we bought in Peckham’s General Store and the scotch bonnets well, they’re everywhere. Colourful little buggers.

The pork is rubbed with scotch bonnet powder so the crackling and outer meat is spicy too but you could just roast it simply with salt. This reduction in overall heat will also help with the problem of what to serve on the side. Vegetables make sense but the carbs are trickier. The first time I made a sort of spiced pilaf which took things off in another direction entirely and we’ve also had it in baps with mustard and a cabbagey ‘slaw like a spicy hog roast.

Potatoes?

Anyway, it’s a very fun thing to do with quinces which are at their fragrant, knobbly best right now. Snap ’em up in the shops or – ideally – steal them from someone’s garden. They may even give them to you! I dunno. Things like that mainly happen outside of London.

Roast Pork Belly with Quince and Scotch Bonnet Sauce Recipe

1.6kg piece pork belly (or thereabouts) cut from the meaty shoulder end, with ribs attached (this is just my preference because then you get the tasty ribs as well)
2 tablespoons sea salt
2 tablespoons scotch bonnet powder (I buy this in Peckham but you can also buy online)
2 large quinces
1 fresh scotch bonnet chilli
2 tablespoons honey
1 tablespoon lemon juice (plus a bit extra for prepping the quinces)

If you have the pork belly the day before, pat the skin dry, score it, then leave it uncovered in the fridge overnight to dry out. If not, just pat it dry then score it. Remove any tough white membrane from the top of the rib section.

Preheat the oven to 220C.

Mix the salt and scotch bonnet powder (if using) and rub this all over the pork belly. Place it on a rack in a roasting tray and roast for 20 minutes.

Turn the oven down to 140C and cook for 1 hour 20 minutes, then whack it back up to 220C for a final 20 minutes. This should give you great crackling.

For the quince sauce, peel and stone the quinces, cutting them into segments – you’ll need to pop them in some water with a squeeze of lemon juice in it while you do this, to stop them turning brown.

Cover them with water in a saucepan and add the scotch bonnet (leave it whole) and the honey. Cook until soft, around 1 hour. Remove the chilli and drain. Blend the fruit and stir in the lemon juice. Season with salt. Serve with the pork!

If you’ve been following my recipes or Instagram account for a while, you’ll know I have a thing for Adana kebabs. It started (maybe?) with the late-night, fat-spitting, t-shirt stainer they sell in wraps at FM Mangal and now I’m constantly making them at home, be it in crispy kebab rolls, as this yogurtlu’ version smothered in yoghurt and spiced butter, or the many straight-up, wrap-it-in-flatbread-with-salad iterations. The basic recipe – as recipes do – has constantly evolved.

This is the most up to date version and, I think, the best yet. Why? It’s a case of using the right amount of the red pepper paste so it’s pronounced but not bitter, plus I just really enjoy the mix of spices. Parsley stalks are pretty crucial too because they bring a slight crunch and pops of fresh flavour, while the leaves tend to get lost.

Method is important, so make sure you knead the meat mixture then chill it for a springier texture and to stop it falling off the skewers during cooking. Also, don’t make them too large because they won’t cook evenly. Keep the accompaniments fairly simple; yoghurt is essential and I also like to serve an onion, sumac and parsley salad, plus plenty of freshly made flatbreads. Yes, it’s worth making the flatbreads. A couple of people have asked me to do a flatbread tutorial on Instagram, so I’ll get around to that as soon as I can. In the meantime, I hope you enjoy these! Remember, guys: it’s never too cold to barbecue.

New Adana Kebab Recipe (makes 6 kebabs)

*** THIS IS NOTHING LIKE A TRADITIONAL ADANA KEBAB RECIPE, IT WAS JUST INSPIRED BY ONE***

For the spice mix

1-inch cinnamon stick
1 teaspoon fennel seeds
1 teaspoon fenugreek seeds
1 tablespoon cumin seeds
1 tablespoon coriander seeds
1 tablespoon chilli flakes

Toast the whole spices (apart from the chilli flakes) in a dry frying pan until fragrant, then grind all the spices using a spice grinder.

For the kebabs

6 cloves garlic
1 tablespoon red pepper paste (biber salçası – available in Turkish shops such as The Turkish Food Centre)
2 tablespoons parsley stalks
400g minced lamb
2 teaspoons salt

Combine the garlic cloves and salt in a pestle and mortar and smoosh to a paste. Combine with a tablespoon of the spice mix, the red pepper paste, parsley stalks and minced lamb. Knead the meat in the bowl using your hands, as if you are kneading bread dough. Do this for a few minutes, then allow to rest in the fridge for a minimum of half an hour but if you can do this day before, even better.

Divide between 6 large skewers.

Cook the kebabs over direct heat on a barbecue. You know the drill here, right? Make sure your coals are properly ready, e.g. covered in a layer of grey ash before you start cooking. No flames. They’ll take around 3-4 minutes each side (it’s useful to have a pair of tongs on hand to turn them).

For the onion salad

Slice one onion and add the slices to a bowl of iced water for around 20 minutes or so. Combine with a good handful of chopped parsley leaves, some salt and a tablespoon of sumac.

For the flatbreads

I think you can’t beat fresh flatbreads with this. That recipe uses spices but you can just leave them out (as I did).

Recipes are very rarely ‘original’ these days unless you’re the man on Come Dine with Me who served a viscous, beige stew inside a castle made of toast, or Rachel from Friends attempting a trifle. Even if you think you’re the first to come up with a particular arrangement of ingredients, someone else has probably had the same inspiration. Recipes are constantly tweaked, adapted, repackaged and resold in different ways.

The idea of covering things in scalloped potatoes is nothing new (stewed meat for example, or a fish pie) but I’m not sure I’ve ever seen it over a joint before, like cucumber ‘scales’ on a whole salmon. I say that as someone who hasn’t embarked on even the laziest of Googles. Still, someone somewhere will have done it. Get in touch, fellow genius, for this is one of the greatest potato and lamb combos ever conceived, and I can say that with full enthusiasm because it was not my idea.

Having acknowledged how incredible this was I have to say that we both thought it was destined to fail. How would the potato slices stick to the lamb and not slide off during cooking? Answer: sprinkle with potato flour. We also wrapped the scaled lamb leg in clingfilm once roasted to allow the slices to ‘set’ into shape, then carefully unwrapped and slung it into a hot oven to cook the potatoes and get them good and crisp. Miraculously, it emerged in fully burnished armour.

You get the name, right? It looks like an armadillo but it’s made with lamb. That’s got to be an original.

The Baaa-madillo (a crispy potato coated slow roast leg of lamb recipe)

I recommend adding a layer of potatoes underneath the lamb too, ensuring you get a good haul of lamb fat soaked spuds – actual heaven (and not a new idea).

1 leg of lamb (around 2kg bone-in)
1 tablespoon oil (veg or groundnut)
2 sprigs rosemary
1 whole head of garlic
Around 6 floury potatoes, cut into thin slices using a mandoline
Potato flour

Preheat the oven to 160C.

Place the lamb in a roasting tray and score the fat on top. Rub with the oil and season really well with salt and pepper. Roughly chop the rosemary and add that too. Lob the whole garlic bulb into the roasting tray.

Cook for around 45 minutes or until an instant-read thermometer reads around 45C at the centre (this isn’t cooked enough yet but you are putting it back in the oven).

Lay a sheet of clingfilm on a work surface and layer the potatoes on it, overlapping (see picture above). Sprinkle evenly with potato flour as shown, then lay the lamb on top, fat side down. Now you need to carefully mould the potatoes around the lamb leg without them all shifting around. Let those you don’t need fall away (e.g. you won’t cover the base of the lamb leg) and rearrange any that have moved. It’s not TOO hard if there’s two of you doing it, although I say this as someone who has made the above recipe precisely once. Rigorously tested it ain’t – go forth, culinary adventurer.

Wrap the clingfilm really tightly around the lamb leg, adding a couple of extra layers once secured, and leave to sit for 45 minutes. Whack the oven up to 220C.

Place lots more potato slices in the roasting tray to make the best potato crisps you’ve ever eaten. Carefully remove the clingfilm and place the lamb back on top of the potatoes. Cook for approximately 15 minutes then turn the oven up to 280C (or as hot as your oven will go) for a final 5 minutes, or until golden and crisp.


I remember reading some ‘dieting advice’ once, probably during the ’90’s when I was an impressionable teenager and therefore likely to have been seeking out that kind of drivel. The author – who I imagine now writes articles about baking eggs into the centre of avocados, or runs a ‘cartwheels on the beach’ Instagram account – advised readers ‘never reward your success with food.’ Are. You. Actually. Freakin’. Kidding.

Woman, did ya not know that rewarding oneself with food is one of life’s greatest pleasures? I feel sad that you were not able to get a new job, pass a test or (let’s face it) do something very routine and dull like pay a bill or go to the dentist without promising yourself a fat sandwich afterwards, or a share-size bar of Dairy Milk. How did you reward yourself, exactly? Perhaps a stern rap on the knuckles (good for staying ‘in the moment’) followed by two hours of step aerobics? Buzz off.

When I want to reward myself with food like a normal person I know how to do it properly, which brings me to these crab tacos. We’ve recently enjoyed various successes in this house and wanted to celebrate but we’ve also had some struggles and the logical response to both is the same: good food. If this were a ’90’s multiple choice quiz with absolutely no scientific basis my answers would now reveal that I am ‘C: The Emotional Eater.’ Who isn’t? If you see food as ‘just fuel’ then we are too fundamentally different and I think you meant to click on the link to www.don’tsabotagemy#gains.com.

We had to really work for these as well due to an apparent shortage of masa flour in the south east London area. In the end we bought some in Wholefoods (Picadilly) and as a result made an important discovery which is that the Cool Chili Co. masa flour is WAY easier to make tacos with than this Mexican brand, the one we usually buy. Our tacos often turn out a little crumbly but with the very finely ground Cool Chili Co. stuff they were pretty much perfect. If you’re having the same trouble, give it a go. They have a stall at Borough Market as well as the online shop.

We’d already come up with this recipe a few months back during a test run. The brown meat is mixed with smoky Mexican chillies, topped with a lime-heavy grilled corn salsa, white crab meat, sour cream and then – because why TF not – some caviar. Not the massively expensive stuff you understand but enough to give it a salty kick and make you feel like a boss. Enough to make you feel like you’ve received the reward you deserve for just, like, existing in the world without making a hash of it. If you want to make a hash, of course, then rock on.

Crab, Corn and Caviar Tacos Recipe

You can make this with 1 large, whole crab if you want to cook it yourself but obviously, the amount of meat will vary. I’ve given you the weight of meat here to make things simpler. This makes around 18 tacos.

For the tacos

250g masa flour (masa harina)
1/2 teaspoon salt

For the crab

150g brown crab meat
200g white crab meat
1/2 dried Guajillo chilli
1/2 dried Ancho chilli
1/2 Pasilla chilli (obviously, just use one variety if you have one but I happened to have three – or mix it up)

For the salsa

4 corn cobs
1 small red onion, finely diced
Juice of 2 limes
Large handful coriander leaves, chopped

To serve

Sour cream
Caviar

Barbecue the corn cobs until lightly charred on all side. Shave the niblets (NIBLETS!) from the cob and mix with the other ingredients plus some salt. Set aside.

Soak the dried chillies in boiling water for around half an hour, or until softened. Deseed and whizz in a blender with the brown crab meat. Set aside.

To make the tacos, put the flour in a bowl and add the salt. Add 350ml water and bring together into a ball. Cover this and let it sit for 20 minutes. Press on the ball – if it cracks you need to add a bit more water. Do this a tablespoon at a time until it’s soft but not sticky. Divide into approx 30g balls. These instructions I copied from the back of the masa flour packet – they’re very good!

Line a taco press with a greaseproof paper square and place a ball on it. Put another square of paper on top and press.

Heat a dry frying pan or skillet over a medium-high heat. Cook each tortilla in a dry pan until the tortilla begins to release itself from the pan – 20-30 seconds. Flip – sometimes they puff up (desirable), sometimes they don’t. Don’t worry about it. Keep warm wrapped in a tea towel.

Assemble! We did brown meat followed by corn salsa, white meat, sour cream, caviar.

I should’ve posted this when the weather was bonkers-hot and the idea of cooking *anything* was repellent but I think we all know I am not that organised. It’s still a perfect noodle salad for summer and the effort is minimal, so hear me out. Soba noodles take but two minutes in boiling water and I’ll let you into a secret – hardly military base level stuff this – I often use those ready-cooked salmon fillets from the supermarket. I know. This is where someone jumps in to tell me they’re cooked in arsenic steam or vapours of Piers Morgan. Chop chop now, head right down to the comments before the urge gets cold.

They’re really handy for a working lunch because you just flake them into whatever you’ve made and it feels pretty luxurious. You didn’t even look at a steamer basket! No burns for you. Pretty much any vegetables will work here, but I like to use a combo of avocado and cucumber if it’s really hot because: no cook. I’ve also enjoyed those little baby courgettes that are around now though — sliced thickly, they take just a minute to soften to optimum level and you can cook a handful of edamame or peas at the same time (just lob them in with the noodles for the last minute of cooking and save water like a hero).

The real superpower here though is the furikake. What is this word? It is the name of a Japanese seasoning consisting of seaweed, bonito flakes, sesame and other savoury bits and bobs, to be sprinkled on top of rice and other cooked foods – i.e. you use it as a finishing seasoning, rather than add it as an ingredient during cooking. Like most seasonings, it adds umami and the seaweed here ties in very well with the fish, as you can imagine. It’s great on loads of things including rice, eggs, tofu, soup, noodles or spaghetti. Go wild*. There are lots of varieties of furikake, and this is one we made with bits that were hanging about. The Japanese do these seasoning mixtures so well. See also: shichimi tōgarashi.

Anyway, this is a bold salad that’s cooling, delicious and takes barely any effort to make once you’ve got your furikake together which, to be honest, is an investment for the future anyway. What more do you want?

* There is an excellent and really quite mad furikake recipe from Freddie Janssen in Issue 02 of Pit. What are you waiting for?! 

Cold Soba Noodles with Avocado, Salmon and Furikake Recipe

This makes a substantial, dinner-sized salad for 2 greedy people. If you’re making it for a lighter meal I’d suggest reducing the noodles to 150g and adding 1 salmon fillet.

For the furikake (scale up as needed)

1 tablespoon toasted white sesame seeds
1 tablespoon toasted black sesame seeds
1 tablespoon blitzed up seaweed, such as nori
Large pinch salt
Large pinch dried red chilli flakes
Large pinch bonito flakes (or ground dried shrimps or anchovies)

For the salad

1 or 2 cooked salmon fillets
200g soba noodles
1 avocado, peeled and sliced
1/4 cucumber, quartered and sliced
A handful of frozen edamame beans
A handful of mint leaves
A handful of coriander leaves
2 tablespoons light soy sauce
2 tablespoons rice vinegar
1 teaspoon sesame oil
Chilli flakes

Make the furikake by mixing all the ingredients together and storing in an airtight container.

Cook the soba noodles for 1 minute in boiling water then add the edamame and bring back to the boil. Drain and run under cold water until cool. Add the sesame oil and mix through the noodles (easiest with your hands).

Combine the noodles and edamame with the avocado, cucumber, herbs, soy, vinegar and a good pinch of chilli flakes to taste. Mix well and serve sprinkled with furikake.

Just a quick hello and a recipe for peach iced tea, which you absolutely need in your life if you’re missing your regular brew during this heat wave. I am dedicated to tea drinking but there’s no way I’m sipping a hot cup of char (as we used to say in The Shire) when it’s 33C outside. And please, don’t give me any of that ‘it’s better to drink hot drinks because it makes you sweat and cools you down’ malarky because I am NOT INTERESTED. Are you honestly telling me you’d rather do that than drink an iced beverage? Lies.

Make this.

Peach Iced Tea Recipe

2 ripe peaches
250ml water
125g sugar
Tea
Ice
A squeeze of lemon is nice, if you have it

Put peaches, water and sugar into a saucepan. Simmer until sugar is dissolved. Mash peaches with a potato masher. Turn off the heat, put a lid on and leave to infuse for half an hour. Strain through a sieve into a bowl. Well done, you have a peach syrup. Chill it.

Brew up some tea and chill it. Add to a glass with ice, with peach syrup to taste. Add some lemon if you’re into that. Be cool and smug.

The cherries have started creeping into shops and will be around now until the end of July. While I think they’re best, generally, eaten as they come (who can resist that snap of taut skin?) there are ways to enhance their flavour when using them in desserts, to maximise cherry flavour.

Roasting is one such method and I think it works particularly well for ice creams and sorbets. I was reading this recipe and loved the idea of roasting the cherries with the sugar in the oven first, which also sidesteps making a separate simple syrup (that’s just sugar dissolved in water, FYI). What you end up with, then, is a load of collapsed fruit bubbling in sweet juice, ready for blending and churning.

It’s always tempting to romanticise inspiration for recipes but I’d feel disingenuous doing that here. Basically, I was pitting the cherries* with no particular plan for them, when my gaze fell upon a bottle of pomegranate molasses sitting right there on the kitchen counter. Ta da!

I’m still giving myself a pat on the back though because this is a stunner: it has a deep cherry flavour (thanks, roasting) and a whisper of perfumed pom molasses which brings a Turkish or Iranian vibe. In fact, this would be the perfect end to a meal of kebabs, flatbreads and bowl of sloppy tomato salsa which has warmed itself slowly in the afternoon sun.

*If you don’t have a cherry pitter, I strongly recommend you buy one. They can also be used to stone olives.

Roasted Cherry and Pomegranate Molasses Sorbet Recipe

1 kg cherries, stalks removed and pitted
200g caster sugar
2 tablespoons pomegranate molasses
1 tablespoon lemon juice
Large pinch salt
200ml water

Preheat the oven to 200C

Put the cherries, sugar and salt in a roasting tray – you want them to be snug and not spread out (a couple of layers of cherries works well). Mix well to coat.

Roast for 30-45 minutes until they are bubbling and the juice around them is thick. Add the water and return to the oven for another 10 minutes.

Allow to cool to room temperature then blend (in a food processor) with the lemon juice and pomegranate molasses. Taste the mixture and add more lemon juice if you like. It’s best to make it slightly too sweet as the sugar will be dulled slightly by the freezing process.

Pass it through a sieve (no really, do) making sure you really press and scrape all the fruit skins through the mesh (and remember to scrape the bottom of the sieve, too). Put the sieved mixture into the fridge and leave overnight or for at least a few hours, as it needs to be very cold.

Churn in an ice cream maker. This would also be great with vanilla ice cream, or mixed into vanilla ice cream as a ripple. If you don’t have an ice cream maker you can do the whole, freezing, vigorously whisking, freezing, whisking and so on but I really recommend getting on if you think you might make a few ice creams/sorbets. This is the model I use – great because it doesn’t have very small parts you can easily lose. I’ve had it for around 5 years now with no probs.

Hello! Yes, I know, it’s been ages. I’ve had a change of job and I’m back in the kitchen developing recipes full-time, doing the odd bit of food writing on the side and of course, working on Pit. I couldn’t be happier because it just feels so right, plus I’ll have much more time to share recipes here.

Here’s something I made off the cuff last night which turned out really well, particularly considering it began with a lonely (albeit sunshine-yellow) courgette. With a potentially watery, flavourless vegetables like this the success of a recipe depends pretty much entirely on the cooking technique; treat it poorly and you will be punished. We’ve all had pallid courgette in an insipid ratatouille or squeaky aubergine in a hastily layered Melanzane Alla Parmigiana. One of my favourite ways to cook courgettes in the summer is to sling them right into the coals, or as we call it in the BBQ game: cooking ‘dirty’. This technique can be applied to lots of different vegetables (as with these tacos) or to steaks (where the direct heat and charcoal help to form a mega-crust).

You just lob the courgette in there whole once the coals are at regular cooking temperature (i.e. not flaming still) and in 10 minutes you have a vegetable that is cooked to varying degrees; charred in places on the outside, starting to collapse near the skin and just cooked through at the centre. Once chopped it’s useful as an ingredient in salsas, or just as a side dish on its own but I recommend you try it this way with yoghurt and pomegranate molasses.

This is best consumed when the courgette is still warm as it’s a pleasant contrast to the cold garlic-yoghurt. The juices also begin to seep out and mingle with the other flavours and if you don’t enjoy this scooped up with toasted bread then frankly we cannot be friends.

BBQ Courgette Meze with Yoghurt and Pomegranate Molasses Recipe

1 large courgette (no need to use a fancy yellow one)
1 large clove garlic, crushed
170g Greek yoghurt (I used one of those small Total brand tubs)
Olive oil
Pomegranate molasses
Turkish chilli flakes (pul biber)
Good flaky salt

This is very easy. When your coals are ready for cooking, put the courgette directly on them. Turn it every so often until blackened patches appear all over and it feels soft (but not falling apart) – around 10 minutes.

Mix the garlic with the yoghurt and spread onto a plate. Chop the courgette and place on top of the yoghurt. Drizzle with olive oil and pomegranate molasses. Sprinkle with good sea salt and the Turkish chilli flakes. Eat with fluffy Turkish bread (or pita, or charred sourdough at a push).


Here’s a recipe for flatbreads that go with so many things – way beyond hummus and other dips. They would be good with grilled meats, for example, or even a curry. They’re perfect to have on hand for a barbecue, and they cook well on the grill too.

Easy Everyday Spiced Flatbreads Recipe (makes 8-12 flatbreads, depending on how large you want them)

You can make loads of variations on these using herbs like rosemary, for example, or mixing up the spices. Of course, you can also leave the spices out altogether.

500g strong white flour
2 teaspoons salt
30ml olive oil
300ml warm water
1 packet of instant yeast (7g or about 1.5 teaspoons)

Mix everything together in a bowl and give it a knead for a few minutes, until smooth and springy.

Leave the dough in a warm place for an hour or so until it has roughly doubled in size.

Knock back the dough and divide into 8 balls for large breads or 12 for small.

Roll the dough balls flat and then cook for 1-2 minutes in a properly hot, dry pan – seriously, you need to preheat it for 5 minutes at least. I use a cast iron griddle pan. Cook them until they’re a little charred on each side. They will start to puff up when ready.