It’s that time of year again folks: people are going bonkers for wild garlic. Us Londoners are making fools of ourselves scouring the tiniest patches of woodland, picking through sodden newspapers and train tickets, or having fivers wrestled out of our hands at farmers’ markets. Those of you in the sticks are laughing your heads off while tapping out pitying tweets about having a patch the size of a rugby pitch at the bottom of the garden. What is ‘garden’?

I’ve often wondered why wild garlic is so appealing. It’s not like we can’t get the same flavour – more or less – from standard issue, widely available garlic bulbs. I think it’s the colour, the greenness, the signal that this, finally, is spring. This year more than ever we need to grab fistfuls of pungent leaves and blend them into soups and pesto. We need to feel healthy and refreshed while still being comforted by that deeply satisfying flavour. That familiar allium honk.

Putting wild garlic in something instantly makes it more impressive. Take boring old soda bread – the least challenging of any loaf and so straightforward a child can make it (I imagine) – lob a load of leaves in there and now you have New Bread, Exciting Bread.

Wild Garlic Soda Bread Recipe

300g plain flour
200g wholemeal flour
400g whole live yoghurt
Large pinch salt
1 teaspoon bicarbonate of soda
A large handful of wild garlic leaves washed and roughly chopped

Preheat your oven to 180C

Blanch the wild garlic leaves in boiling water for 30 seconds, drain and squeeze out as much water as possible. Chop finely.

Mix all the ingredients together until they form a shaggy dough. Knead for about 30 seconds, then form into a round shape on a baking tray. Cut a cross in the centre about 2/3rds of the way deep.

Place in the oven for 40-45 minutes – when it’s done it will sound hollow when you tap the base of the loaf. Allow to cool a little before slicing, otherwise the middle of the loaf will be sticky.

I realised recently that I will only eat certain vegetables if they are served with very particular accompanying flavours. A mate asked me what my favourite vegetable was and I replied, without thinking, ‘spinach’ only to realise that it’s only my favourite when combined with feta, or ricotta. I will only eat pumpkin if it’s served with coconut milk and chilli and now I’ve realised beetroot needs the sharp cheese and spice treatment or you can throw it in the bin as far as I’m concerned. Unless it’s pickled.

I wasn’t even going to post this recipe at all, truth be told but someone called the_portland_barman asked me so nicely for it on Instagram (would I mind? If I had time?) that I said yes, actually, that will be no problem at all.

So yeah, I do read all your comments because I love to hear from you guys (stop retching at the back), and it so happens another reader sent me an email asking me to please, please sort out my subscription email because it was a bit of a mess. Thing is, I started blogging in the early days, as you know, and I’d always just used Feedburner because that’s what everyone did back then.

This poor frustrated reader had finally reached her wit’s end and forwarded her subscription email to me. Wow, it was bad. I had no idea you were all suffering through that eye poke and I’m sorry. I’ve changed to Mailchimp. If it doesn’t work and you all get the old email anyway this is going to be really embarrassing. Could happen.

So, there we go. A recipe, an apology and hopefully a snazzy email. Not bad for a… Friday? Yes, Friday. If someone could periodically update me on the day of the week that’d be grand. Thanks.

Beetroot Dip with Feta, Herbs and Scotch Bonnet Oil Recipe

I can’t remember the exact quantities here but it’s so easy it doesn’t really matter.

Five whole beetroots, leaves removed and left whole (don’t peel)
150g thick natural yoghurt
Feta, to crumble
Squeeze of lemon juice
Tarragon leaves
Mint leaves
Mixed seeds (by in a handy bag in the supermarket), toasted in a dry pan
5 scotch bonnets
125ml light olive oil
1 whole bulb garlic

Cook the beetroots whole in boiling until just tender (this takes about 40 mins), then allow to cool a bit and rub off the skins, which will come away very easily (I actually pressure cooked mine which took around 15-20 mins). At the same time, roast the garlic whole with the scotch bonnets. Heat the oven to 120C, slice the top off the garlic so the tops of the cloves are exposed and place in roasting dish with the chillies, rubbing the lot with a little oil. Cook for about 20 mins or until soft.

Blend chillies with light olive oil in a blender. I de-seeded mine.

Put beetroots in a blender with the natural yoghurt, lemon juice, half the garlic cloves and some salt and blend. Taste and add more yoghurt if you fancy it.

Spread the dip on a plate (more surface area for toppings – you could also use a nice wide bowl) and sprinkle over feta, herbs, toasted seeds. Drizzle over chilli oil.

Anchovy and bottarga pasta

I know, you’re never going to remember the name of that pasta shape but don’t worry, this is freakin’ fabulous with basically any pasta – I know this from extensive experience. A great choice would be orecchiette or ‘little ears’ which is what they use down in Puglia when they make their famous broccoli and anchovy arrangement.

As I said on Instagram when I posted a snap, this recipe is proof that with the best ingredients you can make incredible food in no time at all. It uses really excellent bottarga and anchovies both from Lina Stores in Soho, part of a hamper they sent me before Christmas as a promotional effort. If you’ve never been then really, get over there – I’m a long-time customer as it’s a real goldmine of Italian ingredients and one of the very best delis in London, full stop.

This is such a simple dish. You gently cook garlic in butter (olive oil would be more traditional but I love the richness of butter on pasta), then melt in those beautiful anchovies. Next add some blanched and roughly chopped Tenderstem broccoli, chilli flakes and a good squeeze of lemon juice and let it sizzle for a few minutes. The hot pasta is added in one steamy swoop and the lot stirred together and slipped into bowls before topping with crisp crumbs and a shower of golden roe.

It’s probably my favourite pasta dish of all time, actually. Anchovies are one of the world’s greatest ingredients and the quality of these was outstanding – you’ll need to gently tease the flesh from the whole fish (easy) before melting them into the sauce because they’re packed as whole fish, not teeny, aggressive fillets. It’s got everything: garlic, chilli heat, salty fish and lemon plus CARBS. You’ll always be able to rely on Food Stories for carbs, guys, no matter what happens.

Fusillata Casareccia with Anchovies, Broccoli and Bottarga Recipe

Pasta of your choice for 2 people
200g Tenderstem broccoli
4 cloves garlic, crushed or finely chopped
Chilli flakes, to taste
8-10 anchovy fillets (or to taste)
Juice of half a lemon
Handful breadcrumbs, toasted until golden
Bottarga
Butter or olive oil

Cook the pasta in plenty of boiling salted water until al dente.

Put the Tenderstem into a pan of boiling water. When it comes back to the boil, drain.

Heat a knob of butter or splash of olive oil in a frying pan and gently cook the garlic for a minute or so, stirring. Melt in the anchovies. Add chilli flakes and the broccoli. Stir to coat and add lemon juice.

Once pasta is cooked, drain reserving a splash of cooking water. Add both to the frying pan. Stir well.

Transfer to bowls then grate over bottarga and add crumbs. Yeah, it’s really simple.

Clementine meringue pie

This is the second of two sponsored posts in partnership with Vitamix UK, who have just launched the Ascent Series

I’ve mentioned before that I spent ages trying to perfect a grapefruit meringue pie to the point where a friend actually said to me, ‘Helen, why bother?’ And so I stopped. It was a relief.

Why, then, I thought it would be a good idea to make a meringue pie for this project I have no idea. Having spent so much time fluffing up the grapefruit pie (for no particular reason, you understand, it was just one long joke on me) it then took me 4 attempts to get this one right. Why? Well this time I was making the curd filling in the Vitamix, and it took some fiddling with ratios to get it to set, plus there was the time half the curd was spilt in the sink…

The pastry can be blitzed in the blender which is all well and good but the real pleasure here is making that filling. Basically, you just blend the zest and sugar then add in everything else and leave it in there, whizzing away and heating up until thickened. You’re making lovely thick curd in the time it takes to stick something in a blender and leave it on for 10 minutes while you do something else – no standing over a saucepan whisking.

Clementine meringue pie

It sets to a beautiful orange wobble, rich and full of clementine flavour, with a touch of lemon for sharpness. I also piped the meringue because I wanted it to look pretty – those of you who follow me on Instagram will know I struggled to get this right too (I am never going to enter Bake Off, put it that way) but you could also just pile it on top, as is traditional.

So yeah, that’s me done with meringue pies for a while. You should make it though because it’s a very cool festive dessert and I think we forget how good meringue pie can be. Just leave me out of it.

Clementine Meringue Pie Recipe

For the pastry

175g plain flour
100g unsalted butter
2 tablespoons icing sugar
1 egg yolk
Pinch of salt

For the curd

3 clementines, zest and juice in separate bowls
1 lemons, zest and juice in separate bowls
330g sugar
160g butter
4 eggs
4 egg yolks

For the meringue

4 egg whites
200g golden caster sugar
2 teaspoons cornflour

Make the pastry by pulsing the flour and butter in the Vitamix until it resembles breadcrumbs. Add the sugar and salt plus the egg yolk beaten with a splash of water and pulse until it comes together. Scrape out, flatten into a small circle (this makes it easier to roll out later), wrap in clingfilm and refrigerate for 30 minutes.

During the time, make the curd by blitzing the zests and sugar in the Vitamix on variable 3, then add the eggs, juice, yolks and butter, bring the speed up to variable 10 and let it blend for 10 minutes, or until thickened.

Make the meringue by whipping the egg whites to soft peaks then adding in half the sugar, a half tablespoon at a time. Add the cornflour, then add the remaining sugar in the same way.

Preheat the oven to 180C and blind bake the pastry by placing a sheet of baking paper on top and filling it with baking beans, dried pulses or rice. Cook for 15 minutes then turn the oven down to 160C.

Briefly blitz the curd to make sure it’s still nice and hot (this will prevent the meringue from weeping when you put it on top) and pour it into the pastry case. Top with the meringue (start at the edges if you are piling it on and work inwards).

Bake for 20 minutes then leave to cool before serving.

Cavolo nero and feta cheese borek

The origin of börek is uncertain but here’s an undisputed fact: I am unable to walk past the Turkish food centre in Camberwell without going inside, buying a dirty little spinach and cheese börek and stuffing it into my face so fast all that can be seen to the keenest of peepers is my greasy hands and lots of little flakes of pastry, gently floating to the ground.

I call those börek dirty because they really are the scrag end of the spectrum. You can taste the margarine. I mean, I’m still going to eat them but you get what I’m saying. They are made in a factory (I’m guessing) with less than excellent ingredients and I’m ok with that.

Cavolo nero and feta cheese borek

When I was asked to write a börek recipe for Great British Chefs, however, I saw it as my chance to make amends with the world of Turkish pastries and I think I’ve done that rather nicely. Say so myself. Cavolo nero is a brilliant substitute for spinach with its iron-rich flavour and in fact, I think it’s a better choice, particularly now it’s cold and ‘orrible and we need fortifying in every way possible. A woman cannot live on Chocolate Orange alone.

Cavolo nero and feta cheese borek

Cavolo Nero and Feta Cheese Börek Recipe

This recipe first appeared on Great British Chefs

300g cavolo nero, (weight with stalks, which yielded 150g without stalks)
8 sheets yufka pastry, or filo pastry
200g feta, or Sütdiyarı Picnic Börek Cheese if you can find it (or another white Turkish cheese)
100g butter, melted
1 egg, and 1 egg yolk, beaten lightly with a fork

Preheat the oven to 180°C/gas mark 4

Strip the cavolo nero leaves from the stalks (the stalks can be saved for other dishes, and are particularly good finely chopped and added to fried rice), blanch them for 1 minute in boiling water, then drain.

Dry the leaves thoroughly by pressing them between two clean tea towels and placing something heavy (like a wooden chopping board) on top for a few minutes. Chop the leaves finely and mix with the cheese and a small pinch of salt (if using feta, skip the salt).

Take a sheet of yufka, place on a clean work surface and brush with melted butter. Lay another on top. Then, on one side of the pastry, brush a little more melted butter and lay a fresh sheet of yufka on top, so that it overlaps slightly with the two sheets already there (the idea is to make one long strip of yufka). In the end you will have four pieces of double layered yufka, overlapping in a line.

On the bottom edge of the yufka, begin to lay out your filling in a long snake, continuing right to the other end of the pastry.

Then, carefully roll the pastry up and around the filling until you have one long snake of pastry filled with the cavolo nero and cheese. The snake can then be curled around and placed on a baking tray. Don’t worry if your tin isn’t the right size or shape.

Brush the borek with the egg and cook for 25–30 minutes or until golden brown.

Pork and venison sausage rolls

This is the first of two sponsored posts in partnership with Vitamix, who have just launched the new Ascent Series. 

How do you guys feel about Christmas? We’re supposed to love this time of year. My Instagram feed has been saturated with baubles and bristly trees for a couple of weeks now as people get carried away on an avalanche of boozing, socialising and eating.

Festive food is definitely the highlight of the season. Pork pies, pickles, mince pies and trifle. Christmas, for me, is a time to celebrate traditional British food. I like to emerge in January, whiffing faintly of Silton and mulling spice, like a crumpled party napkin discarded among the glitter of the staff Christmas party. The feasting needs to be full throttle – even paper hats should feel snug come the new year.

A lot of Christmas food is about pork and you know it. Stuffing, pigs in blankets, pork pies and of course, sausage rolls. Some of the most popular recipes of all time (ALL TIME!) on Food Stories are these sausage rolls with whisky caramelised onions and this very quick and easy ‘cheats’ version, to use the language of today’s food magazines.

Pork and venison sausage rolls

This recipe sounds like it’ll take an age to make as it involves mincing two types of meat and grinding spices but guess what? Yup, the Vitamix does all that for you. I’ve worked with Vitamix before, you may recall, and the reason I’m doing it again is that these blenders are genuinely brilliant. They are the nuts. They will blend just about anything and they take a lot of work out of a lot of recipes. I use mine constantly, even when they’re not paying me to do it.

These sausage rolls are an excellent variation on the traditional pork, with the gorgeous wintry flavour of venison but enough pig in there to keep the mix nice and fatty. I’ve added a gentle hum of mace, juniper and white pepper and a batch of sweet, golden onions, caramelised with sherry to really tick those jingle boxes. Festive AF.

Pork and Venison Sausage Rolls with Sherry Onions Recipe

Makes around 24. These are perfect served with a blob of English or Dijon mustard.

400g pork belly, trimmed of excess fat, skin and bone
500g venison haunch, skinned
4 onions, peeled and sliced
25g butter
2 generous pinches good sea salt
2 pinches of mace, ground
1 teaspoon ground white pepper
12 juniper berries, ground
2 teaspoons fresh thyme leaves
175ml Amontillado sherry
2 packs of ready-rolled puff pastry
2 eggs, beaten lightly with a fork (to glaze)

Roughly dice the pork belly and venison haunch, then pop in the freezer while you get the onions going.

Slice the onions, and cook gently with the butter (and a drop of oil) until golden, taking care not to burn them. They’ll need regular stirring, even on the lowest heat. Once they’re nicely caramelised (around half an hour), add the sherry, turn the heat up a little and cook until the liquid has evaporated. When the onions are done, spread them out on a plate to cool, then chop roughly.

In the Vitamix, process the cooled meat in handfuls on setting No. 3, until it looks like sausage meat.

Mix the spices, thyme, salt and onions well into the meat. Remove a teaspoon or so and fry it in a pan to check the seasoning.

Preheat the oven to 200C/Gas 6.

Divide the meat mixture into four. Unwrap the pastry sheets and divide each lengthways into two pieces. Make a sausage of meat down the centre of each strip of pastry, then brush one edge with the beaten egg, fold over and seal. Cut into two-inch lengths or whatever you fancy.

Use scissors to snip the tops if you like (I just think this looks nice), put on a baking tray and glaze with egg. Bake for 15-20 minutes or until golden and cooked through. Serve with mustard.

Conchiglioni Rigati Stuffed with Spinach and Ricotta

I have a lot of love for unfashionable foods. There’s a Delia Smith rice salad recipe from the ’90’s, for example, that I adore; it includes tinned tuna, diced red peppers and an actual vinaigrette dressing on the rice. I know. Prawn cocktail is another excellent example, as are steak slice, cod in parsley sauce or corned beef and pickle sandwiches.

I feel like gigantic stuffed pasta is going the way of rice salad. These pasta shells are something I remember seeing often on US blogs around 10 years ago, and this recipe does feel very American somehow. The fact that it’s slightly dated just makes me love it more.

Conchiglioni Rigati Stuffed with Spinach and Ricotta

I wrote recently that spinach is one of my favourite vegetables and my mate texted me all like, ‘f*cking SPINACH?!’ and I said yeah.. before I realised that it’s only one of my favourite vegetables when it’s mixed with either white cheese in a pie/borek or with copious amounts of ricotta for pasta. And here we are.

The stuffed shells are sitting in a rich and sweet but actually quite basic bitch tomato sauce that’s really easy to make, and I ramped up the excitement a little bit by adding an anchovy crumb on top. More carbs = more fun.

Conchiglioni Rigati with Spinach and Ricotta

Conchiglioni Rigati Stuffed with Spinach and Ricotta Recipe

200g conchiglioni rigati (you’ll need around 20 shells but cook a few extra in case they break)
600g spinach, washed
250g ricotta (get the best quality you can find)
225g sourdough breadcrumbs
50g tin anchovies in oil
Zest of 1 unwaxed lemon
1 onion, finely chopped
8 cloves garlic, crushed or finely chopped
1 large glass red wine
3 tins chopped tomatoes (again, quality matters here)

Heat a couple of tablespoons of oil in a saucepan and soften the onion gently without colouring for around 10 minutes. Add the wine and let it be absorbed, stirring it to prevent sticking. Add the garlic and let it cook, stirring, for a minute or so.

Pour in the tomatoes, add some salt and pepper then put the lid on and cook for 45 minutes covered. Take the lid off and reduce by 1/4.

Make the anchovy crumb by melting the anchovies in their oil in a frying pan. Add the crumbs and fry, stirring, until crisp but not too golden (they will carry on toasting in the oven).

Cook the pasta shells until they are halfway cooked – they still need to be quite hard as they’re going to carry on cooking in the oven. Drain and run them under cold water to cool them down.

Put the washed spinach into a pan over a low heat with a lid on and let it wilt down (you’ll probably need to do this in two batches). Run it under cold water to cool it down, then squeeze out as much of the liquid as you can, using your hands. Roughly chop the spinach then mix it with the ricotta and lemon zest, plus some salt and pepper.

Preheat the oven to 180C.

When the tomato sauce is ready, add it to a large dish or roasting tray. Stuff the spinach mixture into the pasta shells and place them on top. Top with the crumb. Bake for 20 minutes, or until golden.

Quince and scotch bonnet hot sauce

I was going to start this post by asking long-time readers to recall the different food phases I’ve been through over the years. There was the sandwich phase, the barbecue phase and (link to current topic dead ahead, guys!), the hot sauce phase. Then I realised: I still wang on about sandwiches, I actually make a magazine about barbecue and here I am sharing a hot sauce recipe. I’m like, so not as fickle as I thought I was *flicks hair*.

I’ve wanted to make a fruity hot sauce for ages and as much as I love pineapple or mango with chilli, it’s quince season, so here we are. I am a big fan of the quince. Raw, they’re just rock hard weirdos but cooked they’re perfumed and sweet once you’ve um, added a load of sugar. Raw quince will pucker your mouth like a cat’s bottom.

What I like about this recipe is that it’s simple. You can taste the fruit and you can taste the flavour of those chillies (not just the heat). It also really comes together after a week in the bottle, transforming from something that was ‘yeah, pretty good actually’ into a sauce I’m fully in love with.

I’ve been pushing the boundaries in terms of the amount I can slosh onto my eggs and I can’t wait to try it on tacos. I also made an absolute shit tonne of it so if you know me in real life, you’re probs getting hot sauce for Christmas.

Quince and Scotch Bonnet Hot Sauce Recipe

This filled a lot of jars of different sizes. I reckon it would fill around 6-8 ‘regular’ Hellman’s mayonnaise jars if that’s any help. You’re welcome… *gritted teeth emoji*

5 quinces, peeled, halved and then chopped into chunks (I think I cut each half into four pieces)
15 scotch bonnets, stalks and seeds removed
15 cloves of garlic, peeled and crushed
1 onion, peeled and finely chopped
6 tablespoons cider vinegar
8 tablespoons caster sugar
2 tablespoons salt
1 litre water
Neutral oil (vegetable, groundnut)

Cook the quince in a pan of boiling water for 20 minutes or until soft.

Add a splash of neutral oil to a pan and soften the onion and garlic without colouring. This will take around 5-10 mins – be careful to keep stirring it.

Add the quince, onion and garlic, chillies, vinegar, sugar and salt to a blender. Blend until smooth. Add back to a large saucepan with the litre of water. Allow to simmer gently for around an hour.

Pour into sterilised jars and seal. Force upon friends and family as Christmas presents.

Grilled pork banh mi recipe

If there’s one thing I’ve learnt about bánh mì, it’s that the variations are endless; the bread comes in tiny skinny baguette shapes with just pâté inside, or sometimes in round ‘bap’ shapes. Pickles are not limited to carrot and daikon, and protein not to pork, chicken or fish. I actually saw a version on YouTube stuffed with dumplings. I KNOW. 

Grilled Pork Banh Mi Recipe

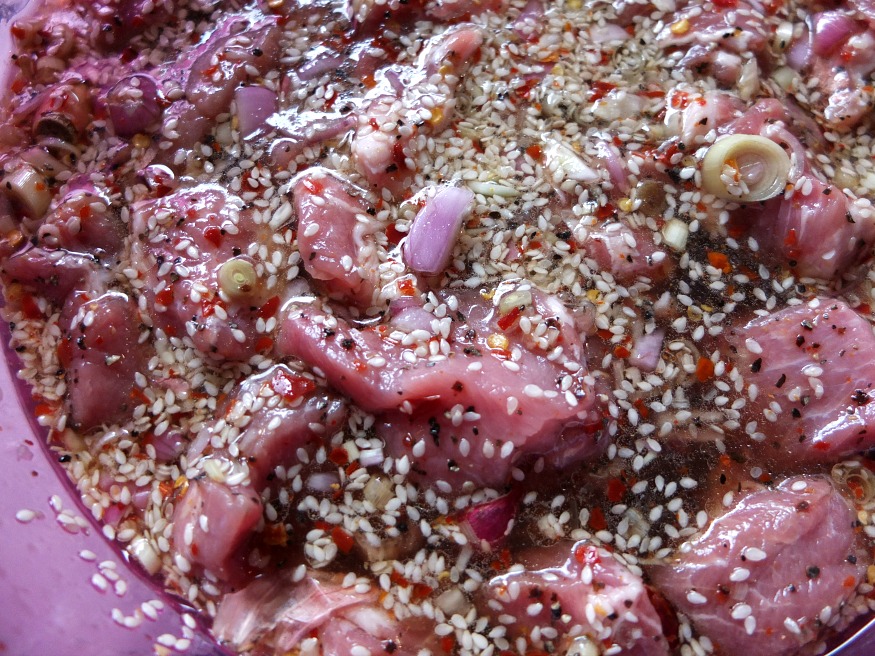
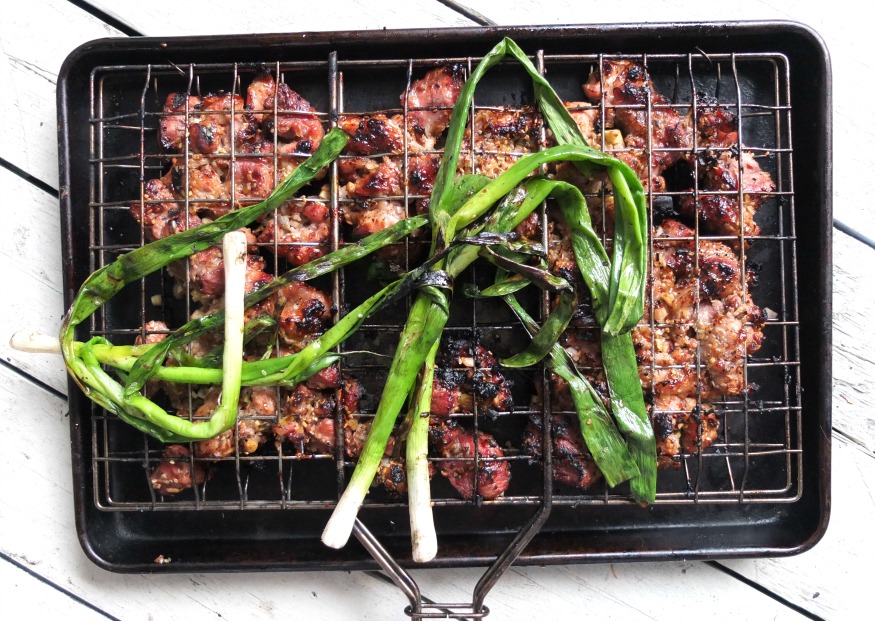
Knowing that the fillings are so readily adapted to the whims and fancy of the maker freed me up a little bit to have some fun with this recipe. It had to be grilled because you know I love my barbecue and if there’s one enduring memory I have from Vietnam it’s the scent of pork grilling on the streets. My recipe uses diced pork shoulder, which grills nicely, staying bouncy and tender but also retaining some chew. Important ingredients in the marinade are fish sauce, lemongrass, sesame seeds and… a can of Ting. Yeah, that’s right, this is a South London special. For those of you further afield, Ting is a soft drink that’s popular in the Caribbean (and South London), flavoured with Jamaican grapefruit.

I’ve done quite a classic pickle with carrot and daikon but one time I ran out of radish and used cauliflower stalks and that was good too. Like I said, this should be a free and easy sandwich. I do, however, recommend adding the scotch bonnets to the pickle – the vinegar mellows them and you’re left with the fruity flavour. Another local touch.

Grilled Pork Banh Mi Recipe

Finally, there’s the bread, which is notoriously tricky to replicate at home. These are simply shop bought baguettes, brushed with soy and oil and grilled on the barbecue, as per a regional variation I found out about on Youtube. It’s from Lạng Sơn, apparently, and it’s great because you get that ultra-crackly crust you want from a banh mi and it’s extra savoury from the soy.

There are a lot of myths surrounding the bánh mì and how it’s made (particularly the bread) but if there’s one thing I’ve found out it’s that this sandwich really isn’t as complicated as people think, nor are its ingredients set in stone.

Grilled pork banh mi recipe

Grilled Pork Bánh Mì Recipe

For the marinade

You can marinate the meat the night before if you like but an hour or so is fine with pieces of meat this size, to be honest. You can either skewer the meat or cook it in a cage (the same thing you’d use to cook fish), which is what I do.

1 kg diced pork shoulder

1 can Ting (I guess the nearest substitute would be Lilt)
3 banana shallots
2 stalks lemongrass, hard outer bit removed
2 tablespoons brown sugar
1 tablespoon good sea salt
1/2 tablespoon black pepper
1 teaspoon MSG (optional)
1 tablespoon honey
3 tablespoons fish sauce (Three Crabs is the one I use – you can buy it in Asian supermarkets but obviously use whatever you can get)
1 tablespoon sesame seeds
1/2 tablespoon vegetable or groundnut oil
1 tablespoon regular chilli flakes

For the pickle

2 carrots, cut into batons
Half a daikon, cut into batons
200ml rice vinegar
200ml water
1 scotch bonnet chilli, de-seeded and finely sliced
1 tablespoon salt
1 tablespoon sugar

For the sandwich

4 baguettes
2 tablespoons soy sauce mixed with 2 tablespoons vegetable or groundnut oil
Mayonnaise
Butter
Coriander and mint
Cucumber, cut into long strips
2 spring onions very finely sliced and mixed with just enough olive oil to loosen

To make the marinade, mix all the ingredients together and combine with the pork. To cook the pork, prep a barbecue for direct grilling. When the flames have died down and the coals are covered in white ash, it’s ready.

Get your meat ready in the cage in a single layer (or on skewers) and cook, flipping frequently until just cooked through and caramelised on the outside – around 10 minutes.

Brush the baguettes with the oil and soy mixture and briefly grill until crisp.

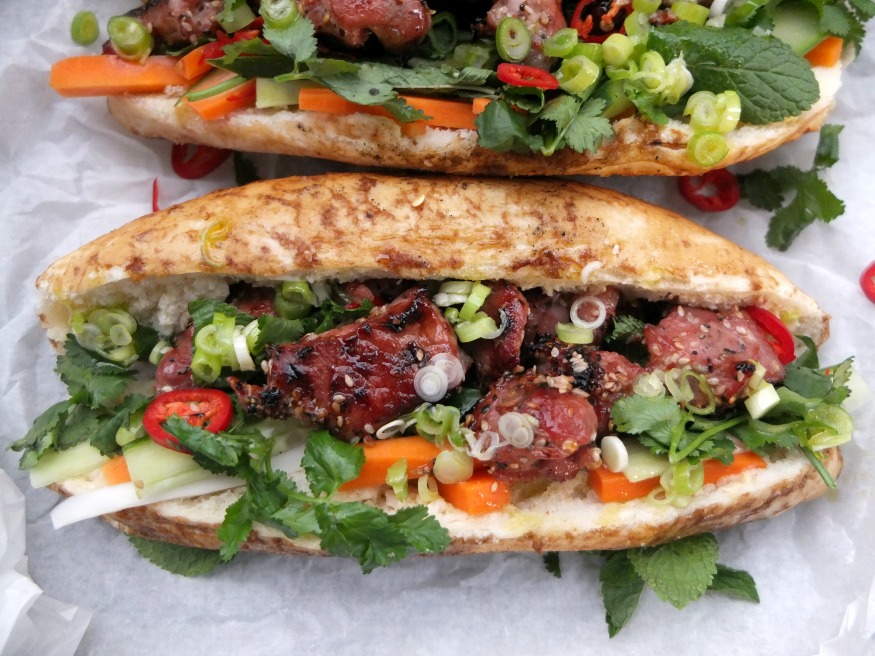
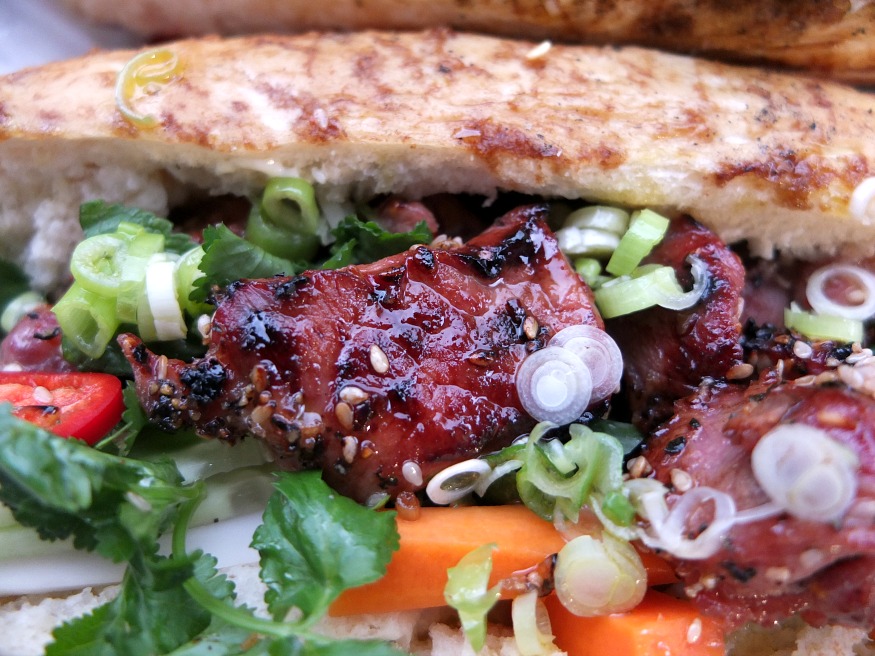
Cut the baguettes open and scoop out some of the fluffy insides (room for more filling), then spread one side with butter and one side with mayo – both GENEROUSLY. Don’t skimp, you will ruin the sandwich.

Layer up with cucumber, pickle, the pork, loads of fresh herbs and the spring onion oil on top. Eat – like you mean it.

Ultimate cookie dough ice cream recipe

Yeah, I know; I should’ve posted this during summer when you were thinking about ice cream. Well here’s the thing: I always think about ice cream. I should fess up right away on this one and say that this isn’t my recipe, but Donald’s. He’s been wanging on about making an ultimate cookie dough ice cream recipe for ages and I’ll admit, I was kinda ‘meh’ about the idea. Then he made it and I had to eat my words which was tough going when my mouth was so rammed full of ice cream.

The real trick here is to infuse the milk with cookies overnight, in the same way as you’d make the cereal milk ice cream everyone went mad for a few years back. The result is that the whole thing tastes like cookies rather than just the chunks. It’s SO RICH. As rich as JK Rowling, or Snoop. He’s prob very rich, and I’m sure he likes ice cream, mainly because of this picture…

Snoop Dogg ice cream

Anyway if you’re looking for an ultimate cookie dough ice cream recipe, this is it. I’m sure Snoop would say it’s the shiznit.

Ultimate Cookie Dough Ice Cream Recipe

For the brown butter cookies

255g unsalted butter
250g all-purpose flour
3g bicarbonate of soda
2 teaspoons good sea salt
2 teaspoons vanilla extract
2 eggs
140 g brown sugar
140g caster sugar
1 chocolate bar, smashed (I have nailed him down to 60% cocoa solids dark choc, prob standard Green & Blacks size)

Begin by browning the butter. Melt it in a pan with a light coloured base (so you can see the colour of the butter), giving it a swirl every now and then. It will turn a darker golden colour, and eventually a toasty brown. When it turns toasty brown and smells nutty, it is done. Remove from the heat and fridge it for an hour.

Preheat the oven to 180C.

Mix the flour and bicarbonate of soda in a bowl. Add the eggs, caster sugar and vanilla to an electric mixer and mix. Add the brown sugar and butter, mix again. Add the flour and bicarbonate of soda mixture and mix again for no longer than 10 seconds.

Add the broken up chocolate, mix for another 10 seconds.

Blob cookies onto a baking sheet and bake for 15-20 mins.

For the ice cream

1 litre whole milk
3 egg yolks
250ml double cream

When the cookies are cool, break them up (reserving a few for chunks) and pour over 1 L of whole milk, cover and leave in the fridge overnight.

Strain off the milk, saving 500ml.

Put the milk into a pan and heat until just boiling. Whisk the egg yolks and slowly pour over the milk, whisking constantly. Add to a clean pan and stir until thickened. Set aside in a bowl with clingfilm touching the top until completely cool. Stir in the double cream.

Churn in an ice cream maker, adding the leftover cookies in chunks towards the end of churning.

Crab Lasagna recipe

Oh readers, how I have failed you. It has been a full five months since I promised I’d fill this site with more crab recipes. Crab, as I’ve mentioned too many times, is one of my favourite foods and although I will always love eating them simply cooked and served with mayonnaise best of all, it would be criminal not to experiment. I would be letting the side down. 

In the archives, then, you will find Louisiana crab cakes, crab fried ricehot crab dip and now, this.  Get your baggiest pants ready my friends because this arrangement of carbs and crabs (*notes important order of letters*) is going to beat you into submission until you are a quivering wreck of happiness, belly up like a flailing beetle.

Crab Lasagna

If this lasagna were a particularly camp and bitchy young fashion magazine employee it would walk, steps crisscrossing one another like knives in a vicious sashay, telling everyone it would slay you. And it will. This is possibly one of the richest dishes I’ve ever made, despite attempts to curtail said richness with the addition of lemon and herbs. It’s the kind of dish you eat a small portion of then ask for another but regret it, like the kid who makes himself sick on chocolate cake then voms it up on someone’s white sofa.

So yeah, it’s really great. Make it. You’ll need four full crabs so maybe this is one best left for when you want to really impress someone or put them off crab for life. Could go either way.

Crab Lasagna Recipe

This fills a 9 x 9 x 2 inch baking dish.

The meat from 4 cooked and prepared crabs (white and brown), or just buy 4 whole dressed crabs
500 g ricotta
1 handful tarragon, finely chopped
1 handful chives, finely chopped
50g butter
50g all-purpose white flour
500ml whole milk
Juice of 1 lemon
White pepper
Pecorino
Lasagna sheets

Preheat the oven to 200C.

Separate the white and brown crab meat. Mix the white meat with the chopped herbs, ricotta and lemon juice. Season with salt and white pepper.

Melt the butter in a pan, then add the flour and stir vigorously to form a paste. Add a little of the milk at a time until all the milk is incorporated, stirring constantly until you have a smooth, slightly thickened sauce. Season and mix in the brown crab meat.

Dip the lasagna sheets in very hot water (easiest in a baking dish). Layer up in alternating layers so white mixture, pasta, brown mixture, pasta and so on. Finish with an aggressive grating of Pecorino.

I struggle to remember how long we baked this for – 20 minutes or so I should think. Just bake it until it’s golden on top, basically.

A recipe Pisco Sour Sorbet, made in a Vitamix blender

This is the last of four recipes I created in partnership with Vitamix and Great British Chefs

I’ve been waiting for the right time to share this but it seems like summer is running away from us so I’m going to do it as the rain batters the windows and thunder sends the cats running under furniture, wide-eyed and bristling.

The noise of the Vitamix will also do that because damn, that thing is powerful. Yes, this is the last of my four recipes designed to show off its versatility; previously we busted through coffee beans and chipotle chillies; pecan nuts and pasta dough. Here I’ve shown how it’s possible to make a sorbet or — to be honest — more of a boozy slush.

I did try adding eggs whites to make it smoother but that’s not possible with this method so yeah, it’s a frozen cocktail. Nowt wrong with that I hear you say, and you’re quite right. It’s pretty sour, this ‘sorbet’ because I was restricted on the amount of sugar I could use in the recipe. In all honesty, I’d add another 25g to make the most of that sweet-sour balance but if you like things sour by all means leave it.

Add a dash of Angostura Bitters at the end and give yourself a pat on the back. You’ve just made a bowl of lovely alcoholic ice in a matter of minutes. Mr Frosty eat your cold plastic heart out.

Pisco Sour Sorbet Recipe (made in a Vitamix)

4 limes
100g caster sugar (I recommend adding the extra 25g, so 125g in total)
50ml Pisco
600g ice cubes
Angostura bitters, to serve

This recipe uses a Vitamix Pro750, fitted with the 2.0l low profile container.

To begin, grate the zest from one of the limes and place the zest in the Vitamix container. Use a sharp knife to skin the limes, removing as much pith as possible.

Add the flesh of the limes to the Vitamix container, followed by the sugar, Pisco and ice cubes (in that order).

Start the Vitamix on Variable 1 then slowly increase to Variable 8, using the tamper to push the ice cubes down into the motor. Once the tone of the motor changes (noticeably) stop the Vitamix.

Transfer to a container with a lid and place in the freezer for 1 hour for a firmer finish.

Scoop into glasses and add dashes of bitters to serve.