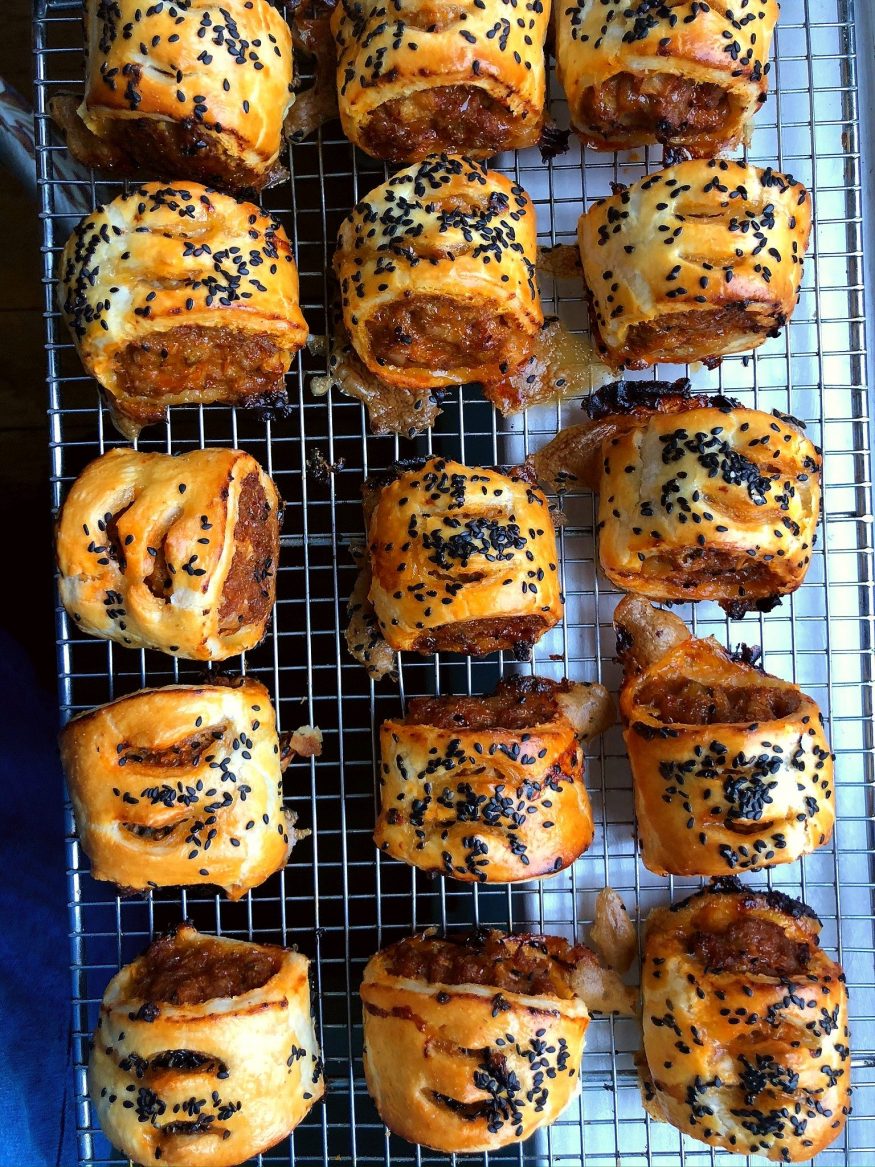
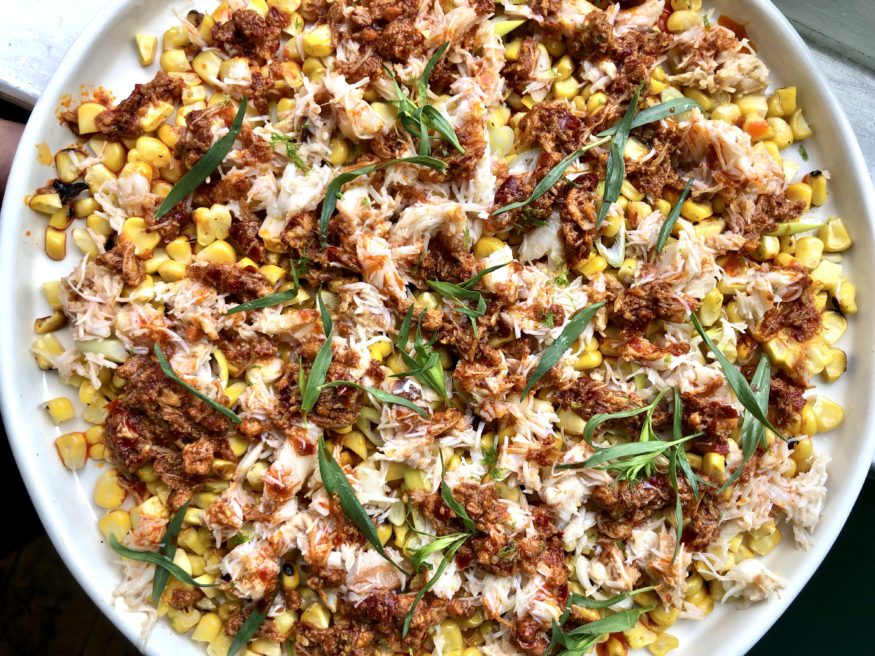
It doesn’t take long before I start craving bright, East Asian flavours around Christmas time; crackling chilli mingled with lime’s fragrant acidity and the umami depth of soy. There’s only so much cheese, dried fruit and pastry a person can take and in and between it all I want my palate revived and excited.

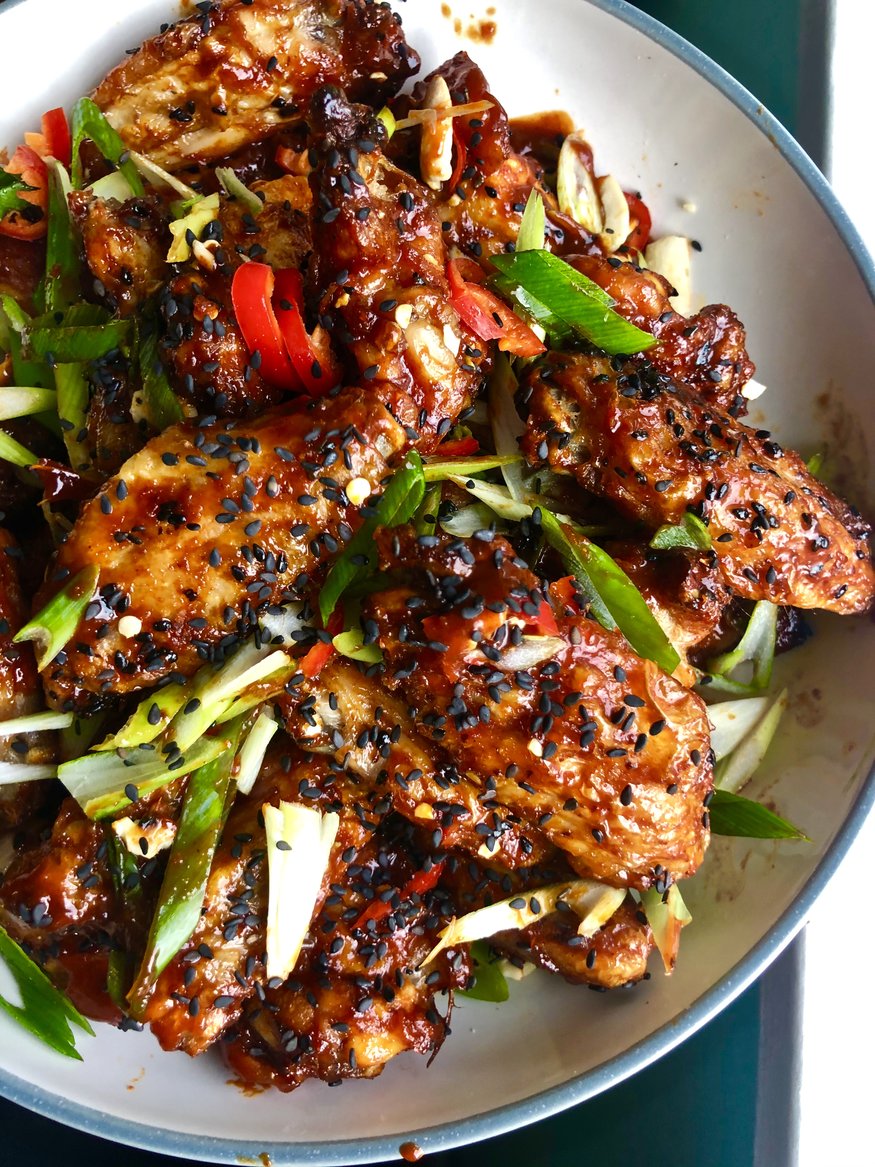
These wings are perfect party food and the best thing is you can oven-bake them. Deep frying at home can be a hassle. It’s fine once or twice a year but there’s no getting away from the fact it makes your house reek. Instead, try sprinkling the wings with bicarbonate of soda and salt and leaving overnight in the fridge (or even a few hours) where they will dry out nicely, giving you ultra-crisp skin.

The sauce is straight-up addictive. I personally like a fair bit of acidity on my Korean wings as it balances the sweetness of the gochujang and sugar. The garnish is essential too; this is not a timid recipe. Slivers of spring onion and chilli, crunchy toasted peanuts and plenty of sesame seeds complete the dish. It’s an OTT mess, and all the better for it.

Crispy Baked Korean Chicken Wings Recipe

Makes 24 pieces

12 chicken wings, tips removed (put these in the freezer for stock!) and cut into drums and flats (jointed, basically – easy for your butcher but also easy at home with a sharp knife).
1/2 teaspoon bicarbonate of soda
1 teaspoon onion powder (not essential but fun)
1/2 teaspoon garlic powder (as above)
2 teaspoons sea salt

For the sauce

3 tablespoons gochujang
3 tablespoons soy sauce
1 tablespoon dark brown sugar
1 tablespoon rice vinegar
2 teaspoons sesame oil
5 fat cloves smoked garlic, crushed or finely grated (obviously you could use regular, unsmoked garlic)
Juice of 2-3 limes

To garnish

Finely sliced spring onions
Finely sliced red chilli
Crushed, toasted peanuts
Black or white sesame seeds

Combine the bicarbonate of soda, salt and onion and garlic powders (if using) in a large bowl. Add the chicken wings and mix very well, to ensure all the wings are coated. Arrange the wings on a rack over a baking tray and refrigerate, uncovered, overnight (or for at least three hours). It’s fine to put the wings right next to each other but don’t stack them up or squidge them together too tightly.

When you’re ready to cook the wings, preheat the oven to 220C.

The best way to cook the wings is on a rack over a baking tray, although you may need to use two trays, so they’ve got space to crisp up nicely. If you don’t have racks, just do them on a baking tray brushed with a tiny bit of oil.

Cook the wings for 40 minutes, turning them halfway through.

To make the sauce, combine all the ingredients apart from the lime juice in a small saucepan and heat gently, stirring for a few minutes until the sugar is dissolved and the sauce is bubbling. Turn off the heat and squeeze in the juice of 1 lime to start with, then taste and add more if necessary.

Coat the wings with as much sauce as you like and fling all those garnishes over the top. Serve with extra wedges of lime and approximately 10000 napkins.

This is a recipe I’ve developed as part of a paid partnership with Parmigiano Reggiano.

It’s only in recent years I’ve begun to throw myself into seasonal cookery as part of my plan to reclaim Christmas as something more my own, rather than focusing on all the aspects I don’t enjoy (see: the whole religious festival thing, the stress, tinsel). Obviously, the social side is fun, and it’s nice to have a break – even if I didn’t bloody choose to have one thankyouverymuch – but for me, it’s about trying to enjoy myself in non-traditional ways and not get annoyed with gaudy lights and forced participation.

I’ve chosen to buy a non-traditional tree, for example. I was always whining that I didn’t like the green pointy variety, so why did I ever consider buying one? Mine’s a willowy silver number covered with food-themed baubles and a crab on top instead of an angel. So there.

Please don’t for a moment think I am judgemental about the ways in which others enjoy Christmas because nothing could be further from the truth. I think there is a lot of pressure at this time of year to do things a certain way, and what I’m trying to say is that it’s helped me a lot to find my own path.

Food can become oddly competitive too, which is a shame because it’s arguably the best thing about Christmas {insert caveat about family time here}. Over the years I’ve developed some recipes which have become firm favourites (these sausage rolls with whisky caramelised onions for example) and some which are popular newcomers (looking at you, Brussels sprout kimchi).

I think one thing we can all agree on is that it’s necessary to ensure a steady stream of snackage, and these croquettes are a perfect little bite. They’re just mashed potato, bacon, Brussels and plenty of Parmigiano Reggiano made into balls and deep-fried, and you could easily swap in some leftover ham or other greens if you felt like it.

The Parmigiano Reggiano brings moreish savouriness and depth of flavour, plus it’s very handy to have around at this time of year – try grating it onto puff pastry and twisting into straws before baking for the easiest last-minute party snack for example, or use as a filling for palmiers with anchovy. It would be great in some miniature tartlets with crab as a smart starter, or try adding to stuffing for a savoury note that will keep people guessing.

The most important thing is not to stress, and I think one of the nicest ways of hosting at Christmas is to invite people round, tell them to bring their own bottles, make a big pile of literally just one snack and have them dig in. These are cute and filling enough to keep everyone satisfied and you don’t have to faff about with multiple tasks. They work nicely with a quick n’ dirty dip made with mayonnaise, a touch of yoghurt, chives, garlic and more Parmigiano Reggiano. Dive in, kick back and try not to worry about what on earth you’re going to buy that cranky old uncle you don’t particularly care for.

Parmigiano Reggiano, Bacon and Brussels Sprout Croquettes Recipe

Makes 25-30 croquettes, depending on size

700g potatoes for mashing such as Maris Piper
2 egg yolks, plus 2 whole eggs for coating
100g grated Parmigiano Reggiano
120g Brussels sprouts, stalks removed and finely shredded
240g bacon (8 thin rashers), large pieces of fat removed and finely diced
Flour, for coating
Breadcrumbs, for coating
Oil, for frying

Cook the potatoes in salted water, then mash them until very smooth.

Add the bacon to a hot, dry frying pan and cook until just beginning to crisp, then add the sprouts and stir well. Cook, stirring, just until the sprouts have softened.

Mix mashed potatoes, Parmigiano Reggiano, sprouts, bacon and some salt and pepper. Taste for seasoning, then add the yolks and mix well.

Roll into walnut-sized balls and chill for at least 2 hours.

When you’re ready to cook the croquettes, cover one plate with flour, another with beaten egg and another with breadcrumbs. Using one hand for dry ingredients and one for wet, coat each ball in flour, then egg, then crumb.

Heat oil for deep frying to 180C. Turn an oven on low (50C or thereabouts).

Cook the croquettes in batches of 4 or 5, turning often, until golden brown all over (2-3 minutes should do it).

Drain on kitchen paper and transfer to the oven to keep warm while you cook the rest.

For the dip, I just mixed few tablespoons of mayo with a couple of yoghurt, a squeeze of lemon, a clove of garlic and plenty of grated cheese. Garnish with a few chives and you’re all set.

Guys, these are the best sausage rolls I’ve ever made and rest assured I have made many. Recipes on this site range from the simplest (just squeezing sausages into pastry, basically), to a version with venison, pork and sherry, or apricots and whisky-caramelised onions (still one of the most popular recipes on this website!)

And now, here I am fermenting sprouts into seasonal kimchi and flavouring my sausagemeat with gochujang. If you can stop yourself from eating three in quick succession then you are a stronger woman than I.

So I was compelled to share the recipe with you as soon as possible. You’ll need to make the Brussels sprout kimchi first but it’s so easy anyone can do it and then you’ll be able to eat that in cheese toasties and on eggs and so many other brilliant things I haven’t thought of yet for the rest of the festive season. Of course, you could use regular kimchi instead but the end result will be different.

Yes, mince pies and roast potatoes and trifle are good but what your Christmas table really needs is a healthy dose of fermented sprouts, and I won’t hear otherwise.

Gochujang and Brussels Sprout Kimchi Sausage Rolls Recipe

Makes approx 18 sausage rolls

1 kg sausagemeat (better quality meat means a better sausage roll – seems obvious but worth saying nonetheless)
1 packet puff pastry (I used Jus Rol because life’s too short etc.)
3 tablespoons gochujang
150g Brussels sprout kimchi
2 eggs, lightly beaten
Black sesame seeds to decorate

Preheat the oven to 200C.

Mix the sausagemeat, gochujang and kimchi in a large bowl. Pull a small piece out and form it into a patty then fry it in a dry pan until cooked so you can check you’re happy with the flavour.

Roll out the pastry on a lightly floured surface – you want a large rectangle and a thickness of 2-3 mm, so quite thin.

Divide the meat mixture in two, then cut the pastry in two lengthways. Make two long sausages on top of each half of the pastry and brush the edges with beaten egg.

Fold over the pastry and seal, turning over so the seal is on the bottom. Cut each into 2-inch lengths and arrange on baking trays. I like to make two snips in the top of each sausage roll with scissors.

Brush very well with beaten egg and sprinkle with black sesame seeds.

Bake for 20-25 minutes or until deep golden brown. Cool on a wire rack, if you can wait that long.


Brussels sprout kimchi! Has she gone mad? Absolutely not – they’re just mini cabbages, after all. This makes one of my favourite ever kimchis and of course, it’s fiercely seasonal. I cannot emphasise enough just how well this works in a toastie with Stilton, and also the day after in a toastie with Cheddar and ham. Imagine putting it in your Christmas leftovers sandwiches! It’s perfect in the morning with eggs as well.

Basically what I’m saying is that no one should be without this kimchi during the festive season and if you make it now you’ll have a massive jar to see you right through until January.

Give the gift of sprout-chi to your gut microbiome this Christmas!

Brussels Sprout Kimchi Recipe

This isn’t a particularly spicy kimchi so adjust to your taste. I like to eat my toasties with sriracha so we kept this quite mild. It’s tangy and fizzing with all your usual brilliant kimchi flavours and the sprouts have a lovely lemony edge to them.

1kg brussels sprouts, sliced (I did this in a food processor)
1 daikon, cut into strips or sliced (I did mine in julienne)
1 Chinese cabbage, sliced
2 heads garlic, cloves peeled
1/2 cup Korean chilli flakes (you can literally just measure this in a mug)
2 inches ginger, peeled
3 tablespoons white miso

Place the shredded sprouts, daikon and Chinese cabbage in a bowl with a good handful of fine salt and mix well – don’t worry about the quantity because you’ll rinse a lot of it off afterwards. Squeeze it with your hands until some juice forms, then top it up with enough water to cover it. Weight it down with something heavy-ish like a sturdy pan. Cover and leave overnight.

Sterilise a 2 litre Kilner jar.

Blend the garlic, ginger, miso and chilli in a blender.

Rinse the veg then mix with the garlic paste and pack into the jar, pressing it down firmly with your fist. I cover my ferments with a zip lock bag filled with water because it moulds to the shape of the ingredients and jar nicely, making sure it’s all submerged – a small dish or ramekin would be a non-plastic alternative.

Leave to ferment at least 4 days before tasting but make sure you open the jar to burp it once a day.

I made mine around 10 days ago and I am keeping it at room temp but burping every day. It will keep actively fermenting at this temperature and the flavour will develop, so it’s up to you when you’d like to stop that process. When you do, just transfer it to the fridge where you won’t need to keep burping it.

Long-time readers (hello, and thank you) will remember my phase of Project Sandwiches – those which took time and effort but meant I could happily spend the day baking bread and pickling vegetables then sit down with a brilliant sandwich at the end of it.

I made huge meatballs subs; chicken sandwiches which involved roasting a whole chicken with 40 cloves of garlic then making mayonnaise with its fat; salt beef (and corned beef); banh mi; burgers; sabich and, of course, po’boys.

This fried mussel po’boy is a variation on the classic shrimp filling. Mussels are cheap and sustainably farmed so I’m making an effort to eat more. Is it a faff deep-frying mussels? Absolutely yes. We had to steam them open, pluck them from their shells, coat them in cornmeal then fry them but they did make an excellent filling once tossed with Old Bay seasoning. I suffer for my art.

We piled them into sub rolls with homemade garlic and gherkin mayo which I finished with a bit of smoked olive oil, a spicy pickled salad of finely diced sweet white onion, bell pepper and celery, lots of shredded lettuce, some celery leaves and Peckham Smoker hot sauce. It was memorable: mussels hot from the fryer, rich smoky mayo, piquant salad and pops of searing chilli heat.

If you ever make this I must warn you that your kitchen will smell like fried mussels for at least two days. We opened all the windows and sat shivering for an hour in front of Masterchef, The Professionals which took the edge off a little bit but it really was quite the funk. Have I put you off making this sandwich yet? If I have then I’m sorry – project sandwiches are best suited to the truly dedicated.

Fried Mussel Po’Boy Recipe

(makes 4)

1 kg live mussels
4 white sub rolls (or baguette)
Iceberg lettuce
2 eggs lightly beaten
Plain flour
Coarse polenta
Old Bay seasoning

For the pickled salad

1.5 sweet white onions, finely diced (these are smaller and sweeter than regular brown-skinned onions – just use a small regular one if you can’t find any/can’t be bothered)
1 yellow pepper, finely diced
2 green chillies or jalapenos, finely sliced
2 ribs celery, finely sliced
120ml white wine vinegar
1 heaped teaspoon caster sugar
2 large pinches salt

For the mayonnaise

2 egg yolks
100ml flavourless oil
30ml smoked olive oil
1/2 teaspoon Dijon mustard
2 cloves garlic, crushed
2 gherkins, finely chopped
2 tablespoons lemon juice

Begin by making the salad. Mix everything together well. Set aside and give it a stir now and then while you make the other elements.

Make the mayonnaise. I find this easiest in an electric mixer. Add the egg yolks then slowly begin adding the flavourless oil drip by drip, then in a thin stream. When it’s all incorporated add the lemon juice, mustard and garlic and whisk in. Slowly add the smoked olive oil. Tip into a bowl then season with salt and add the gherkins.

Clean the mussels by pulling off any beards. Give any that are open a sharp tap on the work surface – if they don’t close they are dead – chuck those ones away.

Heat a few splashes of water in a large pan. Once hot add the mussels and put the lid on until they open. Remove them from their shells, chucking any which haven’t opened (dead).

Get three plates or shallow bowls ready – one covered with flour seasoned with salt and pepper, one with the beaten eggs and one covered in polenta. Coat the mussels first in flour, then in egg, then in polenta. It’s easier if you use one hand for dry stuff and one hand for the egg.

Heat a large pan or fryer with vegetable oil to 180C. Fry the mussels in batches until golden brown (a few minutes). Drain on kitchen paper and put in a very low oven or under a low grill to keep warm while you fry the rest.

To make the sandwiches split the sub rolls, add mayonnaise, salad, lettuce and loads of mussels. Top with extra Old Bay seasoning and hot sauce. Congratulations, you have made a Project Sandwich.


Chicken fat is wonderful stuff – I’m sure you know this already. I bought some beautiful, plump thighs from Flock and Herd yesterday with the express intention of roasting them on top of the slightly stale sourdough sitting on the kitchen counter. You may have already tried roasting a whole chicken on top of bread; the fat soaks through and creates an incredible, schmaltzy bedrock which you will find yourself uncontrollably drawn towards. I’d take it over a roast potato any day.

The zippy salsa verde with all its herbs, mustard and vinegar offsets the richness and brings its own pickle-y punch to the party. Do I like a Sunday roast? Kind of. I’d much rather have this, to be honest – more fun and around 10 x simpler.

Chicken Thighs with Chicken Fat Sourdough and Salsa Verde Recipe

6 good quality, free-range chicken thighs
200g stale-ish sourdough (mine was 2 days old) torn into large chunks
2 heads of garlic
1 onion, peeled and roughly sliced

For the salsa verde

1 large handful parsley leaves, finely chopped
1 slightly smaller handful each mint and basil leaves, finely chopped
Handful capers, finely chopped
Handful cornichons, finely chopped
3 cloves garlic, finely chopped
8 anchovy fillets, finely chopped
2 teaspoons Dijon mustard
2 tablespoons red wine vinegar
6-8 tablespoons extra virgin olive oil

Preheat the oven to 200C (fan).

Heat a large, heavy-based frying pan such as a cast-iron skillet over medium heat. Add the thighs skin side down and cook until the skin is browned – around 6-8 minutes depending on size. Set aside, leaving the fat in the pan.

Add the onions, garlic and sourdough and season lightly. Place the chicken thighs on top, skin side up and season again. Put in the oven and cook for 30 minutes, or until cooked through.

While the chicken is cooking, make the salsa verde by mixing all the ingredients together. Add a little salt if you think it needs it.

Serve the chicken thighs with some of the sourdough, garlic and onions and the salsa verde.

Yup. I’m here to tell you how to bake some potatoes. They’re a little bit fancy though – perfect for someone who’s celebrating the end of a cooking slump but also needs straight-up comfort food because she’s bored of watching everyone else have a good time on Instagram.

Social media has really done my head in recently, which is a weird thing to say because I know that’s where you’ve probably just come from. I posted a link to Instagram and you followed it? Thank you for doing that. But social media (be it Twitter, Instagram or Facebook) is a place that buoys you up when you’re up and kicks you hard when you’re down and that’s something I only tangentially understood until recently.

As I said, I’ve been in something of a rut, culinarily speaking. Coming out of it has been a little like watching a sunrise: at first, there’s a barely detectable change, incrementally increasing until a familiar warmth spreads through everything. Being creative on demand is tough until you get good at it and then suddenly there can be a period of weeks or months where you can’t grasp hold of the ideas anymore.

These potatoes may not be the most revolutionary idea I’ve ever come up with but they hit the spot. The confit garlic and pickled mushrooms are both very easy – it just takes an hour or so to make them both. This is perfect if you’re emerging from a cooking coma and want to potter in the kitchen of an afternoon but if you can’t be bothered then why not just roast the potatoes with some garlic? And perhaps garnish them with some shop-bought cornichons? At the end of the day, it’s just a plate of cheesy potatoes. Don’t stress.

I’ve been contacted by a few food writers over the past few weeks who’ve let me know they often experience a similar phenomenon: a malaise that starts to become a vicious circle of not cooking + feeling rubbish. I’m beginning to think it’s part and parcel of being creative, something akin to sleeping where ideas and experience assimilate into something more foundational. I hope so at least.

Today shall be spent cooking an incredible Fosse Meadows chicken we found at the market in Herne Hill, along with a beer and sourdough bolstered celeriac gratin – both of them on the barbecue. I’m back in business and I’m loving it. However, my message to any cooks out there who feel like they can only manage a Deliveroo while lying on the sofa is this: please don’t feel guilty. The love will return because it’s too deep-seated to go away for very long.

Fancy Baked Potatoes Recipe (with Gorgonzola, pickled chanterelles and confit garlic)

Serves 4

1 kg new potatoes
Gorgonzola (a few chunks per serving)
Tarragon, leaves picked
Chives, finely chopped
Olive oil
Confit garlic (see method below or alternatively, chuck some in the oven with the potatoes)
Pickled chanterelles (see method below or serve with shop-bought pickles such as cornichons)

Preheat the oven to 190C/170fan/Gas 5

Put the potatoes in a roasting dish, add a couple of tablespoons of olive oil and some coarse salt (be generous) and roast for an hour, or until tender on the inside and crisp and wrinkled on the outside.

To assemble the dish, preheat a grill.

Place some potatoes onto plates and crush lightly, then top with chunks of Gorgonzola and pop under the grill under the cheese has melted. Garnish with pickled chanterelles, confit garlic cloves, chopped chives and tarragon leaves. Extra garlic oil and salt might be a good idea.

For the confit garlic

4 bulbs garlic
Olive oil (enough to cover the garlic in the pan)

Peel all the garlic cloves and add them to a saucepan. Cover with olive oil so they are totally submerged.

Bring to a very light simmer then reduce to the lowest heat possible and cook for 40 minutes. The idea is to very gently poach the garlic, so the oil should not be bubbling. I find a heat diffuser (of the type you use for a tagine) is very handy here but it’s not necessary.

Once cooked, transfer to a clean jar and cover with the oil. IMPORTANT: It’s very important that you store confit garlic and garlic oil properly because it can breed botulism. As soon as the garlic and oil are cool, store in the fridge. Do not keep either at room temperature.

For the pickled chanterelles

150g chanterelles
150ml white wine vinegar
30ml water
3 teaspoons honey
1 teaspoon salt
Few black peppercorns
Pinch chilli flakes

In a jug, combine the vinegar, water, honey, half a teaspoon of the salt, peppercorns and chilli flakes. Stir to combine.

Put a frying pan or saucepan over medium heat and add the chanterelles (no need to add butter or oil). Cook, stirring until the mushrooms begin to release their water.

Add half a teaspoon of the salt and continue to cook, stirring, for a minute or so. Add the vinegar mixture and bring to a boil then reduce and simmer for 5 minutes then transfer to a clean jar.

Burn out is something I thought happened to other people. I’ve always worked hard at juggling various commitments – a tough career as a freelancer, editing a magazine, desperately trying to finish a PhD, my personal life – but it’s always been OK. Friends who’ve been on the receiving end of cancellations or people I’ve lived with might feel differently but I always thought I was holding things together quite well.

Until three weeks ago. I felt it creeping in before I was due to go away on a work trip but ignored the signs and ploughed on. I’m tough, I work hard, this is what I do. I got sick before a 24-hour journey involving three flights and had to take to bed with tonsillitis for two weeks. I had conjunctivitis in both eyes – a strong look – and ended up feeling pathetic. More than the physical sickness though I was just at the end of my tether – at the end of being committed to doing things, done with getting out of bed and definitely 100% through with cooking.

Trying to find energy to cook when you’re feeling down is bad enough but my problem is that I actually can’t. I genuinely seem to lose the ability and end up making horrible food. So many people say they cook ‘to relax’ or ‘forget about problems’ but that’s not my motivation at all. I cook because I love creating beautiful food and because I’m greedy. I cook because I have an idea of what I want to eat and nothing else will do. I cook because I like eating my own food better than almost anyone else’s.

When I’m upset, it’s like my anger channels into my hands and my mood darkens every dish. Once, during a particularly gloomy period, I didn’t cook for a whole six months.

The good news is I think this curse might be coming to an end. I made soothing chicken soup when I was beginning to feel better, trekking to the butcher to get chicken wings and carcasses (then lying down for an hour before I could begin). So when yesterday became the first time serious cooking was on the cards it felt fitting to make something fairly time-consuming, like pasta.

I had my first taste of sweetcorn ravioli at London’s super-hot-right-now 10 Heddon Street. Why have I never come across this before? I fell in love with the dish and made a note to rip it off as soon as possible. My take is packed with fresh corn cooked down with butter, shallot, an absolute metric f*ck tonne of smoked garlic and a swoosh of fluffy ricotta. I added salty crisp Parma ham and more melted butter on top, along with wilted basil and a heavy Parmesan snowfall. I made it and I didn’t immediately share it on Instagram as usual. Instead, I went to sleep on the sofa for an hour and was only woken up by the church bells ringing across the road – nowhere near as romantic as it sounds.

I still found myself itching to get here and start writing and had to check myself because old habits die hard. I’ve been writing and posting recipes on this site for nearly 12 years, which is an extraordinary length of time to do something you only get paid for occasionally. I guess it just has to be more on my terms now, as I learn how to balance this very weird life I’ve chosen to lead.

I think I might finally have the motivation again.

Sweetcorn Ravioli with Crispy Parma Ham, Butter and Basil Recipe

(makes around 30-50 ravioli, depending on the size of your cutter. Mine was quite small so made 50. You will feed 4 people with a big side salad)

For the pasta dough

200g 00 flour
2 eggs and 1 egg yolk
Pinch of salt
Fine polenta, for dusting

For the filling

3 cobs sweetcorn, kernels removed
Half a bulb (around 8 cloves) smoked garlic, crushed
3 cloves regular garlic, crushed
50g butter
3 heaped tablespoons ricotta
1 shallot, very finely chopped

For the topping

1 packet Parma ham or similar (around 6 slices)
Parmesan
Basil
Butter
Black pepper
Squeeze of lemon juice

Make the pasta dough first by making a volcano with your flour and sprinkling the salt on top. Place the eggs and yolk into the top of the volcano and bring it all together until you have a mass.

Knead for around 10 minutes for a good arm workout. It needs to be smooth and springy. Divide into 2 balls, wrap in cling film or a damp cloth and set aside at room temp for 1 hour while you make the filling.

Melt the butter and sweat the shallot and corn kernels in it for 10 minutes or so – do this on a very low heat so the corn doesn’t brown too much. Add the garlic and continue cooking for around 5 mins more.

Mix with the ricotta and season with salt. Set aside in the fridge while you roll out the pasta dough.

Use a rolling pin to roll each pasta ball into a strip 1cm thick. This makes it easier to pass through the pasta machine. Of course, you can roll it by hand but be prepared for a proper workout. Pass it through, working through the different settings until it’s as thin as possible – this is setting number 6 on our machine.

Scatter a work surface with polenta. Lay one strip of pasta down on it and use a ravioli stamp or cooker cutter to gently mark your ravioli so you know where to put the filling. You can also do this without a cutter, just by cutting around the filling afterwards.

Place half teaspoons (or larger, depending on cutter size) onto the pasta, then wet the edges using your finger. Lay another sheet on top, gently pressing around each dot of filling to remove air. Stamp out the ravioli and set aside on a tray scattered with polenta.

Heat the oven to 180C and crisp up your Parma ham by laying it on a baking sheet and baking for around 10 minutes, turning halfway through. Melt some butter and wilt a handful of basil leaves in it.

Cook the ravioli in boiling salted water for a few minutes. Garnish with ham, basil butter, a good squeeze of lemon juice, Parmesan and pepper.

This post is part of a paid partnership with PGI Welsh Lamb

‘Yeah, the castle came with the farm’ Will Pritchard casually explains as we stand under the shadow of what’s left of Weobley, a 14th Century fortified manor house on the Gower Peninsula. Beyond it lies the salt marsh, an intertidal zone between the sea and the land, on which sheep roam freely, bred for their tender meat. The marsh is stunning. Behind us lies a streamlined with whispering rushes, beyond are mudflats, broken by pockets of salt-tolerant herbs and grasses, on which the sheep graze.

We arrive as the tide is coming in, so the sheep must be moved to higher ground, and they’ve gathered into small groups to head upland, sheepdogs wheeling behind them. Will and his family have been farming this 4000-acre piece of land for 15 years and have around 1200 sheep. His brother, zooming around on a quad bike, must stick to the well-worn tracks as some bombs from World War II still lurk silently unexploded beneath the surface. Don’t worry, sheep are a lot lighter than quad bikes. The breeds are nimble, able to skip their way around the winding streams and inlets.

Saltmarsh lamb is prized as the sheep are said to benefit from grazing on herbs that grow in the unique ecosystem. It’s popular in France, apparently, but the British have only just begun to appreciate it in recent years. The meat is lighter in colour, leaner and more tender than regular lamb.

The season runs from August right until Christmas and that goes for PGI Welsh Lamb in general not just that from the salt marsh. Wales has a unique climate – lots of rain means lots of grass – and high land is perfect for animals which need space to graze. The production is also governed by strict rules thanks to the lamb’s PGI status (Protected Geographical Indication) which cover traceability, transport, slaughter. The majority of farms are family-owned small holdings with a historical legacy of livestock farming.

You all know I’m a huge fan of lamb, not least because I think the meat is perfect for the barbecue with chops, shoulder, breast and neck fillet all working well. I wanted to make some kebabs with minced lamb (Me? Spiced lamb kebabs?) but this time wrap them in caul fat. What is caul fat? Well, it’s the lining of the sheep’s stomach – a beautiful, white, web-like structure which is used to make faggots, among other things. The fat bastes the meat as it’s cooking and brings even more lamby flavour.

I’ve based the style of kebab on the Cypriot sheftalia, which is a very simply flavoured ‘sausage’ made with parsley, onion and pepper. I kept to this simple recipe, adding just a touch of cinnamon because it brings out the sweetness of lamb. And yes, I had to make some laver flatbreads too because honestly, what is life without grilled lamb, yoghurt, salad and fresh fluffy flatbreads. Miserable indeed.

PGI Welsh Lamb Sheftalia with Laver Flatbreads Recipe

Makes approx 14 kebabs

1kg minced PGI Welsh Lamb (PGI lamb is available from most supermarkets but a handy map of butchers is available here)
1 medium onion, finely diced
6 cloves garlic, crushed or grated
3 tablespoons parsley stalks, finely chopped
Black pepper, around 1 teaspoon, freshly ground
¾ teaspoon ground cinnamon
Salt

2 large pieces caul fat, for wrapping

In a large bowl combine all the ingredients and use your hands to mix well. Heat a small frying pan and fry a teaspoon of the mixture to taste and check for seasoning. Adjust if necessary.

Divide into 14 balls and shape each into a sausage. Lay the caul fat out on a flat surface and place a sausage onto it. The thinner pieces of caul are better for this than the thick parts, so aim to use up the thin parts first. Wrap around the sausage and cut away any excess.

To cook, preheat the barbecue for indirect cooking. It’s important to do this because the caul fat will melt on the grill and it will cause flare-ups.

Once the coals are covered in a layer of ash and the flames have died down, you’re ready to cook. Place the kebabs on the side without coals, and keep them well away until the fat has rendered from all sides of the kebab. Once it has, you can move them to the direct heat part to crisp them up.

Mine took around 20 minutes to cook but this will depend on the thickness of your kebabs.

Serve with the flatbreads, salad, yoghurt and hot sauce.

For the flatbreads:

150g laver
200ml warm water
500g strong white bread flour
30ml olive oil
2 teaspoons salt
1 x 7g sachet dried yeast

Mix everything together in a bowl and knead on a lightly floured surface for a few minutes, until smooth and springy. You want a nice, smooth, springy dough.
Leave the dough in a warm place for an hour or so until it has roughly doubled in size.

Knockback the dough and divide into 8 balls for larger breads or 12 for small.

Roll the dough balls flat and cook for 2-3 minutes in a properly hot, dry pan (I use a cast iron griddle) until a little charred on each side. They will start to puff up when ready. Keep them warm inside a clean tea towel while you cook the rest.

For the salad:

1 large onion, sliced and soaked in iced water while you prep the other veg
2 tomatoes, sliced
2 large handfuls parsley leaves
Juice half a lemon
2 tablespoons olive oil

Combine all the ingredients and season with salt and pepper.

A dish of crab and corn feels like the heady height of summer. I made this plate to cheer myself up, truth be told; there’s nothing ‘wrong with me’ per se, I just feel a bit overwhelmed. Arranging sunny flavours on a plate can go a long way towards lifting my spirits, particularly followed by an hour or two on the sofa with a book. Like a kind of reset button.

I bought a dressed crab for this because cooking and picking one would’ve been too much, and I charred the corn indoors on a griddle pan rather than on the barbecue because I didn’t want the smokiness to overwhelm the crab but honestly, I also couldn’t be bothered with faff.

Rich, salty crab meat and sweet niblets (niblets!) of corn are a wonderful combination and I brought it all together with a sauce of melted butter, harissa and brown crab meat. A squeeze of lime plus its zest and a few wiggly tarragon leaves and this is a very fine and really quite decadent lunch.

There are different directions you could take this in depending on mood – an Old Bay and chilli butter would be fantastic, as would straight up tarragon, or tarragon and chive. Try swapping lime for lemon or grapefruit, or add carbs e.g. small potatoes. It’s a very simple recipe – just a lovely arrangement of good things which has the potential to make you feel very clever and capable.

And yes, I’m feeling much better, thank you.

Charred Corn and Crab with Harissa Butter Recipe

Serves 2 with bread/potatoes/whatever as a main dish, or 4 as a side

1 dressed crab or 1 brown crab cooked and picked – separate the white and brown meat
2 large cobs of corn, husks removed
1 spring onion, white and green parts very finely sliced
A couple of sprigs of tarragon leaves, picked
Juice and zest of 1-2 limes
25g butter
1 tablespoon harissa

Heat a griddle pan until very hot. Rub the corn lightly with oil and season with salt and pepper, then place into the pan. Cook, turning frequently until charred lightly on all sides. Remove and allow to cool, then slice the niblets from the cob.

Gently melt the butter and stir in the harissa and brown crab meat.

Scatter the corn over a serving plate, add the white crab meat and spring onion. You may not want/need all of the spring onion. Drizzle over the harissa butter and follow with a good squeeze of lime juice and zest. Taste and adjust by adding more seasoning or lime juice. Finally, add the tarragon leaves and serve.

Want more crab recipes?

Hot Crab Dip | Crab, Corn and Caviar Tacos | Crab Lasagna | Crab Fried Rice | Louisiana Crab Cakes 

Want more corn recipes?

Jerk Spiced Corn Fritters | Sour Creamed Corn | Corn and Kimchi Fritters | Pickled Corn with Scotch Bonnet 

This the second of two recipes I’ve developed for a paid partnership with Parmigiano Reggiano. 

‘Have you ever made gnudi before?’ D dared to joke when I suggested this recipe. He’s referring to the time I made hundreds of them for a supper club and by the time I’d done a couple of practice runs and the actual event (220 required) I’d really had enough. The upshot is that I’m really good at making gnudi though, so you can now reap the benefits.

I served them with crab and pickled wild garlic buds but this time kept things more classic in an effort to show off the Parmigiano Reggiano. Now, let me tell you what I have learnt about gnudi. Firstly, there’s a lot of talk on the internet about how difficult they are to make. They are not. Second, you don’t need to leave them for days in the fridge to form a skin around the outside – a few hours will do just fine; basically, you can leave them in the fridge for anything between three hours and three days. After that, they tend to go a bit tough. Finally, it’s true that using expensive ricotta will save you time and taste better but it’s rubbish that the gnudi simply won’t work with supermarket ricotta (but you will need to strain it overnight). I made these gnudi with supermarket ricotta and frankly it makes a nice blank canvas at which to throw huge flavours.

One of those is the Parmigiano Reggiano, which you know is going to be excellent because its manufacture is governed by a strict set of rules, right down to the diet of the cows whose milk it’s made from. The rules specify that 50% of the cows’ diet must consist of ‘forage’ grown on the dairy farm and 75% of it must be local. It’s the forage that determines the positive bacterial flora, establishing a link with the land and therefore the cheese’s PDO status. The milk is raw when it’s used to make the cheese, and it’s combined with just natural calf rennet and salt. Rules like this please me greatly. See also: Neapolitan pizza and Parma ham.

What doesn’t please me is ‘rules’ people post on the internet which are simply incorrect. I urge you to try making gnudi then, particularly if you’ve been intimidated by them, as I once was! They’re incredible: fluffy cheese balls which are served with a sauce made entirely from butter. If that doesn’t get you excited then you’re on the wrong website.

Parmigiano Reggiano, Ricotta and Spinach Gnudi with Anchovy-Garlic Butter Recipe

Makes approx 28

300g ricotta
300g spinach
100g Parmigiano Reggiano, grated finely
3 egg yolks
40g plain flour
Coarse semolina, for coating and storing

8 anchovy fillets
4 cloves garlic (or more! Up to you)
100g butter
A squeeze of lemon juice

For the crumbs

200g stale sourdough (a day or two old, not rock hard)
3 tablespoons oil from a jar of anchovies

Place the ricotta into a brand new jay cloth or piece of muslin and tie it up at the top with string. Suspend this over a bowl in the fridge and leave overnight.

The next day, wash the spinach and put it in a saucepan with water still on the leaves. Gently wilt over medium heat with the lid on, stirring halfway through. Spread out to cool and then squeeze out as much water as possible. I find this is easiest using a clean cloth to squeeze it.

Chop the spinach finely and mix it with the strained ricotta, Parmigiano Reggiano, egg yolks, flour, and some salt. Roll into balls a bit smaller than a ping pong ball.

Make a bed of semolina on a plate and roll each ball in it. When all the gnudi are coated, pour more semolina on top and put them in the fridge, uncovered for at least 3 hours and up to 3 days.

Make the crumbs by blitzing the sourdough in a blender and frying in the anchovy oil until crisp. Drain on kitchen paper.

Make the sauce by melting the butter and gently melting the garlic and anchovies into it. Squeeze in some lemon juice to taste.

To cook the gnudi bring a pan of water to the boil and gently lower them in. They’ll take just a couple of minutes to cook and are ready when they float to the top. Pop them into the pan with the butter to take on a little colour and serve, scattered with the crumbs.


Some of you come here for the sandwiches. I know this because I’ve started doing supper clubs and I actually get to meet you guys. It’s brilliant fun, and I’ve found you’re not shy about telling me what you like/don’t like/miss about this site. A topic that has come up a few times now is my lack of sandwich updates.

This one’s for you, sandwich lovers.

You’ll find plenty on here already, including several banh mi, fish finger, sabich, some excellent toasties and more left-field experiments like 19th Century curry sandwiches and the Fool’s Gold Loaf. This time, I obviously wanted to show off the flavour of Parmesan, and my mind immediately jumped to the idea of updating a modern high street classic: the chicken Caesar.

I swapped chicken with crisp-skinned (so crisp-skinned) barbecued guinea fowl because it has such great flavour and – thanks to the grilling – a lush smokiness. Then it’s all about the dressing. Caesar has huge flavours and they need to be even more so to work with grilled meat in a sandwich. This is essentially a smoosh of cheese, anchovies and garlic made spreadable with yoghurt and mayo and I am entirely happy with that. In fact, I had to keep myself from swiping the lot with my finger before it even made its way onto the bread.

The rich, complex flavour of Parmesan strides boldly to the forefront of this sandwich. We have monks to thank for inventing this hard cheese around 900 years ago – they wanted to make a cheese that could last a long time, which is how they ended up with a distinctive, hard, dry cheese that works so well grated. It is aged for a minimum of 12 months, becoming fully mature at 24 months, and continuing to develop through to 40. The Parm I’ve used for this recipe was aged for 24 months so it had time to develop all the wonderful nuttiness that makes it one of the world’s greats. It brings a lot of umami and richness too, which means the pickled red onions are essential. Don’t skip them.

And I suppose I should also warn you that once you’ve tried this, you’ll never be able to go back to the high street version. Sorry (not sorry).

Guinea Fowl Caesar Baguette Recipe

1 baguette
1 guinea fowl
Crisp lettuce, finely shredded

For the dressing

4 cloves garlic, crushed
Pinch salt
5 anchovy fillets
100g grated Parmigiano Reggiano (the weight after grating)
2 tablespoons olive oil
Juice ½ lemon (but reserve the other half)
3 tablespoons natural yoghurt
2 tablespoons mayo

Quick pickled red onions

1 red onion, sliced
White wine vinegar 150ml
2 teaspoons sugar
1 teaspoon fine salt

Prepare the barbecue for indirect cooking.

Spatchcock the guinea fowl by cutting down either side of the backbone with a sturdy pair of scissors. Remove the backbone then turn the bird over and flatten it out.

Rub with a little oil and season well. Cook offset on the barbecue for around 30 minutes, turning over halfway through.

To make the onions, just mix the sugar, salt and vinegar until dissolved and add the onions. Set aside while the guinea fowl is cooking.

In a pestle and mortar, bash up the garlic with a pinch of salt. Add in the anchovy fillets and mush them up too. Add about half the cheese, mush it up then add the yoghurt and mayo. Stir in the rest of the cheese, plus the oil and lemon juice. Check for seasoning and balance – add more lemon juice or some black pepper if you want it.

Spread the baguette with plenty of dressing, then add lettuce, guinea fowl meat and plenty of pickled onions. Grate a little extra Parmigiano Reggiano on top!