Pork Pie

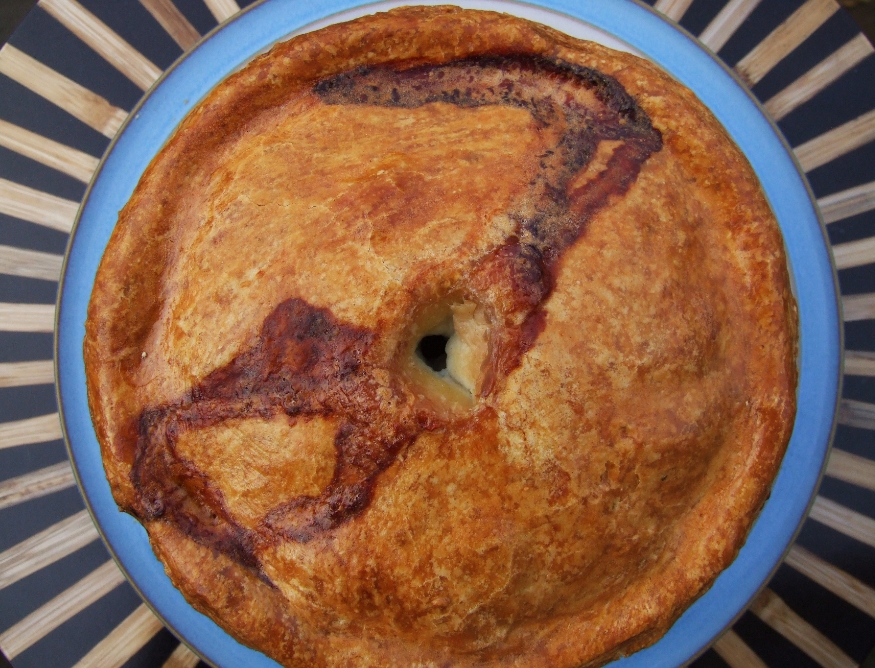
I am now officially 80% pork fat. My Dad reckons that the other 20% is made up of beer. Yet again I have stuffed myself to the button-popping threshold of what is socially and physically acceptable and gained more than I care to mention. It all started with this pork pie.

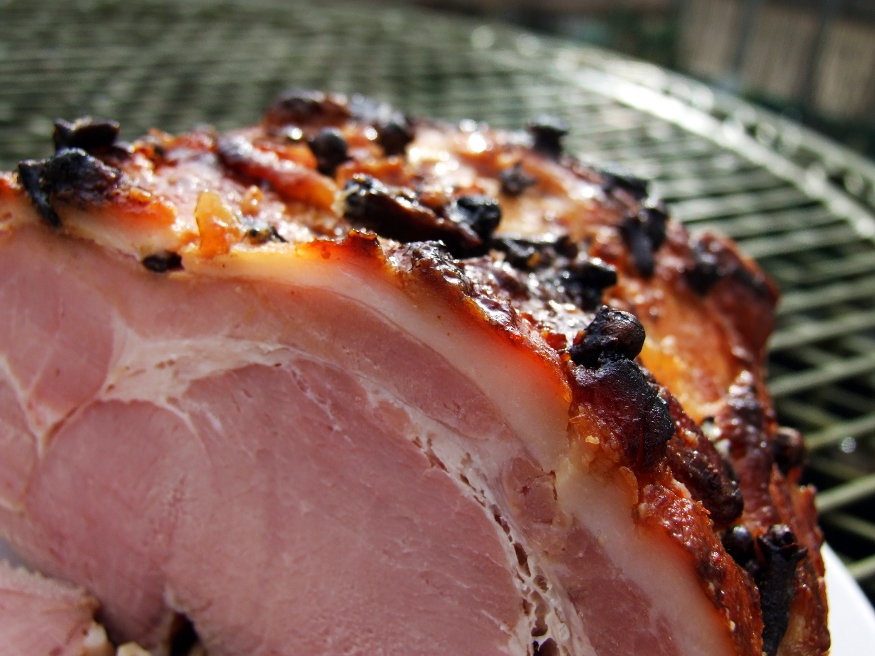
Every year mum and I have a Christmas cook-off – the entire day is spent in the kitchen churning out essentials such as sausage rolls, glazed ham, bread sauce and this year, an absolute monster of a pie. She was big, golden brown and stuffed with three cuts of pig. She was beautiful; bubbling and spluttering with porky juices as we sat there and actually watched her cook and yet, she would also prove rather tricksy.

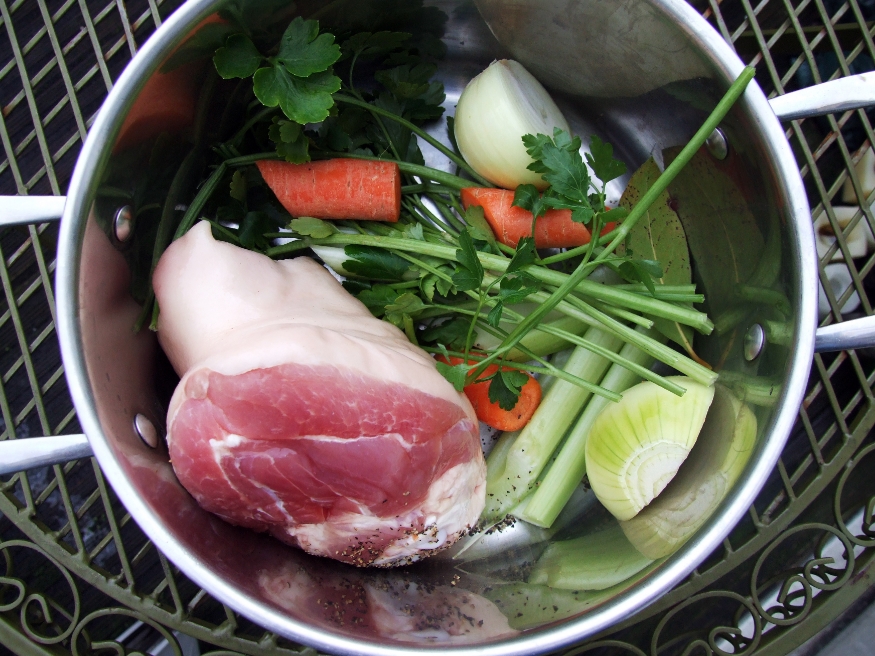
First I had to contend with a smelly trotter. Worried I wouldn’t have time to pick one up back home, I boarded the coach with a previously purchased cloven hoof for my companion, but when I came down to making the stock, the thing seriously kiffed and had to go in the bin. I’d been sold a funky foot. Unable to find another, it was a very small hock which eventually came to the rescue; we simmered it as you would the trotter, with some bones, herbs and onion, and it made a stock which set to a rich savoury jelly. Phew.

Jelly crisis averted, things looked up with a hot water crust which came together easily despite the fact that the recipe in front of you reads contrary to everything you know about making any kind of pastry. Butter and lard are heated with water then added to the flour; it comes together into a very soft and pliable play-doh like ball, before being stuffed to the brim with three kinds of pork; 1.3 kg of diced shoulder, 250g minced belly, and 250g back bacon.

A proud little bay leaf preserved a hole through which to pour the jelly later, and she went in the oven for an hour and half, before coming out of the tin for glazing and going back in for a further 15 minutes to go all shiny. The re-heated jelly stock is then slowly funnelled into the top of the pie once cooled and, if you are unlucky like me, three hours later it bursts out the bottom. My mum discovered the pie on her way to bed, sitting in a clear pool of partly set liquid and, thinking it would make the pastry soggy (as would I), tipped the jelly away and crossed her fingers. In the end though, a pie that blew any shop bought version out of the water. At one point, we got so emotional that the pie was actually described as ‘resplendent’. Annoyingly, the jelly in particular was incredibly tasty; some at least was retained around the base and quivering gems studded the meat where the liquid had seeped into every available space.

I will be making another pork pie, certainly next Christmas, if not before. The meat inside was seasoned just how I like it, because obviously I made it; heavy on the white pepper, hints of mace, sage and thyme in the background. Most of all it’s full-on pork. The remaining jelly was savoured and a lesson learned: there is only so much pork one can ever get into a pastry case. You’ve just got to accept it. A big fat wedge made a very welcome addition to the ‘pork plate’ alongside my mum’s glazed ham with Cumberland sauce and a couple of crisp, buttery sausage rolls; pickles must of course be close at hand. A porky goodbye to 2009 and here’s to a slightly less porky me in 2010. Stranger things have happened.

I hope you all had a delicious Christmas too and a very Happy New Year!

Pork Pie

(makes one absolute beast of a pie which fills an 18 or 20 inch cake tin)
It is easiest to start the pie the day before you want to eat it.

For the Stock

A few pork bones
A pig’s trotter or a very small hock
1 onion, halved and studded with six cloves
A stick of celery, chopped in half
Six black peppercorns
Parsley, thyme and bay leaves
Roughly 2 litres of water

Put all the ingredients in a pan and then gently simmer for 3-4 hours, skimming off any scum as necessary. Strain the stock then leave in the fridge overnight or until well chilled and set to a jelly. Scrape off the layer of fat on top and the stock is then ready to be re-heated. You will need about 250ml for the pie (don’t try to get any more in, trust me). The rest is a very valuable addition to your freezer.

For the Crust

The crust recipe I used comes from this site.

100g butter
100g lard
200ml water
550g plain flour
1.5 teaspoons salt
2 large eggs, plus another for glazing later
1 bay leaf

Melt the butter and lard with the water over a gentle heat. Meanwhile, mix the flour with the salt in a large mixing bowl then add the eggs. Use a knife to start cutting it together as you normally would when making pastry. Begin adding the melted fat and water mixture a little at a time until it starts to all come together like this. Then go in with your hands and bring it together into a ball. Knead very briefly until smooth then wrap in cling film and refrigerate while you make the filling.

For the Filling

1.3 kg pork shoulder
250g smoked back bacon
250g belly pork, minced
1 heaped tablespoon chopped sage
1 tablespoon chopped thyme leaves
1 generous teaspoon salt (don’t go overboard as the bacon is salty)
1 generous teaspoon black pepper or to taste
1 generous teaspoon white pepper or to taste
Half a teaspoon of ground mace (substitute nutmeg if you don’t have it)

First, finely dice the pork shoulder, removing any sinewy bits. I went for quite a coarse dice, about 1/2-1cm square. Then finely dice the bacon too and mix all three meats together in a large mixing bowl. Add the rest of the ingredients and combine well. Take a little bit of the mixture and form into a small patty about the size of a 50p piece, then cook in a frying pan to check the seasonings and adjust to taste as necessary.

Assembling the Pie

Preheat the oven to 180C. Cut off a third of the pastry and set aside for the lid (back in the fridge), then roll out the remaining two thirds on a lightly floured surface. You want a circle big enough to cover the base and edges of your cake tin. Mould the pastry into the tin, making sure that there are no gaps, then stuff with the filling. You can pack it down well as it will shrink during cooking, leaving room for the jelly.

Roll out the remaining pastry to make the lid and brush the sides of the pie with beaten egg before putting the lid on top and crimping and sealing well with your fingers. Use a bay leaf to make a hole in the top of the pie and bake on the centre shelf for 30 minutes. After this time, reduce the heat to 160C and back for another hour. Then remove the pie from the tin and brush all over with beaten egg before baking again for 10-15 minutes.

Leave to cool for 30 minutes before removing the bay leaf, then re-heat 250ml stock and slowly funnel it into the top of the pie. This takes some time as you have to do it bit by bit. Allow to cool completely and refrigerate to allow the jelly to set completely.

Glazed Ham

Olive Magazine asked me to ‘challenge Gordon’ in their December issue, with a Christmas recipe of my choosing; I went for the glazed ham. A reader and their mates then tested both his recipe and mine and decided on a winner.

The idea of a straight ‘glaze-off’ seemed a bit dull and predictable so I decided to mix things up by using the cola method, which I’ve tried before and loved. The ham is covered and bubbled in the syrupy liquor, resulting in a ham infused with an addictive spicy caramel sweetness, helped along a bit by a couple of star anise and the humble onion. I kept the glaze simple with marmalade (zesty bits essential) and teeny hints of ginger and cinnamon. The cola makes the edges caramelise to a sticky, tooth-tacky sheen . And that’s what it’s all about. I burnt my fingers several times trying to pull off the edge bits.

It was a dead heat between mine and Ramsay’s ham, by the way. I can’t say I wasn’t hugely relieved not to lose. I bet he’s quaking in his sweary little boots…

Sweet and Spiced Glazed Ham

1 x 2kg mild-cure gammon
1 x 2litre bottle of cola
1 onion, peeled and halved
2 star anise

For the glaze

Cloves, for studding
225g marmalade (with zesty bits if possible)
1/2 teaspoon ground ginger
1/2 teaspoon ground cinnamon
1 tablespoon Dijon mustard

Bring the gammon up to room temperature, then put it in a large pan, skin side down, add the onion and star anise and cover with the cola. Bring to the boil, reduce to a simmer and rest the lid on top so that it is not fully sealed. Let bubble for about 2 1/4 hours.

Discard the cooking liquid, remove the ham to a plate and allow to cool slightly.

Preheat the oven to gas 7/210 C. Remove the skin from the ham, leaving a thin layer of fat. Score the fat in a diamond pattern and push a clove into the point of each diamond.

To make the glaze, put all the ingredients into a pan and let it bubble up to the boil then simmer for a few minutes until syrupy.

Brush the glaze all over the ham and bake for 10 minutes. Remove the ham, brush on some more glaze and bake for a further 10 minutes. If you do this more often then the outside will be even stickier. If you want to let the ham cool and then glaze it the next day, it will need longer in the oven – about 30 to 40 minutes.

Salt Fish Fritters

The Jamaican name for this dish, ‘Stamp ‘n Go’ is said to come from the behaviour of impatient, fritter-hungry customers who would stamp their feet for attention and then simply leave the shop if they didn’t get it. Leave without the fritters? Eh? There must be another part to that story; I’ve only eaten them once and I’m hooked. This is the kind of recipe you know you’re going to love but just never get around to making and then you kick yourself repeatedly once you do. Piping hot, fresh golden batter bombs explode with poofs of salty, spiced steam ready for the mighty plunge into bud-tingling chilli sauce.

With a big bag of fillets left over from the okazi soup and a trick up my sleeve for preparing it quickly, these were a doddle to knock up on a school night. I gave the fillets just two boils in fresh changes of water this time to keep a chewier texture and slightly more salt, before adding the flakes to a batter along with spring onions, chilli, garlic and parsley. Tablespoon by tablespoon they dropped into a skillet of shimmering oil, spreading out just enough before crisping quickly to ‘eat-me-now-dammit’ brown. Inside, the salt fish brings an insanely satisfying toothsome chew, surrounded by the fluffy flavour sponge of batter. We inhaled the lot in minutes and not many of them.

I took the simplest approach possible when it came to the sauce and lobbed a can of chopped tomatoes, about 5 regular red chillies, a few cloves of garlic, some salt, some vinegar and some sugar into a pot and cooked it down on the tame side of furiously for about 20 minutes, before half heartedly stabbing at it with a stick blender; it repaid me way too generously for my meagre efforts.

That said, as soon as the first fritter began its inevitable and rapid journey towards my belly, there was talk of spicy sweetcorn relish. I honestly cannot think of any better accompaniment; I kicked myself once more. In my future right now, I see fritters: great towering piles of steaming fritters accompanied by bowls, no, vats, of hot sweetcorn relish. I won’t hesitate to stamp until I get them.


Salt Fish Fritters

350g salt fish fillets, boiled in two changes of water for five minutes each time and then flaked (removing skin and bones)
1 small white onion, finely chopped
3 spring onions, white and green parts finely chopped
1/2 – 1 scotch bonnet chilli, de-seeded and finely chopped
2 cloves garlic, crushed (to be honest, I’m not sure I actually used this in the end so it’s up to you)
A small handful of parsley leaves, finely chopped
115g plain flour
2 eggs
120ml milk
Groundnut oil, for frying

Soften the spring onions, onion, garlic and chilli in a little oil until soft but not coloured. Add to a bowl with the salt fish and parsley. Beat the flour, milk and eggs together in a separate bowl until smooth then combine with the fish mixture. Season with black pepper (no salt).

Heat a 2cm depth groundnut oil in a skillet or frying pan and drop tablespoons of batter in, turning once, until golden brown on both sides. Drain on kitchen paper and serve.

Thai Style Stuffed Squid

Too cold for a BBQ you say? Pah! Never. Well, not yet anyway. There’s nothing like flinging a few good things on a hot Weber to chase away the winter blues, and good things were in abundance as we chowed our way through these enormous steaks, some spectacular sausages, a smoky baba ganoush, a rack of sticky jerk ribs and my contribution: Thai style stuffed squids.

When researching the recipe I discovered that stuffing squid with pork mince is actually a Vietnamese preparation but I had some galangal, coriander and lime leaves hanging around so Thai-style it was. To lighten the stuffing I also added breadcrumbs soaked in milk (as you would for an Italian meatball), which might seem a bit odd but was designed to avoid ending up with an overly heavy and coarse mixture, what with it being a BBQ and therefore an exercise in maximising stomach capacity. I actually added a bit too much in the end which I thought made it overly loose but everyone else told me to stop fretting and rein in the pedantry.

The most important thing to bear in mind when preparing your squid is that one should not over-stuff. The squid shrinks when cooking and if you’ve too much pig jammed in, then there can only be one result and that is a big porky mess. I’d pre-cooked the filling so we simply rubbed with oil, seasoned and grilled until golden on each side; just enough time for the filling to heat through and the squid to stay delightfully bouncy and toothsome. The tentacles were also given the appropriate amount of respect; we saw no better way to treat them than seasoning highly and draping across the searing hot grill until the suckers were curled and crispy-tipped.

At 7pm, when two layers of clothing were no longer enough to keep out the chill and the wind kept blowing out the candles, we admitted defeat and retired to the sofas for cheese, gin and a bit of inebriated shouting at the telly. Winter BBQ’s rock.

Squid on the BBQ


Thai-style Stuffed Squid

6 squid (on the small side of medium), cleaned
350g minced pork
2 tablespoons fish sauce (plus more to taste)
2 fat spring onions (green parts only), finely sliced
1 teaspoon sugar
2 crushed garlic cloves,grated
1/2 inch piece galangal, grated
4 lime leaves, finely chopped
2 Thai chillies, finely chopped
1 small handful coriander leaves, finely chopped
2-3 sliced of white bread (crusts removed), soaked in enough milk to make it into a mush when mashed with a fork
Black pepper
Juice of 1 lime (plus another to adjust to taste)

Cocktail sticks, for sealing

First make the filling. Mix the pork mince with all the ingredients except the fish sauce, lime juice and coriander. Add this mixture to a pan over a fairly gentle heat and stir every now and then until cooked through. Remove from the heat and allow to cool completely if you will not be cooking the squids right away.

Ensure that each squid is sealed at the thin, pointy end as they can sometimes have a hole. If this is the case, secure with a cocktail stick before stuffing each with the pork mixture. Take care not to overstuff the squids as they will shrink during cooking. Secure the end with another cocktail stick.

To cook the squid, rub each with oil and season lightly then grill until golden on each side.

Beef Rendang

I actually made this a couple of weeks ago, when the weather had just started to really turn. What better way to stoke the internal fire than with a big bowl of rich rendang in the belly.

The recipe comes from William Leigh (which you can find on Dos Hermanos) and I will come out right now and say it: this is the best rendang I have ever made. So perfectly balanced; fragrant and rich. There is something very satisfying and heart warming about putting a load of ingredients in just one pot and a few hours later plating up a thing of great beauty, the smell of which has been intensifying with every teasing minute.

Aside from whizzing up the paste, that is essentially all you do until you get to the end stage when things get a little hairy. The final step of the recipe involves the splitting of the coconut milk and I’ll admit to feeling slightly alarmed when I returned to the pot to find this unholy mess.

Don’t panic though – this is normal. As the liquid cooks out of the milk the oil is left behind and the beef then fries in it, resulting in that all important flaky texture. You need to keep a careful eye on it at this stage, as once it begins to dry up, you are done. I would also recommend using a solid, heavy based pan (or a wok) and be prepared to give it a good soaking afterwards. One final bit of advice: the method section of the recipe on Dos Hermanos does not tell you when to use the can of water so I added it to the pot with the coconut milk as I couldn’t see any other logical time to do it.

I was rewarded for my patience with a deep, sweet, tongue titillating rendang;  fragrant with lime leaves, galangal and lemongrass, with a tropical note of coconut and a good heat from the 10 Thai chillies I added. William acknowledges that his final seasoning of fish sauce and lime juice is a break from tradition but I agree that it lifts the whole dish and gives a very welcome burst of freshness. The meat flaked apart at the merest prod with an eager fork. I urge you to try this recipe.

I served it with a  raita (tomato, cucumber, coriander, lemon juice and seasoned yoghurt) and an onion salad, which I serve with pretty much all curries. Just plunge finely sliced onions into a bowl of icy water and leave for an hour or so until they turn crisp then season and add dried mint; I keep a pot of dried mint for no other reason. We scooped up each greedy gob-full with warm chapattis then sat back and rubbed our bellies in an appropriately satisfied manner. If I could, I would have purred like a cat. I made the rendang again the very next day.

Beef Rendang (from Dos Hermanos)

FOR THE PASTE:
6-10 Thai Chillis depending on how hot you like it
1 inch ginger
1 inch galangal
4 cloves garlic
1 tsp turmeric
1 tsp ground coriander
1 tsp ground cumin
1 tsp brown sugar

1kg stewing beef ( cut in 2in cubes)

2 tins coconut milk
1 tins worth of water
Stalk lemongrass
Lime leaves
1 bay leaf
2tbs fish sauce
Juice of a lime

Whizz the paste ingredients with a little water to a smooth paste. Add to a large pan or wok with the lime leaves, bashed lemongrass stalk, bay leaf and coconut milk.

Add the beef to this and let it bubble slowly for an hour and a half. Turn the heat up and cook until all the coconut milk has almost gone. This will take a while, maybe 45 mins to 1 hour, and it will look strange while it’s doing it. Eventually it will start to colour and the oil will come out of the coconut milk completely.

The beef will fry in this oil and turn quite dark brown and rather flaky – then you’re done. Turn off the heat and stir though the fish sauce and lime juice.

Tinda Masala

The tinda masala is one of my favourite dishes at Tayyabs; certainly my favourite vegetarian dish and a no-brainer when it comes to ordering. The very first time I went there, I noticed it clinging on at the bottom of the menu and decided to try it as a sympathy order. When I put the first mouthful in my greedy gob however, there was no doubt that the dish was laughing in the face of my pity. I’ve only ever been served one disappointing tinda which, sadly, arrived after I’d been talking my mate’s ear off about it in the pub beforehand. It was watery, bland, lukewarm and all the worse for me bigging it up so much. Generally though those juicy little gourds are cooked on a fierce heat with a punchy, slightly sour sauce, the main ingredients of which Tayyabs insist are just garlic, ginger and chilli; I can’t blame them for not wanting to reveal their secrets.

I’ve seen fresh tinda around recently, but they always seem to look very tired. I cannot tell you the frustration this caused me until eventually, the canned ones stepped in to offer succour.  As soon as I opened that tin, I got a familiar waft of briny tinda – Tayyabs must use the canned version too.

I used this recipe from Mamta’s kitchen, although I omitted the potato and used mustard seeds where she suggests a choice between mustard and cumin. Overall I was pleased with the result: a perfect starting point for some experimentation, although I did think the tomato dominated and will reduce that considerably or just add some fresh at the end like Tayyabs do. A crispy onion garnish would also be most welcome. The tinda don’t really have much flavour of their own but are special for being so incredibly thirsty, soaking up the spiced juices which then burst into the mouth at the slightest pressure. Next time, I will tweak the spices and cook it faster at a higher heat, to avoid breaking up the tinda so much. Of course, I’ll need to make a trip to Tayyabs first for research purposes, just to make sure I get that spicing right. What a hardship.

Cherry Samosas

The cherries here are flambéed, then cooked down until gooey and confected. The mixture is then cooled before being dolloped onto filo pastry, folded into samosas and brushed with lots of melted butter – sweet, jammy cherry mixture encased within hot, crisp filo all ready for a good dippy dippy into cooling, apple kissed mascarpone.

Just be careful to let them cool down a bit before eating or you could end up with a pop tart/Maccy D’s apple pie situation, and don’t pretend you don’t know what I’m talking about, we’ve all done it.

Cherry Samosas with Apple Mascarpone

Serves 4

1 box of filo pastry
300gr cherries
A small handful of mint
A pack of unsalted butter
1 tbsp sugar (to taste)
A good glug of brandy (I guestimate at 100mls)
A tub of mascarpone
Half an eating apple
Icing sugar

Pit and halve the cherries, reserving a few for garnish. In a non stick frying pan, melt a knob of butter until foaming, and then add the cherries. Add the tablespoon of sugar and cook on a low heat until the juices are released. Pour over the brandy and carefully bring a lit match towards it – it should catch fire and flambé the mixture. Simmer on a low heat until thickened and syrupy. Taste it and if needed, add more sugar. Take off the heat, throw in the mint, chopped finely, reserving one leaf. Leave the mixture to cool.

To fold the samosa, take out the filo and slice into three lengthways. Melt the pack of butter and pour off the clarified butter, discarding the white bits. Using a pastry brush, brush one lengthways layer of filo with the butter, then lay another on top. Brush again with butter and lay another one on so that it’s 3 sheets thick. Spoon a tablespoon’s worth of the cherry mixture onto the bottom corner of the sheet, then fold the sheet carefully into a triangle, pressing down the seams. Butter the rest of the sheet and carry on folding until you’ve run out of pastry, sealing the seams as you go along. Repeat until you have 8 samosas (2 per person). When you come to baking them, brush both sides with butter (no one said it was a healthy recipe…) and bake in a hot oven, around 200 degrees C, for 10 – 15 minutes or until browned. Meanwhile, grate the apple into a clean tea towel and squeeze a little of the juice out. Mix with the mascarpone.

To serve, dust the samosas with icing sugar and place two on the plate with a quenelle of the mascarpone. Garnish with a mint leaf and a couple of cherries.

For Lizzie’s post about our yumsome samosas go here.

If you’re in a generous mood, Action Against Hunger have teamed up with Nom Nom Nom and are holding a charity raffle; prizes include a meal at Le Gavroche… Click here to donate.

Duck with Gooseberry Sauce

Duck with Gooseberry Sauce

Serves 1

1 duck breast
100gr gooseberries
4 shallots
A knob of butter
2 medium sized floury potatoes
A glug of white wine
A pinch of ground cloves
Sugar, to taste
Half a bulb of garlic
1 sprig of rosemary
Chicken stock
Some greenery (in our case, Swiss chard but spinach or savoy cabbage also works)

Score the duck breast and salt heavily. Meanwhile, peel the potatoes and cut in half lengthways. Top and tail the gooseberries. Pat the duck breasts dry, and fry them on a low heat, skin side down to slowly render the fat out. This needs about 15 minutes, to really get the fat out and crisp up the skin. When this is done, turn the duck breast and fry on a medium heat for a minute or two to give it some colour. Remove and leave on a baking tray. Preheat the oven to 180 degrees celcius.

Next, fry the potatoes in the rendered duck fat until they are browned. Remove them and place in a frying pan with a lid, with the browned sides facing up. Smash the garlic cloves with the side of a knife, scatter them around the potatoes with the sprig of rosemary, chopped finely. Add the chicken stock until it comes partway up the side of the potatoes, but doesn’t cover the previously fried part. Put the lid on and simmer gently for about 15 – 20 mins, or until the potatoes are tender.

Meanwhile, heat the knob of butter in a pan and add the shallots, sliced. Fry until softened and then add the glug of wine. Simmer until reduced, then add the gooseberries and the cloves. Fry on a low heat until the gooseberries have collapsed, and mash them down with a fork. Add sugar to taste and leave to simmer gently.

Depending on how thick your duck breasts are, we put ours in the oven for 8 – 10 minutes. Remove and leave them to rest for 10 minutes, to coincide with the potatoes being finished. To serve, plate the potatoes on a warmed plate. Strain the stock into a saucepan and add the greens to be cooked in the garlicky rosemary stock until al dente, and then drain and use them as a bed to serve the duck breast, sliced on top. Spoon some of the stock onto the meat, and serve the gooseberry sauce on the side.

Ham Hock Stock

It’s winter, it’s cold and so I crave the pie – all the time. Deep filled, meaty pie with buttery pastry. Pure comfort food. First I toyed with the idea of using lamb shanks in a pie, all St. John style with the bones sticking out the top but I finally decided on a cheap as chips ham hock filling.

Smoked Ham Hock Pie Recipe

(I would advise soaking the hock for at least a few hours or overnight before discarding the water and cooking as below)

1 smoked ham hock
1 carrot
10 peppercorns
1 stick celery
1 large onion, peeled and halved plus 1 small one finely chopped, for the filling
4 bay leaves, torn
1 large leek, finely shredded
Butter
1 clove garlic
1 standard pack shortcrust pastry (sorry, don’t know the weight but it’s enough to cover the top of your pie dish..)
1 egg, beaten

Bechamel

425ml milk
8 black pepper corns
1 bay leaf
40g butter
20g plain flour
Salt and pepper
A pinch of mace or nutmeg
A large handful cheddar cheese

Method
– Put the hock, halved onion, carrot, celery, bay leaves and peppercorns in a large pan and cover with water. Bring to the boil then simmer for 2-4 hours, until the meat is falling off the bone.
– Remove the ham and set aside, strain the liquor and reserve for later use.
– Cook the leeks and onion gently in butter until soft – about 10 minutes, then add the garlic for a further 3-5 minutes. Meanwhile, make the bechamel.
– Put the milk, bay leaf, mace or nutmeg and peppercorns into a pan and bring slowly up to simmering point.
– Remove from the heat and strain the milk into a jug.
– In a clean pan, melt the butter gently, add the flour and stir to a paste. Add a little milk at a time, stirring to make sure all is incorporated.
– Start adding larger quantities, as if you are making mayonnaise, stirring with a whisk.
– When the lumps are gone, add the cheese and whisk again until smooth.
– Remove the meat from the hock, taking care to avoid the fattiest bits and combine with the leek mixture and the bechamel. Transfer to a pie dish. Roll out the pastry to desired thickness (I dunno, 1cm?) and top the pie with it. Brush with beaten egg.
– Bake at 190°C/ 375°F/Gas 5 for about an hour until golden brown.

Steak with Salsa Verde

If I had to choose a ‘favourite meal’, steak with salsa verde would most definitely be up there – top 3. A well-hung  piece of meat which is dark, flavourful, the flesh marbled with fat. Yes please.

I remember the first time I tasted salsa verde. A summers day and one of my mum’s perfect summer meals. Roast chicken, slathered with herbs and butter. Broad beans with bacon and herby vinaigrette and new potatoes, glistening and flecked green with the salsa. I still make that meal to this day.

Salsa Verde Recipe

Small handful each capers and cornichons
1-2 cloves garlic
5-6 anchovy fillets (brown, salty kind)
Large handful flatleaf parsley, leaves picked
Slightly smaller handful each basil and mint
1 level tablespoon mustard (I used wholegrain but dijon is better)
3 tablespoons red wine vinegar
8 tablespoons olive oil
Pepper

– The key is to chop everything really finely, then put in a bowl before adding the mustard, pepper and vinegar. Then stir in the oil. If you find it too tangy or have a less than great red wine vinegar, try adding a little sugar.

10

This is rich and deeply comforting. Each pasta layer is cloaked in a dreamy sage-scented bechamel. Roll on autumn, I’m ready!

Rabbit Lasagne Recipe

1 large rabbit, jointed
2 onions, chopped
4 cloves garlic, finely sliced
100 ml white wine
1 generous sprig thyme
1 litre stock
2 bay leaves
1 generously heaped tablespoon tomato purée
1 small bunch parsley leaves, chopped
200g wild mushrooms
6 ripe tomatoes, de-seeded (and skinned if you like) and roughly chopped

For the sauce

400ml milk
50g butter
50g flour
Parmesan, grated (a good handful, or to taste)
2 tablespoons chopped sage
salt and pepper

Cheddar cheese, for grating
Lasagne sheets

– Preheat the oven to 200C/400F
– Heat some oil in a pan – 3-4 tablespoons (I like to use a roasting tray which I put directly onto the stove top and then transfer to the oven later). Add the rabbit pieces and cook on a high heat until browned on all sides. Remove the rabbit pieces and set aside.
– Add the onions, garlic to the pan and fry for a couple of minutes, stirring.
– Add the wine, tomatoes, bay leaves and thyme, cook for a minute, then add back the rabbit pieces. Add the stock, cover with foil and cook for 30 minutes, remove from the oven and set the rabbit pieces aside.
– Remove the thyme and bay leaves form the pan, then reduce until thickened by approximately half. During this time, shred the rabbit meat from the bones, then add back to the sauce along with the mushrooms and parsley.

For the bechamel

– Bring the milk to almost boiling then set aside.
– Melt the butter in a pan, then add the flour and stir vigorously to form a roux. Add a little of the milk at a time until all the milk is incorporated, stirring constantly.
– Add the parmesan and stir to combine before adding the sage and seasoning.

Assembly

– Turn the oven to 180C/350F
– Rabbit mixture, lasagne sheets, bechamel, rabbit mixture, lasagne, bechamel etc. Grated cheese on top. Bake for 30-40 minutes.

Meat Stock Recipe

4 medium meat bones
1 carrot
1 stick celery, in quarters
1 onion, halved
2 juniper berries
4 peppercorns
Pinch salt
2 bay leaves

– Roast the bones and vegetables for 30-40 minutes in a 230C/450F oven.
– Remove and add to a stock pot along with 3 litres water, bring to the boil then simmer for 1.5-2 hours, removing the scum every now and then. Drain through a sieve. Cool and freeze until needed. It will keep for a month or so.

6

This is a delicious Polish recipe given to me by a friend’s mother. Vegetables (carrot, parsnip, potato) are simmered in stock and water with a leg of chicken or a fatty cut of beef. At the end of cooking time, the meat is removed (his mother notes: ‘do with it what you want!’) then the cucumbers (brined not pickled) are grated and fried in butter before being added to the pot. Cream, seasoning and dill are then stirred through, together with a little of the cucumber brine if you want a slightly more sour taste. It is this brine that makes the cukes Polish-style. The process of natural fermentation in brine is how they develop their sour taste – no vinegar involved.

As you can see we put the shredded chicken back into the soup afterwards – not part of the original recipe – couldn’t resist it. I also added quite a lot of the brine back to the pot as I really loved the sour taste.

Polish Cucumber Soup Recipe

3 pints water (I used 2 pints water + 1 pint of stock instead of the stock cube below. This is purely because I have an irrational fear of stock cubes!)
1 stock cube (if using)
284ml single cream
1 bunch dill
1 parsnip, diced
1 large carrot, diced
1 baking potato (I used 2 normal sized potatoes as I didn’t have a baker), diced
1 jar of cucumbers in brine (my friend’s mum recommends Krakus, which is the brand I used but apparently, others will do fine), drained weight 540g.
1 chicken leg (or beef but this needs to be a fatty cut)
2 tablespoons butter

Add water, stock and chicken (or beef) to pan.

Add the chopped veggies and simmer until meat and veggies are soft (around 30 minutes). At the end of this time, remove the meat (I shredded it to add back at the end).

While the soup simmers, grate all the ‘cumbers’ and reserve the brine.

Fry the cumbers in the butter on a very low heat for around 5 minutes and add to the soup.

Finally, add single cream, dill, salt and pepper. If you want the soup to be more sour, add some cumber brine. If you want a thinner soup, add a little water. Add the chicken back in if you like.