Corn Fritters

I usually serve these with bacon. It’s sweet n salty amazing. This scotch bonnet salsa is also lovely, but there’s a clear lack of pork in the picture and for that I apologise.

Corn is dirt cheap right now and I constantly hear it begging me to shear it from the cob and fritter the living daylights out of it. The fresh stuff really keeps its succulence but canned and frozen will also work. There are all sorts of things you could add to the mix; Simon suggested cockles, which I’m dying to try. Salt fish is a favourite, if a little more effort. Often though I prefer a simple recipe – a touch of spice, a little spring onion and fresh herbs; it’s all about the corn.

Fiona Beckett asked me to contribute a recipe to her student cooking site, Beyond Baked Beans and so this is it. The recipe is easy, fun to make and when served with bacon and perhaps an egg, one of the best hangover cures known to woman. What more could a student want from a meal? If you can stomach it though, there’s no better accompaniment than an ice cold beer.

Corn Fritters

140g plain flour
1/4 teaspoon baking powder
1 egg, lightly beaten with a fork
220ml milk
3 large corn cobs
1 teaspoon ground cumin
1 teaspoon ground coriander
3 spring onions, finely sliced
A small handful of fresh herbs, such as mint, coriander or parsley
If you’re not serving this with a hot sauce, try adding a finely chopped red chilli in the batter
Salt and pepper

Vegetable or groundnut oil, for frying

Sift the flour into a large bowl with the baking powder. Pour in the milk and mix well to make a smooth batter.

Remove any outer papery husk and strings from the corn cobs then stand one on its end on a chopping board and carefully run your knife down one side to remove the kernels. Repeat this until all the kernels are stripped off and then add them to the batter. Add the egg, spices and spring onion and season with two large pinches each of salt and pepper.

Heat a 1cm depth of oil in a heavy based frying pan or skillet and wait until it starts shimmering, but not smoking. Turn the heat to medium-high. Drop a tablespoon of the batter into the oil at a time and immediately flatten it out into a round fritter shape. It will take a few minutes to turn golden on the underneath – you can then flip it over and brown the other side. Be wary as the oil will spit a little and splash as you turn them. Set aside to drain of excess oil on kitchen paper then keep warm in an oven on its lowest setting while you make the rest. Don’t be tempted to try and put too many in the pan at once.

Serve with bacon. And perhaps egg. Or anything else you fancy.

I ate a stunning baba ganoush at Maramia Cafe recently as part of a ‘lamb banquet’. The meat was soft and tasty as hell, but the baba was what really blew people’s minds. It was thicker than mine; I wondered how they’d achieved the consistency and considered straining the yoghurt. I’m a serial strainer – you end up with something almost cream cheese-y but way more refreshing. I tried using it in the baba and the result was of course, richer. I’ve also started using smaller aubergines, which means that the smoke can penetrate all the flesh, rather than just the outer layer.

That’s it really – makes all the difference.

Baba Ganoush

8 small aubergines
2 cloves garlic, crushed
2 lemons (juice)
1 handful mint leaves, chopped
1 handful coriander or parsley leaves (or a little of both), chopped
6-8 tablespoons tahini (I like a good whack but you may want less)
1-2 tablespoons pomegranate molasses
Salt and pepper
4 tablespoons olive oil (not extra virgin)
4 tablespoons strained yoghurt (see below)

First, strain the yoghurt. If you don’t remember to do this the night before it doesn’t matter, even a couple of hours will make a big difference and the process itself takes seconds of preparation. Take a 500g tub of decent Greek-style yoghurt such as Total. Full-fat will obviously taste better than low fat but the latter does work okay. You’ll need some butter muslin, which is available from hardware stores easily. Cut a square of the muslin and line a bowl with it. Mix the yoghurt with a scant teaspoon of salt, mix well, then dollop it all into the middle of the muslin in the bowl. Gather it up, tie string around the top then tie the other end to something (I use a kitchen cupboard handle). Leave it for a few hours or ideally, overnight with the bowl underneath.

Pierce the aubergines with a fork and place directly on the gas rings of a hob (1 per ring) on a low flame, or put them under the grill, turning occasionally until blackened all over and collapsed. They will burst but this is fine, it just requires a bit of attention so you don’t lose the flesh. Remove to a plate and let cool slightly, then scrape the flesh from inside, leaving any bits of blackened skin and liquid on the plate behind.

Blend with all the other ingredients and season and adjust as necessary. You may want to add more lemon, yoghurt or salt for example. Drizzle with pomegranate molasses and scatter over extra coriander, if you like.

Allow to sit for a few hours before serving with hot flat breads or pitta for scooping.

Corn Soup

It’s the end of the summer and the corn is going cheap. I bought four cobs for a quid in Peckham yesterday and a frankly quite staggering twelve red peppers for the same. Twelve. Not joking.

This soup only uses one you’ll be pleased to know, along with two cobs and some classic Caribbean flavours: thyme, scotch bonnet chilli and coconut. It’s a hearty mix, thickened with yellow split peas and potato but my version is light compared with other recipes which use pumpkin or squash and other vegetables. I prefer a fresher version that keeps the focus on the juicy bursts of corn. I strip one cob and slice the other so I’m not denied the pleasure of gnawing on it.

The scotch bonnet chilli is left whole and slit lengthways to release just moderate fruity heat and the creamy coconut milk smooths things over. It tastes tropical and most importantly, it celebrates the corn. At that price, it would be rude not to.

Jamaican Style Sweetcorn Soup

1 large onion, diced
2 cloves garlic, finely chopped
1 scotch bonnet chilli
150g yellow split peas
1 litre stock (I used vegetable)
400ml tin of coconut milk
2 sprigs of thyme
2 cobs corn
1 red pepper, diced
1 large potato, diced

Heat a couple of tablespoons of vegetable or groundnut oil in a pan and add the onion. Let it sweat over a lowish heat for about 8 minutes then add the garlic for a couple of minutes more, taking care not to let it burn. Make a cut down the length of the chilli, but keep it intact and add it to the pan with the split peas, thyme and stock – simmer for 30 minutes.

Prepare the corn by shaving the kernels from one of the cobs, running your knife down the sides, top to bottom. Slice the other one into 2cm thick slices (I nicked that idea from this recipe recently. I also nicked their presentation). Add the corn, coconut milk and potato and simmer for 10-15 minutes. Add the red pepper for the final 5 minutes. Season with salt and pepper.

Allow the soup to cool a little then remove the chilli, thyme and corn slices (reserve the corn slices) and blend half the soup. If it is still quite hot then make sure not to fill the blender more than half way and hold the lid down because if you don’t you will end up with soup all over your kitchen. It will blast the lid off the blender. Return to the pan and add back the corn slices. Reheat if necessary, adjust the seasoning and serve.

You can’t say you haven’t thought about it these past few days. A few spots of drizzle and it’s pie o’clock.

One thing I didn’t expect to find myself making though was a vegetarian pie. It’s inspired by the Italian Easter pie, torta pasqualina and the filling is a deeply savoury mixture of roasted artichokes, crème fraiche, eggs, cheese and spinach. I just can’t get enough spinach into my body at the moment and it’s so darn cheap in Peckham; 3 or 4 huge bunches for just 1 of your shiny quids – that’s about 400g  of spinach once you’ve trimmed the stalks and it’s ready to use. I cast my eye over the sorry looking shelves in Tesco Express yesterday for comparison – £1.40 for 260g of baby leaves in an inflated plastic bag. What a rip. It’s baby spinach yes, but I prefer the mature, ballsy stuff to be honest.


One thing that doesn’t come cheap however, is a decent egg. I used Clarence Court eggs for The Big Lunch and I’ve developed a bit of a habit; Cotswold Legbars are my favourite ‘old breed’ with their rough textured, pastel-blue shells and rich amber yolks. This recipe uses a lot: 6 in the filling mix, 4 on top. They set the filling as well as enrich it though, so you can cut a slice without everything oozing out. I wanted the mixture to be quite coarse but absent mindedly puréed the lot. It didn’t matter, the result was a pleasant light texture.

So it’s not a traditional torta, but it is a very tasty variation. Usually, the pie contains ricotta but I used crème fraiche and a bit of grated cheddar because well, that’s what I had. It’s amazing really, just how satisfying this pie is. I lay in bed one night and seriously considered getting up in the wee hours for a nibble.

The olive oil pastry is rolled out very thin and arranged in layers – traditionally 33, to represent the number of years that Christ supposedly lived. There was no way I was doing that many layers (coming from a woman who skins chickpeas) and anyway, I can’t imagine it being particularly pleasant to eat. I managed 5 or 6, and felt rather chuffed about it, particularly because they were clearly distinguishable in the cooked pie. My recipe uses 8 tablespoons of olive oil, which I’m not sure is much in the way of fat in pastry-land, and yet it’s very silky. A keeper.

We ate indecently large wedges with a simple tomato and onion salad; perfectly ripe fruits layered with red and spring onions, drizzled with good balsamic and olive oil, salted and peppered. I never thought it possible, but this pie was every bit as satisfying as a meaty version.

Torta Pasqualina

(to make a more classic torta, substitute the crème fraiche and cheddar cheese with ricotta and some Parmesan if you have it).

This fills a 23cm spring form cake tin.

800g spinach (this is the equivalent of 6 large bunches bought in the mighty Peckham)
200g crème fraiche
A large handful of large cheddar cheese
1 massive onion, chopped fairly small
2 fat cloves of garlic, finely chopped
1 large handful (about 30g) flat leaf parsley
250g roasted artichokes from a jar
10 eggs

For the pastry

660g plain (all purpose) flour
8 tablespoons olive oil
2 teaspoons salt
1 egg, for glazing
About 230ml cold water

First, make the pastry. Combine the flour, oil and salt in large bowl. Gradually add the water and mix to form a dough that is fairly stiff. Turn it out out onto lightly floured surface and knead until smooth and elastic, about 15 minutes then transfer to a bowl, cover and leave it for 30 minutes in the fridge.

Allow the spinach to wilt down in a dry pan then allow to cool and squeeze out as much water as you can. Soften the chopped onion gently in a tablespoon of olive oil for about 10 minutes, then add the finely chopped garlic and artichokes for a few minutes longer, stirring regularly. Combine this mixture with the parsley, creme fraiche, cheese and 6 of the eggs. You can do this in a blender but do remember to pulse not blend! Season heavily with salt and pepper.

Preheat the oven to 220C

Brush the tin with olive oil and divide the dough into 10 pieces. Roll each piece out very thinly on a lightly floured surface so that they are large enough to fit the pan. I used 6 layers on the bottom and 4 on top and brushed each layer with olive oil before adding the next. Add your filling, then make 4 indentations in the top and crack in the other 4 eggs. If you feel there is too much white you can get rid of some by letting some run off as if you were separating the egg.

Add your pastry layers to the top then crimp the sides and brush the whole pie with beaten egg. Bake the pie for 45 minutes to 1 hour. It should be golden brown all over.

Savoy Slaw with Bacon and Walnuts

The crinkled heart of a young savoy is delicious freshened up with a dressing of yoghurt, mustard and lemon; raw brassica never tasted so good. This may be down to the addition of grilled pork and its fat.

I like this with mackerel; a freshly grilled fillet is nice but to be honest, on a school night, a couple of smoked pieces from a packet is often all I can manage.

Savoy slaw with bacon and walnuts

1 savoy cabbage, tough outer leaves and core removed and finely shredded
1 small red onion, halved and cut into fine slices
200g Greek yoghurt
1 tablespoon wholegrain mustard
100g walnuts, toasted and roughly chopped (by ‘toast’ I mean put them in a dry pan on a low heat and shimmy them around until they start to smell fragrant. Take care not to burn them).
6 rashers streaky bacon
Pinch of caster sugar
Juice of half a lemon

Grill the bacon until crisp and then chop into small pieces.

Mix the shredded cabbage, onion, bacon and walnuts together in a large bowl. Mix the yoghurt, mustard, sugar and lemon juice together well then add to the cabbage mix and combine. Season with salt and pepper.

Hummus and Pitta

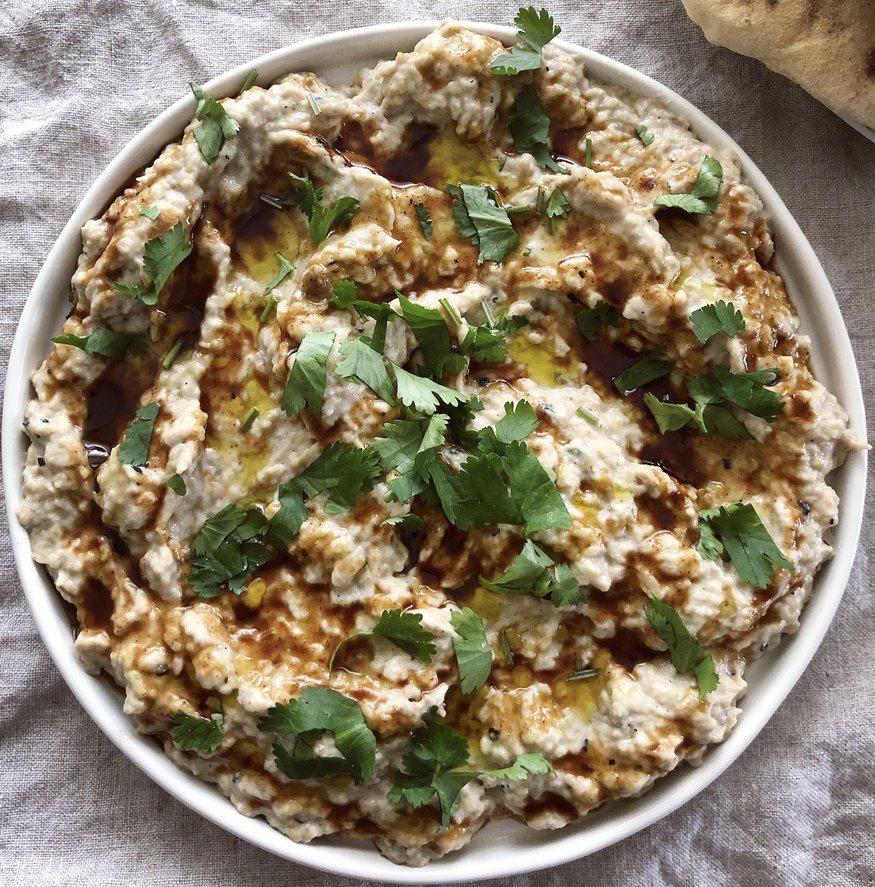
You’ve probably heard that it is really easy to make good hummus at home and that, once you’ve tried it, you’ll ‘never go back’ to the shop-bought stuff. This is rubbish. I’ve rarely met anyone in real life who hasn’t told me that their experiences of making this classic Middle Eastern chickpea slurry at home were wildly disappointing. Recipes say things like, “for a super simple, healthy supper, just whizz two tins chickpeas with 1 clove garlic, 2 tablespoons tahini, juice of 1 lemon and a glug of olive oil.” It absolutely never comes out right. It’s never smooth enough and the flavours always seem out of kilter.

I’ve been trying to make a decent version myself for years because, once I fail at something in the kitchen, I’m like a dog with a bone. Steingarten-esque in my persistence of perfection. I think I’ve cracked it but let me warn you now, you’ve got to put a little work in to get the results.

I’d been approaching the task in entirely the wrong way, viewing it as a five-minute job – whack it all in the blender and hope for the best. Really good hummus, though, is actually a labour of love.

It is essential to cook your own chickpeas. Tinned ones pong, their flesh weak and pallid. Soak the dried ones overnight in cold water with bicarbonate of soda then cook the next day; a 10-minute rapid boil and skimming plus an hours simmer should do it. If you think that’s a lot of effort then brace yourself for the next step. The creamiest texture comes from individually popping each chickpea from its papery skin; it is these tough coatings that make the hummus coarse. We’re talking one episode of Come Dine with Me (new format) to skin those suckers.

Another tip is to use the smallest chickpeas you can find. I’ve taken to these brown ones recently, they’re small and nutty, although the end result is never quite as smooth as with white peas. When it comes to blending, I do the tahini and lemon juice first, otherwise, the tahini can clump and never distribute properly and then add the chickpeas in batches with a splash of water each time. Again, it all helps to make a smooth paste. The rest is down to personal taste although of course, it’s better to add a little at a time rather than try to counteract a dominant flavour later.

Pitta Bread

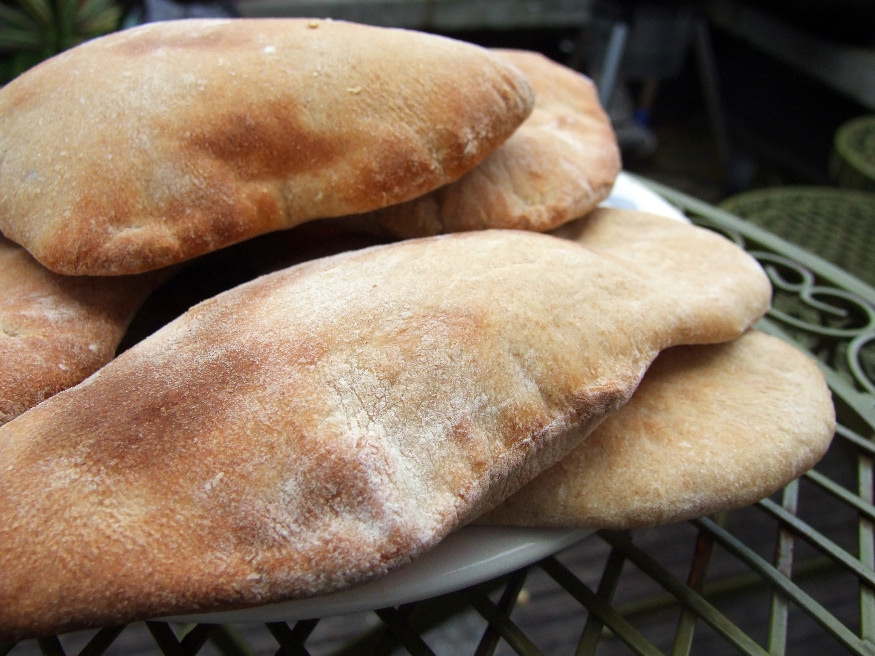
Buoyed by my success with the hummus, I decided to have a go at making pitta bread. They only needed an hour to rise and puffed up really well. Unlike the hummus, very easy to get right first time and honestly, so much better than shop-bought. Really.

Hummus and Pitta Bread Recipes

This makes a big batch but let’s face it, if you’re going to faff about skinning chickpeas then you may as well make it worth your while.

325g dried chickpeas (they will double in weight once cooked)
1 teaspoon bicarbonate of soda
5-6 tablespoons tahini
1/2 teaspoon ground cumin
Juice of 1 lemon and possibly the juice of another (at least half)
2 fat cloves of garlic
1 heaped teaspoon fine salt
Olive oil

Parsley and paprika to garnish (optional). Toasted pine nuts or whole chickpeas are also good on top.

Begin the day before, by soaking your chickpeas in cold water with the bicarbonate of soda and leaving them overnight. The next day, rinse them, cover with cold water (no salt) and bring to a rapid boil and leave for 10 minutes, skimming off the scum that rises to the top. Drain then re-cover with water and simmer for an hour – 90 minutes, until they are soft and squish easily between your fingers.

Once cool, pop each one from its skin. It takes a while but I found plonking myself in front of the telly eased the pain.

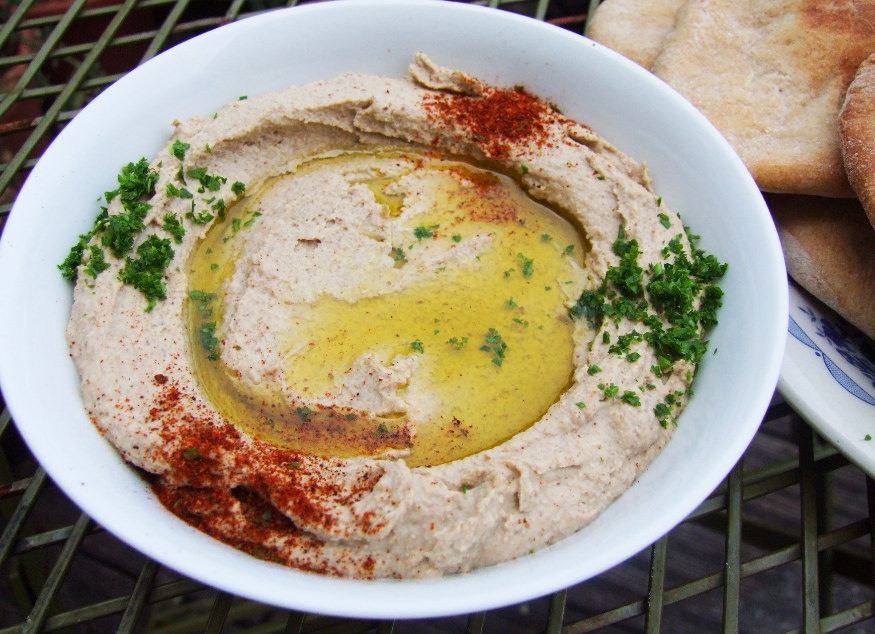
Whizz the tahini and juice of 1 lemon together in a blender until well combined, then blend the garlic and salt into the mix before adding the chickpeas, a handful plus a splash of water each time. When all your chickpeas are blended in, add a good glug of olive oil (hold the bottle over the blender for a couple of seconds), turn the blender on and leave it for a few minutes. Adjust the flavours to your taste. I find it always needs more lemon juice.

Garnish with more olive oil, parsley and paprika.

Pitta Bread (makes eight)

I used part wholemeal flour, firstly because I had some hanging around and secondly for a bit more of a robust flavour. I think it works well but you can use entirely strong white bread flour if you prefer.

220g strong white bread flour
150g whole wheat flour
1 heaped teaspoon fine salt
1 tablespoon caster sugar
1 x 7g sachet fast action dried yeast
300ml warm (not hot) water
2 tablespoons olive oil

Add the yeast to the water and leave in a warm place for about 10 minutes until frothy. This means that the yeast is activated.

In a large bowl combine the flours, salt, sugar and oil and then add the yeasty water. If you have an electric mixer with a dough hook then simply set the lot on the lowest speed for 10 minutes, adding more water if necessary, until smooth and elastic. If you don’t have a mixer, combine the mix until it comes together into a ball of dough. Again, add a little more water if necessary to bring it together. Knead on a lightly floured surface for 10 minutes until smooth and elastic.

Rest the dough in a lightly oiled bowl (so that it doesn’t stick) and cover with clingfilm or a damp tea towel and leave in a warm place until doubled in size – mine only took an hour.

After this time, knock the dough back a little by punching it a few times then divide it up into 8 pieces. Roll each into a ball, then recover for another 15-20 minutes. Preheat the oven to 200C and preheat a baking stone or baking tray (turned upside down).

On a lightly floured surface, roll out each dough ball into a pitta shape – each should be about 0.5 cm thick. Bake them on the stone or baking tray for about 5 minutes, or until golden and puffy. They are best eaten warm from the oven and they re-heat well.

Grilled Aubergines with Tahini Sauce

Nearing the end of  The Big Lunch* cook-off, we found ourselves flagging; we’d been cooking for 10 hours straight, only pausing to open the odd beer. There were plans for an aubergine galette and I’d toyed with the idea of baba ganoush but when it came down to it, a super quick and simple recipe was needed. I’d made this a few weeks earlier; the cool, sesame-laced yoghurt lifts the meaty aubergine into salad territory – perfect for a hot summer’s day.

It disappeared quickly at the lunch, with one guest declaring it “one of the best pieces of aubergine” he’s ever eaten. It’s the kind of dish you bust out at a BBQ; minimal effort, looks pretty and much more interesting than your average salad. You could even grill the slices on the BBQ first for extra smoky flavour.

Grilled Aubergines with Yoghurt-tahini Sauce

Will serve four people as part of a BBQ or with other salads

2 very large aubergines, sliced into 2cm thick slices

500g full-fat Greek yoghurt
3-4 tablespoons tahini paste (or to taste)
1 large clove garlic, crushed
Juice of 1 lemon
A handful of mint leaves, finely chopped
A handful of coriander or parsley leaves (or both) finely chopped
Olive oil, for grilling

Begin my brushing the aubergine slices with oil and seasoning lightly with salt and pepper. Either grill them for 5-10 minutes each side under a hot grill or do the same on a BBQ – they should be golden brown and slightly shrivelled.

While this is happening, mix the yoghurt, tahini, garlic, lemon juice and herbs (reserving a few herbs for garnish) together in a bowl. Season with salt and pepper and adjust any of the ingredients as you see fit (you may like more tahini for example). If you feel the dressing is too sour, I find a pinch of sugar never hurts. Don’t feel guilty.

When the aubergines are ready, arrange them on a plate and drizzle over some of the yoghurt sauce. Scatter with more herbs and add an extra drizzle of olive oil if you fancy it.

* The donations have continued to trickle in and so in addition to the £200 odd raised on the day, there’s another £115 plus Gift Aid on the Just Giving Page. Thanks so much to everyone who donated.

Labneh

Labneh is strained yoghurt. Now now, do bear with me, it’s delicious. You mix regular, full-fat Greek yoghurt with a scant half-teaspoon of salt then bung it in some muslin and hang it over a bowl overnight. Drip, drip, drip. In the morning all the whey has drained away and what remains is a creamy thick ‘yoghurt-cheese’. It’s magic scooped up with warmed flat breads and sprinkled with za’atar, smeared in a kebab, or rolled into balls, covered with herbs and stored in olive oil.* I’ve taken to eating it plain on walnut toast first thing too; the contrast of hot toast and cool, tangy topping really floats my breakfast boat.

Popular in the Middle East and South Asia, it pops up in mezze, sandwiches, dips and even desserts. It’s basically a flavour whore and will take whatever it can get.

When it comes to comfort snacking, I tend to top it with my salty little friends the anchovies; briny, umami-packed miniatures. First it was the boiled egg with anchovy dippers, then the baked eggs with the same. Now I can’t get enough of them slivered and draped over the labneh, prickled with chilli and sprinkled with whatever herbs are lying around, or perhaps some papery shavings of red onion.

Labneh

Despite labneh’s surprising richness, I like to reason with myself that it’s fairly healthy; not that the fat content of anything has ever held me back, as I’m sure you’ve come to realise. A drizzle of olive oil is all that’s needed to counter the balance back towards gluttonsville though, so don’t worry about that.

Labneh with Chilli and Anchovy

500g good quality, full fat Greek yoghurt (I find Total is the best brand)
Juice of 1/2 lemon
1/2 teaspoon fine salt
Anchovy fillets, sliced in half lengthways
1 small mild red chilli, finely chopped
A few leaves parsley (or other herbs), finely chopped
Black pepper
Good bread, toasted, to serve

Muslin and string to strain the yoghurt

Mix the yoghurt with the salt then line a bowl with the muslin and dollop the yoghurt in the middle. Gather up the muslin then tie the top with string and hang somewhere (preferably cool, although I’ve never had a problem in my kitchen), over a bowl, overnight. In the morning remove from the muslin, mix in the lemon juice and refrigerate until needed. It will last a few days.

Spread on hot toast and top with the anchovies, chilli and herbs. Some black pepper and a drizzle of olive oil won’t go amiss.

* I’ll dig out a jar and post a piccy and recipe up for you; it’s really beautiful.

Black Pepper Tofu

This dish is intense. The foundation of the sauce is 12 sliced shallots; that’s a lot – a whole lot of shallot. There are 12 cloves of garlic, plus five whole tablespoons of crushed black pepper. It’s hot – really hot; I thought my face was going to fall off, and that’s even without the eight recommended chillies. I’d overlooked this part of the recipe and had just one lonely, shrivelled specimen in the fridge. Feeling lazy I thought, sod it, I’ll just add some chilli flakes at the end if its not hot enough. I seriously cannot even imagine the raging inferno had I used even three or four. That pepper alone is something special.

It’s amazing though, and hugely addictive. The first key to its success is getting that sleek, healthy tofu, and giving it a damn good frying in hot oil until a golden crust forms all over. It’s then added back to the shallots, garlic and chilli, simmered with three kinds of soy sauce (light, dark and sweet) and garnished with spring onions. Bob’s your uncle.

This dish needs to be eaten fresh and hot; it’s the kind of thing you think will taste awesome cold for lunch the next day – it doesn’t. It’s a shadow of its former self; just a warning.


Recipe here. Go! Make it!

Spam Mi (Banh mi with Spam)

Maybe you are turning up your nose right now, before wistfully reminiscing about the sophisticated little you tugging on your granny’s starched apron strings while she whisked resplendent glossy meringues and taught you all the secrets of perfect pickles. Well while you did that, I was eating SPAM (actually, my nan made stellar pickles and my parents are great cooks but that’s not the point); for me and my childish palate, highlights were salty chopped pig from a tin, and Mr. Brain’s faggots.

As I got older I turned my back on SPAM, deciding I’d grown out of it; I was embarrassed to admit it had ever passed my lips. It was like ditching an old mate because you moved up to big school and decided they’re not good enough to fit in with the cool kids. Harsh. It’s only in recent years I’ve come to terms with the fact that it’s OK to eat something and damn well enjoy it once in a while, even if you know deep down it’s pretty wrong.

SPAM is meat in a can; let’s think about what that means. I’m aware that it doesn’t contain the finest cuts of rare breed swine with a royal bloodline and that what it does contain is salty as hell, conceals a significant proportion of your daily fat intake and slides out of the can with an alarming jelly-lubed slurp. There’s no denying though, that on certain days in certain ways, I’ll chomp my way down memory lane and like it.

And you know what? It’s amazing how many people share in my occasional appreciation. Simon Majumdar for example, revelled in his opportunity to judge at the SPAM cook of the year awards, while my good friend Lizzie introduced me to one of her family’s favourite ways to eat it. Su-Lin serves up a classic SPAM, egg and rice, Sunflower makes some stonking Chinese pancakes and the Hawaiians are mad for SPAM Musubi.

When the people at SPAM offered to send me a cooking set, I accepted with the enthusiasm of the ten year old me. In it were such treasures as a SPAM apron; a SPAM oven glove; two pens (appropriately embellished, obviously); a cook book; a spatula and of course, a tin of SPAM. In return for this gift, the official people have asked me to come up with a recipe. I thought about the best way to use it. It’s a luncheon meat and the only really acceptable time to eat luncheon meat for me is in either something Chinese-style or in a dish similarly spiced, funked and/or pickled…

Enter the SPAM mi (that’s a bánh mì using – you’ve guessed it – SPAM). I smothered slices with a mixture of crushed garlic, black pepper, fish sauce and sesame oil before frying until crisp and stuffing into warmed baguette piled high with familiar bánh mì garnishes. It really hit the spot.

The taste and smell of the pink fried slices transported me back in time almost instantly, but my own personal history with the mystery meat is minuscule compared to the bigger picture. World War II troops practically lived on the stuff and in Hawaii, they still do the same today, feeling sufficiently passionate to celebrate it with the annual Waikiki SPAM Jam festival. It’s even on the menu at Maccy D’s. There’s a fan club, an outrageously famous comedy sketch, a cook book and a museum. While I probably limit my own consumption to a couple of tins per year, it’s a guilty pleasure that I’m happy to embrace because let’s face it, sometimes only the saline whack of a low budget cured pork product will do.

SPAM Mi

340g SPAM (can size), cut into 1cm slices
2 tablespoons coarse, crushed black pepper
2 tablespoons fish sauce
1 teaspoon sesame oil
1 large clove crushed garlic

Garnish

Coriander leaves
Mint leaves
Sliced red chilli
Thinly sliced red onion or spring onion
Mayonnaise
Thin, de-seeded cucumber slices
Carrot and daikon pickle (there are loads of recipes out there – it’s really about adjusting to taste. Here’s one from Viet World Kitchen).

Baguette (to stuff it all into. Apparently the best ones are made from rice flour but I’ve never found one so I just use a normal one and scoop out a bit of the insides if it’s really dense).

For the SPAM, mix the pepper, fish sauce, sesame oil and garlic together well then rub over the SPAM slices and allow to marinate for an hour. After this time, fry the slices in a small amount of vegetable oil until golden and crisp on both sides. Drain on kitchen paper.

To build, lightly warm your baguette in the oven and then smear on the mayo, add the SPAM and all your other ingredients as desired.

Rhubarb Crumble Ice Cream

Rhubarb? Check. Little doughy crumble pieces? Check. Complete absence of faffy custard base? Checkycheck check. It’s basically perfect. Not that I’m going to take the credit of course, that must go to Saint Delia. Her recipes always work.

You roast your barb with sugar (I added a splash of rosewater – orange blossom water would also be nice) then purée and mix with cream before churning, adding the crumble pieces at the last minute. The finished ice cream has an aerated cloud-like texture and oh my goodness is it ever creamy and tart and spun through with squidgy cookie-dough-like pieces.

Next time, I’ll use a bit less sugar, to let just a smidge more of the barb’s characteristic tartness to come through and steer it in a slightly more grown up direction. Not too grown up though. I mean, it’s ice cream after all and for me, it’s all about the memories. Hunched up in a secret corner somewhere, knees up to my chest, bowl balanced on top, performing the same strange ritual of mashing and moulding and eating that I always, always did as a child. I marvelled at its magical soothing properties; the only thing I could ever eat when ill (or pretending to be ill). It was about the excitement of learning every new flavour and the painful learning curve that is realising how to avoid a brainfreeze. Now it’s more about sensitive teeth and weight gain. It’s definitely worth that extra run every week though, and I know I’ll still be hoovering it up when I’ve no longer got any of my own teeth left. Just think – if I leave out the crumble bits, I won’t even need them.

Rhubarb Crumble Ice Cream by Delia Smith

(original recipe here)

For the ice cream:

1 lb (450 g) trimmed rhubarb
8 oz (225 g) sugar
1 tablespoon lemon juice
15 fl oz (425 ml) whipping cream
A splash of rosewater or orange blossom water (optional)

For the crumble:

3 oz (75 g) plain white flour
2 oz (50 g) butter
2 oz (50 g) light brown muscovado sugar
½ level teaspoon ground ginger

Combine all the crumble ingredients in a bowl and use your hands to rub the butter into the flour as if you were making pastry. You want small, pea sized pieces of dough. Sprinkle these evenly into a baking dish and put to one side.

Cut the barb into 1cm lengths and put in a shallow baking dish, then sprinkle over the lemon juice and sugar mixing well. I added a splash of the rosewater at this point. Put the dish on a low shelf in the preheated oven and the crumble mix on the top. The crumble needs to be baked for 10 minutes then removed and left to cool. The barb may take another 15-20 although I found this slightly too long so remember to check it. When it has cooled slightly, blend it to a purée.

Break up the crumble into pea sized lumps again.

Stir the cream into the purée then churn in an ice cream maker until it has the texture of softly whipped cream, then scrape it into a plastic tub (with a lid) and stir in the crumble pieces quickly, before freezing.

If you don’t have an ice cream maker, do as Delia says and “freeze the cream and rhubarb mixture (without the crumble) in the box for 3-4 hours, then whisk and return to the freezer. Re-freeze for a further 2 hours, then whisk again and stir in the crumble before the final freezing. If frozen solid, the ice cream will need to be transferred to the main body of the fridge for about 25 minutes before serving to allow it to become soft enough to scoop.”

Two Garlic Soup

I actually can’t stop eating outrageous amounts of garlic. One or two cloves is no longer an acceptable amount. The obsession gently rumbles on. In contrast, I like to think that my immune system is racing ahead, building lymphocytes faster than you can say ‘flu’. In reality, rather than glowing with shiny health I’m sure I just gently whiff of garlic. Constantly.

Gorgeous little soup though, even if it is rather rich. I based it on this one but reduced the amount of regular cloves, omitted the sage and added a small handful of the wild garlic I picked at Riverford Farm. The soup is interesting because it goes from looking like hot dishwater with a few pearly cloves bobbing on the bubbles to a creamy, velveteen elixir; pretty amazing considering it doesn’t contain even the merest smidgen of cream. It is instead enriched with the rather wanky sounding ‘binding pomade’ – a combination of eggs, Parmesan and olive oil. You slowly whisk the oil into the cheese and amber yolks, then a ladleful of the broth into the ‘pomade’ and then the whole lot back into the broth. It’s really rather a calming and leisurely process. I used the time to reflect on important issues such as where I might have left the key for the bin room, whether it was too early to open a beer or not and when I might find time to make Ottolenghi’s caramelised garlic tart. Actually that last one really is important.

The original recipe suggests pouring the finished soup over day-old pieces of baguette, which I did, but found the combination of rich soup and soggy bread paste rather unpleasant. Really unpleasant, actually. Like eating a piece of sodden bog roll. The second helping was much more enjoyable with a bit of traditional dunking and of course, the terminal wiping of bowl.

It is extremely garlicky but deeply savoury; the wild garlic brings its sprightly green bite. I would advise you to use good Parmesan, as it makes all the difference and a nice grassy olive oil that isn’t too strong. The finished thing is really rather pretty and spring-like I think, with a cheeky richness that makes a stealthy approach, soothing and satisfying with every mouthful.

Two Garlic Soup

(adapted from this recipe)

950ml water
1 bay leaf
1 teaspoon fresh thyme
6 cloves of garlic, chopped
1 teaspoon salt

For binding

1 egg
2 egg yolks
40g parmesan
Pepper (white might be nice actually)
50ml olive oil

Bring the water to a boil in a pan and add the thyme, bay leaf, garlic cloves and salt. Bring to the boil then turn down and simmer for 40 minutes. Strain into a bowl, then remove and discard the bay leaf and return the garlic and the infused water back to the pan but off the heat. Taste and add more salt if you like but remember the Parmesan is coming later.

Whisk the egg, the yolks, Parmesan and pepper together until creamy. Slowly drizzle in the olive oil, whisking constantly, as if you were making mayonnaise. Then, take a ladleful of the broth and do the same, whisking it really slowly into the oil mixture. Now tip the whole thing into the remaining broth in the pan and set over a low to medium heat, stirring all the time until it starts to thicken. Heidi mentions in her recipe that the creator of the original recipe, Richard Olney, says that it should be cooked, “just long enough to be no longer watery” but I agree with her that it is nicer when it’s a bit thicker.

Serve over bread or not – up to you. I prefer it not. I drizzled a bit more oil and grated a little extra cheese on top.

Other garlicky goodness:

Chicken with 40 cloves of garlic
Garlic Curry