Hot Wings

This isn’t turning into the grilled meat blog, I promise. It’s just, well, it’s summer isn’t it and I’m either having or getting invited to a lot of barbecues. Wings always fit the bill because they’re cheap, cook quickly and have a lot of fat for their size, which means loads of crisp, charred skin. Tick, tick and tick.

Thinking about it, this is probably the unhealthiest of all ways to cook wings without deep frying them first.* They’re hot wings you see, which means they’re bathed in hot sauce cut with a load of melted butter.

Hot Wings


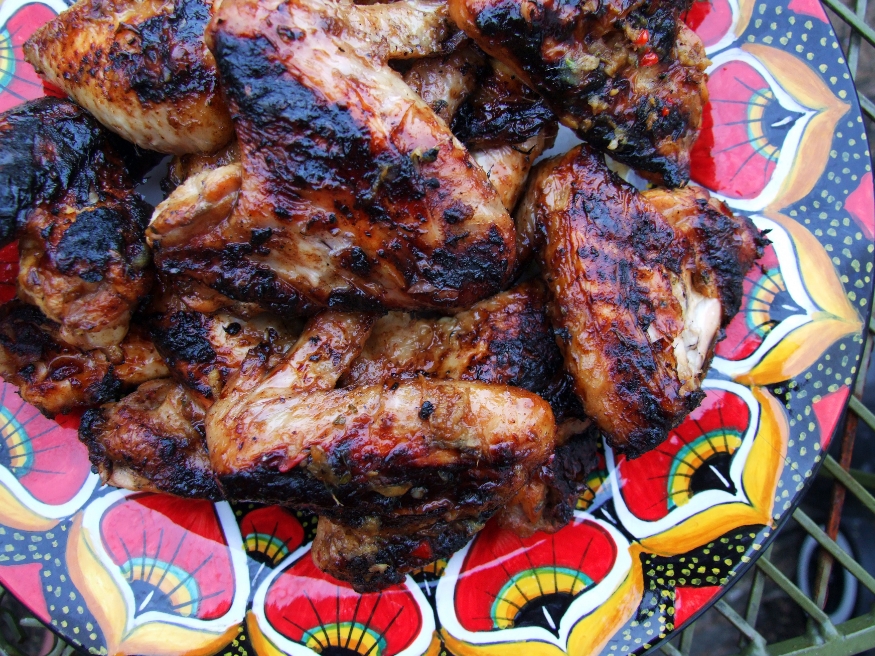
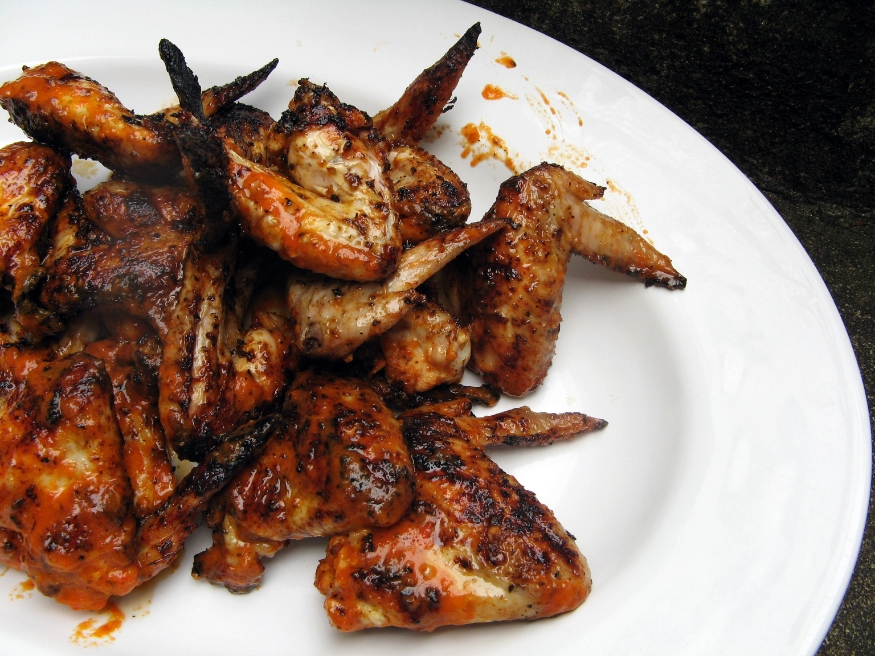
But I’m getting ahead of myself. It begins the night before with a marinade made from onion, garlic, thyme, oregano and paprika. Then right before cooking you melt the butter with the hot sauce, dunk the wings in half of it and grill them, reserving the other half for later. When they are charred and cooked through, you dunk each once again in the sauce, leaving a sweet-spicy coating, silken with butter, which stains your fingers and face bright orange.

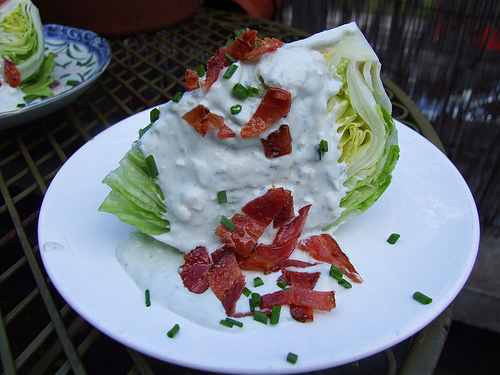
These went down well at the BBQ but they weren’t hot enough because I ran out of hot sauce. Traditionally you would use Frank’s to make hot wings; I didn’t as I needed to use up my homemade scotch bonnet sauce but I didn’t realise quite how much the butter would tame it. Still, easily remedied in future. I served them, as is traditional, with celery sticks and a blue cheese dip, which make for a cooling interlude between each sticky wing.

Hot Wings with Blue Cheese Dip

For the marinade

30 chicken wings
1 tablespoon salt
2 cloves garlic, crushed
1 onion
3 teaspoons thyme leaves
3 teaspoons dried oregano
1.5 teaspoons black pepper
1 teaspoon paprika

For the sauce

250g butter
Hot sauce

Sticks of celery and blue cheese dip, to serve.

Process the onion and garlic in a blender with 1 tablespoon water until you have a puree. Put this puree in a bowl with the salt, thyme, oregano, pepper and paprika. Put the chicken wings in a large dish and rub the marinade all over them, giving them a good rub to make sure each wing is well coated. Refrigerate overnight.

When you want to cook the wings, remove them from the fridge to come to room temperature and start your BBQ. When the BBQ is ready, melt the butter in a small pan and stir in hot sauce to taste. You’ll want it nice and spicy. I only had half this kilner jar of sauce and if you’re using a shop bought sauce you’ll need to experiment. Don’t worry though, it’s not exactly rocket science. Split this sauce into two bowls.

Dump the wings in one of the bowls and mix to cover with the sauce. Grill the wings until charred all over and cooked through. When cooked, dip each into the remaining bowl of sauce.

Serve with sticks of celery and the blue cheese dip.


Ham Cooked in Coca Cola

As you can probably tell, I’m into American food at the moment; perhaps the pulled pork with Boston baked beans or wedge salad with blue cheese dressing gave it away? Cooking ham in coca-cola is one of those ideas that sounds just outrageous but is actually brilliant. I’ve cooked it many times now. The cola imparts, as you would expect, a sweet and subtly spiced flavour to the salty ham and I finished it with a sticky glaze of molasses, mustard and rum, which melted into a glistening varnish.

While pondering how to eat it (it takes 2.5 hours to cook, I pondered a lot), my thoughts inched ever closer to the idea of a towering sandwich; a Man vs. Food style beast topped with deep-fried pickles and hot sauce. Yes, deep-fried pickles. I first saw this genius idea on Homesick Texan, a blog partly responsible for this American food phase. Pickles? Good. Deep-fried stuff? Gooood. Together? BOOM! I decided on a combo of traditional dill pickled cucumbers (I always use the Krakus brand since my friend’s Polish mother recommended them – so crisp), pickled chillies and those sweet little silverskin pickled onions which are totally under-rated. A crunchy cracker base (base, base, base) mixture surrounds juicy, crisp pickle. They made an excellent snack and a serious sandwich garnish that says I Mean Business.

The ham was easily torn apart with frantic fingers and stuffed, chunk on juicy chunk into a roll. We topped each with a selection of the pickles and sauce made with 50% home-made hot sauce and 50% ketchup. Oh my. This is what Sundays are all about.

Ham Cooked in Coca Cola with a Molasses Glaze

1 x 2kg ham. Mine was was just over this weight (I used a boneless one; a bone will add more flavour but you need to account for the weight)
1 x 2 litre bottle full-sugar coca cola
1 white onion, peeled and cut in half

For the glaze

100ml molasses
2 tablespoons sugar
2 tablespoons Dijon mustard
2 tablespoons dark rum (or whisky)
Cloves

Put the ham in a large pan, skin side down. Cover it with the cola and add the onion. Bring to the boil then reduce to a good simmer. Put a lid on, but not tightly; rest it so you have a teeny gap at one side. Cook for 2.5 hours (or just under if your ham is exactly 2kg).

When the ham is nearly finished cooking, preheat the oven to gas 7/210C

When the cooking time is up, drain the ham, put it in a dish then remove the skin so that you are left with a thin layer of fat. Score the fat into a criss-cross diamond pattern. Mix the glaze ingredients together well and brush the glaze all over the ham. Push a clove into the points of each diamond. Cook it for 5 minutes, then brush again with the remaining glaze. Cook for a further 5 minutes then remove the ham from the oven and allow it to cool.

Deep-fried pickles

5 good sized Krakus brand pickled cucumbers, cut into inch-thick slices
6 pickled chillies
6 silverskin pickled onions

1 egg
1/2 cup buttermilk
1/2 pack Matzo crackers (about 75g. Matzo are very similar to the ‘Saltines’ that Homesick Texan uses)
1 scant teaspoon paprika
Salt and pepper
Flour

Vegetable or groundnut oil, for deep-frying

Preheat the oven to Gas1/140C

Cover a plate with flour and sprinkle with pepper and paprika. In a bowl, mix the egg and buttermilk. Put the crackers in a food processor and pulse to crumbs; spread this mixture on another plate. Dip each pickle first in the flour, then the egg, then toss about in the crackers. Set aside. Heat your oil for deep frying in a sturdy pan until it shimmers. You can test if it is ready but putting a little piece of bread in – if that starts to properly sizzle and fry, you’re good to go.

Fry the pickles in small batches; do not crowd the pan. Put the cooked pickles on a plate lined with a couple of sheets of kitchen paper and put in the oven to keep warm while you cook the rest.

5926105625_0b6a3ac749

I just love how the Americans cut a big wedge of iceberg, drench it in blue cheese dressing and then call it a salad. Respect.

I’m rather fond of the poor old iceberg. It doesn’t have any flavour to speak of but as a big ol’ wedge of crunch, no lettuce does it better. So, you take a quarter of the lettuce and drench it; yes, drench it, in a blue cheese and sour cream dressing. Dribble. You’ll need something to offset all that richness and tang though, so why not sprinkle on a handful of sweet ‘n salty pig-candy pieces? Oh yes indeedy. Picture this: kerrrunch down through that wedge; creamy, salty; nuggets of blue cheese sneaking into every layer but then, hang on what’s this? Chewy shards of sticky, streaky candied bacon, that’s what. Salad garnish crack.

Caramelised walnuts would make a lovely alternative to the bacon but I wasn’t allowed to make those because that would have taken up time I could have been using to make more candied bacon.

Wedge Salad with Blue Cheese Dressing and Candied Bacon

(serves 4)

1 iceberg lettuce (try to get a nice round one so your wedges look good)

150g blue cheese (I used Roquefort)
100ml sour cream
100ml natural yoghurt
1 clove garlic, crushed
1 tablespoon lemon juice (plus extra just in case; I found I wanted a little more)
1 tablespoon chives, snipped with scissors

For the candied bacon

8 rashers streaky bacon
1-2 teaspoons of sugar per bacon rasher, depending on size

First candy the bacon by laying the rashers out on a baking tray and sprinkling the sugar evenly over them. Whack them under a hot grill until crisp and caramelised. Wipe the rashers around in the stick juices that have accumulated in the tray, turn them over and cook the other side. Watch them like a hawk once you’ve turned them as they will caramelise extremely fast. Once cooked, remove and let cool on a wire rack. Don’t let the pieces touch each other as they will stick together.

Crush the garlic with a teeny pinch of salt in a pestle and mortar until creamy. Blend the garlic with all the other dressing ingredients together in a bowl. You can do this with a blender if you like but I like my blue cheese dressing quite chunky so I mash it in a bowl to achieve the right consistency; it’s nice to get the odd nugget of cheese. Taste and add salt and pepper if you like; the cheese will already be quite salty. Taste again and add a little more lemon juice if you think it needs it.

Remove any manky outer leaves from your iceberg and quarter it. Wash it. Arrange each wedge on a plate, dollop on the blue cheese dressing. Cut the bacon into pieces and sprinkle over. Serve.

Three Mango Sorbet

That’s three different types of mango, not three individual fruits. I’m into combining different varieties of the same ingredient to maximise flavour, such as two-garlic soup and this cheese and onion tart which uses 3 types of onion. While browsing around in Peckham the other day I noticed the variety of different mangoes available. I usually stick to Alphonsos when making sorbet but these other types were so cheap I couldn’t resist; basically, because they were so ripe they were on the edge of going off. Perfect for making sorbet.

I wondered if the 3 varieties would combine to make one super-intense mango flavoured sorbet. The answer to this question is a whopping great yes. My boyfriend and I ate half the tub the first time we opened it which only leaves the other half for tonight. I am uncomfortable with the thought of being without the sorbet.

There’s something about mangoes that make them better than other fruit for sorbet-ing; they give a very silky-smooth texture which is more like ice cream than sorbet. Extremely satisfying. It’s relatively healthy too, using only 100g sugar. The rest is pure fruit and lime juice.

I should say that I made this in my shiny new Cuisinart ICE30BCU ice cream maker, which Cuisinart kindly sent me to try out (I’m a total whore when it comes to accepting kitchen kit for review). My old ice cream maker was a Magimix Le Glacier 1.1, which did my head in, not least because it had a tiny yet essential part which I (and loads of other people) lost on a regular basis. The Cuisinart model is large in comparison, but with a welcome sturdyness. It also has only 4 parts, large parts, which are easy to fit together. The bottom bowl still goes in the freezer but when it’s on, the bowl turns, not the paddle. This makes it much less likely to break. It takes no time to churn. In short, I love it. And that’s not just because it was free. If you don’t believe that last bit, you can see what I said about the free breadmaker.

So there.

3 Mango Sorbet

Er, 7 mangoes, different varieties. Sorry I didn’t weigh the flesh. We’re talking Alphonso sized mangoes here.
3 limes
100g icing sugar

Scoop the flesh from the mangoes into a blender. Add the sugar and lime juice and blend. You could then pass the mixture through a sieve to remove any fibrous bits but I didn’t bother. Tip into an ice cream machine and churn until frozen.

If you don’t have an ice cream maker, tip the mixture into a freezer-proof container and freeze. After a couple of hours, remove from the freezer and blend again. Freeze again. If you have time, repeat the process once more.

Watermelon and Vodka Sorbet

This recipe was inspired by my student days; vodka watermelons were very popular around that time and we spent days force funnelling the things until they were suitably saturated with the cheapest liquor we could find. A supermarket ‘basics’ brand or Glen’s being our budget poison of choice.

My tastes are a little more sophisticated nowadays (I said a little) and I’d like to tell you nothing but the finest went into this recipe but the truth is that the end of a bottle of Smirnoff was languishing so I used that. The vodka flavour wasn’t exactly pronounced though so my advice is as follows: get yourself a decent bottle then add a wee slosh on top of the sorbet in the bowl. Total refreshment, with a punch. Phwoar.

Watermelon and Vodka Sorbet

1.2 kg watermelon (that’s how much mine weighed after I’d removed skin and seeds)
3 tablespoons lime juice
200g caster sugar
3 tablespoons vodka, plus extra to serve
A few slivers of mint leaf, to serve (optional)

Cut the watermelon into wedges and remove the flesh from the skin with a knife. Chop into large slices and do your best to remove the seeds (the mixture will be passed through a sieve later so don’t worry about a few stragglers).

Put the watermelon chunks in a blender with the sugar and lime juice and blend to a liquid. Now pass it through the sieve into a bowl. Try to push as much of the melon pulp through as possible, not just the liquid. Churn the mixture in an ice cream machine until sorbet-like. Mine took about 20 minutes but my watermelon was well chilled, it could take half an hour.

To serve, let it rest out of the freezer for a good 10 to 15 minutes, otherwise it will just break up like a granita when you try and scoop it. Dribble a little vodka into the bowl and scatter on the mint, if using.

Sticky Rum and Scotch Bonnet Chicken Wings

I’m always thinking about the next thing I can sling on the BBQ. This weekend I fancied flavours of the Caribbean and my thoughts, naturally, turned to RUM. I used that as a boozy base for a marinade, then added a mixture of marmalade and honey, which caramelised on the grill and gave the stickiness I was after. Lime juice provided astringency, garlic and thyme fragrance and a scotch bonnet chilli, proper heat. A hint of allspice muddled nicely with the rum.

After playing around with a few variations, I’ve arrived at this recipe which makes a rather sexy pile of wings. The depth of a pirate-sized slug of Captain Morgan, sweet fruit, lip-tingling heat. Mmmm. Wings are excellent on the BBQ as they’re cheap, have a lot of surface area to hold marinade and they cook quickly, so you can get them nice and charred outside and juicy within.

I served this with a bowl of pineapple salsa, which compliments the booze, and a large kitchen roll. Sticky…

Sticky Rum and Scotch Bonnet Chicken Wings

(makes enough marinade for 10 wings)

10 chicken wings

2 tablespoons runny honey
2 tablespoons orange marmalade
A thumb sized piece of ginger, peeled and grated
50ml dark rum (I used Captain Morgan)
Zest and juice of 1 large lime plus 1 more for serving
2 cloves garlic, crushed
1/2 teaspoon allspice
1 scotch bonnet, de-seeded and finely chopped
1 teaspoon fresh thyme leaves
Salt

Mix all the marinade ingredients together in a bowl, stirring until well mixed and the marmalade is no longer lumpy. Pour about 3/4 of the marinade over the wings, mix to make sure they are well coated then cover and refrigerate overnight. During the day time, try and move the wings around in the marinade a few times if you can, it helps to get them nicely coated.

Preheat your BBQ and cook the wings, turning them often and brushing regularly with the remaining 1/4 of the marinade. Do this until all the marinade is gone, the wings are sticky, charred and cooked through.


Salmon Tartare

I’ve been enjoying the luxury of a few days off, taking full advantage of the fact that I can wander up to the fishmonger whenever I damn well feel like it. Yesterday, I craved something light but still a bit special; salmon tartare seemed to fit the bill.

I’ve long been of the opinion that salmon is best eaten raw. It has such a firm, silky texture and a clean flavour. When heat is applied, there is a very fine line between perfectly semi-translucent flakes and minging mush. This recipe is of course a fishy variation on beef tartare. The flavours are pretty much the same; tangy ingredients like capers and gherkins, herbs, onion and Tabasco all go as well with salmon as they do with beef, although you’ll want to skip the standard raw egg yolk. With fish, I think it’s nicer to cut chunks rather than mincing it quite small as you would with meat.

This is a lovely way to eat salmon in the summer when you want something cool and refreshing or can’t bear the thought of heat from a grill. Just make sure to buy your fish from a good fishmonger and let them know you’ll be eating it raw; although the citrus juice will partly cook the fish, you want the freshest piece possible.

I sometimes do a twist on this, swapping lemon for lime juice and using shallot, chilli, coriander, soy and sesame oil. If you try this variation, mackerel works really well in place of salmon.

Salmon Tartare

(feeds 1 greedy person)

200g salmon fillet, skinned (make sure to check with the fishmonger that it can be eaten raw)
1/2-1 teaspoon red onion or shallot, very finely chopped
1/2 – 1 teaspoon capers, very finely chopped
1/2 – 1 teaspoon parsley, very finely chopped
1 small gherkin, very finely chopped
A squeeze of lemon juice
A few shakes of Worcestershire sauce
A few shakes of Tabasco
Salt and pepper

Chop the salmon into small chunks. Mix in all the other ingredients then cover and let sit for about 10 minutes. Stir again and serve with toasted rye or other bread. You may want to add more condiments after tasting.


Cheddar Cheese and Onion Tart

I pride myself on being able to make dinner out of what looks like nothing. I get into this zone where I think I’m in some kind of Ready Steady Cook-style competition and get all excited about how I can make a 3-course dinner out of an old bag of nuts and an egg. I didn’t make a 3-course dinner, I just made a tart, but still.

It’s good for using up any odds and ends of cheese, this tart. Chuck ’em all in there. I used the fading remains of a block of cheddar plus 3 types of onion: red, white and spring. The pastry was shop-bought, knocking around in the freezer. It was rich, filling and mmmm cheesy. Not bad for a bit of fridge foraging.

Cheddar cheese and onion tart

150g cheddar cheese, crumbled
2 large red onions, sliced into thin half moons
2 medium white onions, sliced into thin half moons
4 spring onions, finely chopped (white and green parts)
1 clove garlic, crushed
1 sprig rosemary (or thyme), leaves removed and finely chopped
2 eggs
100ml double cream
250g shortcrust pastry
Salt and white (or black) pepper

This recipe fills a 24cm tart dish.

Begin by caramelising the onions. Heat 2 tablespoons of vegetable or groundnut oil in a heavy based frying pan and add the red and white onions. Once they are sizzling, turn the heat down as low as possible and let them cook gently for about an hour, stirring every so often, until very soft and caramelised.

Preheat the oven to 190C/fan 170C/gas 5. Roll out the pastry to fit the dish and carefully lay it in, covering the base and sides. You want the pastry to overhang the sides by a couple of centimetres, as it will shrink during cooking. Make sure to patch up any holes. Fill the pastry base with baking beans (or dried beans or rice) and cook for ten minutes before removing from the oven and setting aside.

Mix the cheese with the spring onions, rosemary, eggs, cream and caramelised onions when ready. Season with salt and white pepper. Pour the filling onto the tart base and spread evenly. Bake for 25-30 minutes until golden brown.

Serve warm or cold with a sharp green salad.

Brown Bread Ice Cream with Raspberry Jam Ripple

Brown bread ice cream might sound weird but it’s actually one of the best flavours ever invented. Fact. Crumbs are caramelised in the oven with brown sugar and butter until gooey malt; the edges crisp and the centre remains soft so the final effect is like Ben and Jerry’s cookies n cream with chewy, dough-like pieces flecked throughout.

I got thinking along the lines of toast and jam; lots of nutty caramel from the crumbs and a ripple of sweet (high-fruit) raspberry jam running through. This is about as old English as it gets: a Victorian recipe with a ripple in it.

Brown bread ice cream with a raspberry jam ripple

(I used Keiko’s recipe as a starting point)

4 medium egg yolks
45g caster sugar
1/2 tablespoon vanilla paste (I used Nielsen-Massey vanilla paste from a jar but you can use half a vanilla pod or a little vanilla extract)
80g crust-less wholemeal bread (make sure it doesn’t have any seeds)
1 teaspoon cornflour
250ml semi-skimmed milk (use whole if you want to but I don’t think it necessary for this recipe)
40g butter
50g light brown sugar
250ml double cream
High-fruit raspberry jam (not too much sugar basically), for rippling

Preheat the oven to 180C

Whiz up the bread to make crumbs. Melt the butter then mix it with the crumbs and light brown sugar. Spread this mixture out on a baking sheet and bake for about 15 minutes, until the crumbs are crisp. They may remain a bit soft and chewy in the middle but this is a good thing. Allow them to cool completely then break them up into crumbs again; make sure to leave some big bits.

Pour the milk into a heavy-based saucepan, add the vanilla paste and bring to the boil. Remove from the heat and leave for 15 minutes to infuse.

In an electric mixer or in a large bowl with a hand whisk, beat the egg yolks, sugar and cornflour until thick and pale. Pour over the hot milk very slowly, whisking constantly. Return the mixture to the pan and cook it over a very gentle heat, stirring all the time. After a while the custard will begin to thicken slightly; when it coats the back of a spoon it is ready. That’s at 80C if you have a thermometer. Cover with a cartouche of greaseproof paper and leave to cool.

Stir the cream into the custard, tip into an ice cream machine and churn until thick. Stir the crumbs into the mixture, churn for 5-10 minutes until ready to serve. If you let your ice cream get too thick before you’ve added the crumbs, just stir them in by hand. Tip your ice cream into a freezer proof tub. If your ice cream is rather soft at this point, stick it in the freezer for an hour before adding your ripple. To add the ripple, take a tablespoonful or so of the jam and put in a bowl, mix it very well with a spoon to loosen it up. Put dollops of the jam on top of the ice cream and use a skewer to create a ripple effect.

Beetroot Fritters
I really do love a good fritter. Salt fish fritters for when I’m feeling very ‘Peckham’ or juicy corn fritters at the end of summer when there’s so much corn going cheap I can’t fry fast enough. Recently, I’ve been grating all those stubborn winter root vegetables into submission.

First to get the treatment were the beets; grated into the mix with whole chickpeas and sharp feta cheese, sizzled and drizzled with minty yoghurt.

The carrots got shredded in with plenty of fresh coriander leaves and spring onions, fried till orange-gold and served with a ginger-infused sauce. You can’t really go wrong with fritters; as long as the mixture isn’t too sloppy and your oil is hot you’re set for crisp and crunchy dinner satisfaction. A few singed edges here and there on your first batch won’t matter either.

Frittering root veg seems to bring out their sweetness, which is why the slightly sour yoghurt works so well as an accompaniment. I prefer the creamy full-fat Greek-style version but if you want to use regular or even (shudder) low-fat then cut back on the citrus juice, it will be too astringent otherwise. Seriously though, you’ve just fried vegetables in oil, enjoy them properly.

Carrot and Coriander Fritters with Gingery Yoghurt

(serves 4 as a starter)

500g carrots, grated
4 spring onions, finely chopped
2 cloves garlic, crushed
1 heaped teaspoon cumin seeds, toasted
Handful coriander leaves, chopped
3 tablespoons flour
2 eggs, beaten
Salt and pepper
Oil, for frying

For the yoghurt

250g thick natural yoghurt
Squeeze of lime juice
1 inch piece ginger

Once the carrots are grated, squeeze them to extract as much juice as possible. Mix with the rest of the fritter ingredients. Squeeze some of the mixture together in your hands to make sure it won’t fall apart when cooking. If you think it will, add either some more beaten egg or flour, but just a little.

Cook the fritters in batches: heat a 1cm depth of oil in a heavy-based frying pan. When hot, drop spoonfuls of the batter into it, immediately pressing flat with a spatula. It’s important not to crowd the pan; you’ll probably cook 3 at a time. Cook for 3-4 minutes each side or until golden. Don’t be tempted to turn the fritters before they have formed a good crust underneath, or they will break. Remove to a plate covered with kitchen paper to drain with excess oil then keep warm in a very low oven while you cook the remaining fritters.

Mix the yoghurt and lime juice in a bowl. Cut the ginger into small pieces and squeeze through a garlic crusher – all the juice should come out in the bowl and any ginger root should be finely crushed. Serve dolloped on top of the hot fritters.

Beetroot, Chickpea and Feta fritters with Minty Yoghurt

(serves 4 as a starter)

350g cooked beetroot (if cooking yourself, simmer whole then rub the skins away afterwards)
200g cooked chickpeas
100g feta cheese, crumbled
2 tablespoons parsley leaves, finely chopped
4 spring onions, finely chopped
Zest of ½ lemon
½ teaspoon ground cumin
1 egg, beaten
3 tablespoons flour (plain white flour or chickpea flour)
Salt and pepper
Groundnut or vegetable oil, for frying

For the sauce

250g tub thick natural yoghurt
Handful mint leaves
Juice of 1/2 lemon

Salt and pepper
To make the sauce, put the yoghurt, mint and lemon juice in a blender and whizz until thoroughly mixed. Taste and season with salt and pepper

To make the fritters, grate the beetroot into a large bowl then transfer to a sieve and press down to squeeze out as much of the juice as you can. Transfer back to the bowl and mix in all the other fritter ingredients. Season with salt and pepper but be sparing with the salt as the feta is salty. Squeeze some of the mixture together in your hands to make sure it won’t fall apart when cooking. If you think it will, add either some more beaten egg or flour, but just a little.

Heat a 1cm depth of oil in a heavy based frying pan. Drop spoons of the batter into the hot oil, immediately spreading out to a flat fritter shape (the fritters need to be the same thickness all over).

It’s important not to crowd the pan; you’ll probably cook 3 at a time. Cook for 3-4 minutes each side then set aside to drain on kitchen paper. Don’t be tempted to turn the fritters before they have formed a good crust underneath, or they will break. The fritters can be kept warm in a very low oven while you cook the next batch.

Serve at once with the sauce.

Pork Cheek Tacos with Blood Orange and Chipotle

A slow-cooked meat dish always wants something to offset the richness (beef ragu with gremolata for another example), which is why I thought these pork cheeks would work well in tacos. They need leisurely cooking to melt the fat and render the meat fork-tender. I was thinking along the lines of saucy carnitas.

The blood oranges have hit the shops and so I used some juice to braise the cheeks, combined with Mexican spices and smoky chipotle flakes (you could also add some chipotles en adobo). After 3 hours of bubbling, the meat was coming apart in shreds and the sauce intensely flavoured; it’s probably one of the most delicious slow cooked dishes I’ve ever made. We piled it onto pan-scorched tacos and topped with lime-heavy guacamole, green chilli and Thomasina Miers’ pink onions pickled in citrus juice and herbs

The leftovers made the largest and most kick ass burrito I’ve ever eaten in my life. I would’ve been embarrassed had anyone actually seen me eating it; meat all over my hands and face. I burnt my cheek with chilli. The sauce left its indelible mark in no less than 3 places on my t-shirt. Totally worth it though, especially considering I bought 10 cheeks for £2.50. Result.

Pork Cheek Tacos with Blood Orange and Chipotle

10 pork cheeks
Juice of 1 large blood orange
4 cloves
6 allspice berries
1 cinnamon stick
1 tablespoon crushed chipotle chillies (or to taste)
1 tablespoon fresh oregano leaves
2 carrots, very finely chopped
2 onions, finely chopped
2 bay leaves
2 tablespoons tomato purée
1 litre vegetable stock (or enough to comfortably cover the cheeks; the sauce will be reduced at the end)
1 teaspoon sugar

Flour and oil for searing the cheeks

Heat a few tablespoons of the oil in a large, heavy based saucepan. Dust some flour onto a plate and use it to coat the pork cheeks by turning them over on the plate. Once the oil is hot, sear the cheeks a few at a time until brown on all sides then set aside on a plate.

Add the onions and carrots to the pan and cook for 5 minutes or so until softened. Add the spices (in a little bit of muslin if you want to be fancy and make it easy to fish them out later on), orange juice, bay leaves, oregano, tomato purée, sugar and stock, bring to the boil then reduce to a simmer. Add the pig cheeks back to the pan, put a lid on and cook on the lowest heat possible for 3 hours.

After this time, check the sauce for seasoning and add salt and pepper as necessary. Remove the meat from the sauce; it should be extremely tender and falling apart at the touch. Shred it and set aside. Fish the whole spices from the sauce then reduce it over a high heat by about two thirds. Basically you want enough to coat the meat in a rich sauce. Add the meat back to the sauce and warm through.

Serve on tacos with guacamole and onions lightly pickled in orange and lime juice with herbs. To cut tacos, use a large glass, teacup or knife to make circles from a large fajita wrap and toast lightly in a dry pan.

Egg Yolk Ravioli

Yeah, quite chuffed with these. I thought it sounded near impossible to slip an egg yolk into the centre of a ravioli and cook it without it either busting out into the water or completely over-cooking and to be honest the latter worried me more; the idea of hard-boiled yolk encased in pasta is just really, really grim.

Anyway they are actually quite easy. You have to make your own pasta of course, so it depends how you feel about that and you really will need a machine because the pasta needs to be as thin as you can possibly get it. That would be a long hard slog with a rolling pin and I ain’t no Nonna. It’s easy when you make pasta at home to be fooled into thinking you have it thin enough when you don’t, which is exactly what happened to me the first time I made these. They cooked perfectly, but the pasta was just too fat and gluey.

The next time I pushed right through to the heady heights of setting number 9 on the machine and was rewarded with papery pasta sheets. I made a spinach and ricotta mixture which doubled up as a stand to keep the yolk in place (an idea I tea-leafed from Nicky who used a ricotta and herb mix and took some incredibly good pictures). It’s important to have a large pan so you don’t overcrowd it with ravioli and to have the water at an enthusiastic simmer rather than a boil (to avoid eggy bursts). A mere 2-3 minutes will cook the pasta through (remember it’s very thin, and fresh) and the yolk will remain gooey and ooze out onto the plate creating a rich sauce.

I bathed them simply with melted butter, crushed pink peppercorns, lemon zest and some of the purple basil that my mum grew and I have somehow managed to keep alive. I love how they look all pretty and delicate but are actually packing the punches with pasta, egg and butter. They’re deceptively light in the eating too, dangerously so in fact. You’ll only want one or two per person but there’s no need to worry about not being full; it would be a crime not to mop up all those golden buttery juices with a slice or two of good bread.

Egg Yolk Ravioli

(serves 4)

200g 00 flour (strong white flour)
2 eggs
A pinch of salt

For the filling

8 small eggs
200g spinach leaves
100g ricotta
1 tablespoon grated Parmesan
Black pepper

Sift the flour into a large bowl. Make a well in the centre and crack the eggs into it. Add the salt. Bring the pasta mix together until you have a rough dough. Knead it on a lightly floured surface until smooth and silky. Wrap in clingfilm and leave to rest for half an hour.

Meanwhile, wash the spinach and without drying it put it straight into a small saucepan on a low heat and put a lid on. Steam until wilted down. Drain, then when it is cool enough to handle, squeeze as much water from it as possible and chop finely. Add to a bowl with the ricotta and Parmesan. Add some black pepper. Taste and add some salt if you like.

Roll out the pasta to the thinnest setting using a pasta machine. Cut into 16 large squares on a well floured surface (you want to leave enough room to cut around the ravioli easily without the stuffing coming out of the sides). In the middle of every other square, put a blob of ricotta mixture, then make a dimple in the centre large enough to hold an egg yolk. Make sure the sides are high enough so that the yolk won’t spill over. Crack an egg over a bowl into your hands so that you are left holding the yolk and the white drains into the bowl through your fingers. Carefully slip each yolk into the middle of the ricotta mixture.

Bring a large pan of salted water to the boil and then reduce it to a simmer. Brush some of the leftover egg whites around the edges of each ravioli and place another pasta square on top. Seal the ravioli carefully easing out any air bubbles towards the edges. Use a glass or teacup to cut each ravioli into a circular shape.

Use a fish slice to pick up each ravioli and place gently into the water. Cook for 2 minutes until the pasta is just cooked and the yolk still runny. Serve with melted butter mixed with crushed pink peppercorns and chopped lemon zest. Garnish with basil.