The structure of the sandwich is of utmost importance. As I have said during many an interview on the subject, there is nothing, NOTHING, worse, than the corner of a sandwich gone soggy as a result of seeping tomato juice; that’s just an amateur build, right there. Everyone knows you don’t put that tomato next to the bread, you put it underneath a protective barrier, such as lettuce. Unless of course, it is a tomato sandwich, in which case lettuce should be nowhere near it and you should simply be eating that sandwich immediately.

Another example is the construction of a burger. A burger with chillies and cheese. Think about the layering; what you don’t want to be doing is putting the cheese directly onto the meat and then attempting to settle the chillies on top; they will tumble out of the burger and onto your plate. Or your lap. The chillies should be placed directly onto the meat, and then sealed with the layer of cheese, creating a spicy pocket and preventing any loss of fillings.

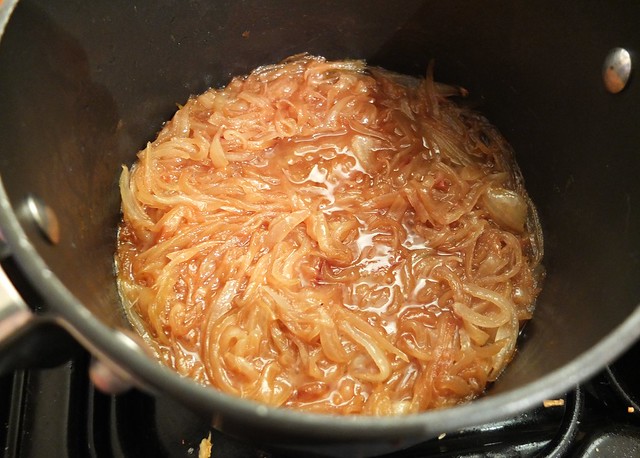
The sandwich I’m going to tell you about in a moment contains caramelised onions, which have been cooked down in very concentrated beef stock and bourbon. Now if they were on a burger (which they bloody well shouldn’t be because that would be horrible and wrong), then they would need sealing on top of the meat with the cheese as per chillies. In the case of my cheesy creation however, it was only appropriate to smear them directly on the bread. Why? I don’t know. Such is the complexity of the sandwich build. Part rule abiding, part instinct.

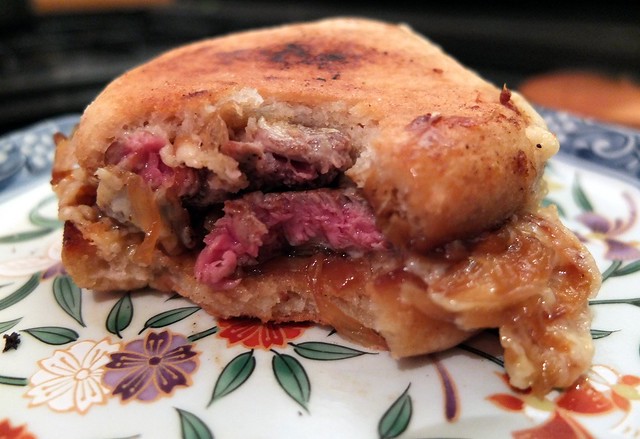
The sandwich is made with Gruyère, steak and sticky onions, in a muffin. I ended up making this as a sort of homage to another food blogger – I’m not going to mention any names – who basically makes dishes ‘with all the flavours of’ other, existing dishes, ‘spaghetti bolognaise tacos’ for example, or  ‘fish and chips pizza’ (I may have made those up). Me and a few of my mates are addicted to this blog, and to laughing (affectionately) at the latest recipe. So this is a sandwich with – wait for it – ‘all the flavours of’ French onion soup. The onions, the beef stock, the onions, the cheese, the onions. It’s hella tasty I have to say. And extremely rich. I wouldn’t attempt it with anything bigger than a muffin, you’d probably be sick.

French Onion Soup Muffins Recipe

2 English muffins Gruyere cheese, grated 2 onions, sliced Beef stock, preferably home made Bourbon 4 thick slices good quality steak (I used sirloin) Butter

Melt a good lump of butter in a pan and let the onions caramelise very slowly in it. This should take about an hour. When they are nicely golden and soft, splash in an inch or so of beef stock and a splash of bourbon. Let this cook out until there is barely any liquid left.

In a hot frying pan or skillet, quickly sear the beef slices on either side for mere seconds, then let rest while you build the sandwich. In the same pan, toast the split muffins briefly. Preheat a grill, then spread each muffin with onions, on the top and bottom halves, and add a layer of cheese over each layer of onions. Wang this under the grill until the cheese is nicely melted. Remove and divide the steak slices between the sandwiches. Put the two halves together and off you go. Lovely with a beer.

For more on the structure and contents of sandwiches, buy my book! 101 Sandwiches is a collection of the finest sandwiches from around the world. 

So it’s only taken me 8 months to get around to writing about Ethiopian cookery. Efficient. I have been experimenting with recipes, which means I have spent a lot of time battling with injera batter. I crave that stuff intensely since coming back; having eaten it 3 times a day, every day, I became addicted, surprisingly, rather than resentful.

Ethiopian cookery is richly spiced and complex. Two of the foundations are berbere and niter kibbeh. Berbere is a rusty red spice mixture, made from dried chillies, fenugreek, nigella seeds, ginger, false cardamom and various other herbs and spices. I managed to find a bag to bring home as the result of a twilight trek around the back streets of a small Ethiopian town. Purchased from a hut made of corrugated iron, it was like gold dust in my eyes. Precious cargo. It adds such a curious depth to a dish, and I add it to many. All very nice for me of course, but not so useful for you lot, huh? So I’ve had a go at cracking it at home. It’s not quite the same of course – the chillies are a different variety, some of the herbs and other bits are simply unavailable – but you know what? It’s not bad. Not bad at all. Recipe at the bottom of this post.

Berbere from Ethiopia 

The niter kibbeh is a clarified butter, simmered with spices including fenugreek, cardamom and nutmeg. It’s a key ingredient in the doro wat recipe below. That’s chicken and egg stew to you. Doro wat is really simple to make once you’ve done your prep and is honestly one of the most satisfying dishes ever invented. A rich, russet red like the darkest autumn leaves, it could stain a white T shirt at twenty paces. The flavour is so intensely spiced and satisfying; perfect for cooler weather and yet reminiscent of the blazing Ethiopian sun.

Berbere Spice Mix Recipe

Chillies (I used a handful of chillies I buy in Peckham labelled, helpfully, ‘African chillies’. They look a lot like piri piri. You could also just use cayenne, although I would use about 5 dried ones. Saveur use chillies de arbol so by all means use 5 of those if you like)
2 tablespoons paprika
1 teaspoon fenugreek seeds
4 cloves
6 black peppercorns
3 allspice berries
Seeds from 6 cardamom pods
6 tablespoons crunchy dried onions (you can buy these from Indian grocers)
2 teaspoons coriander seeds
2 teaspoons salt
1/2 teaspoon ground ginger
1/2 teaspoon ground cinammon

Toast the whole spices in a dry pan, stirring constantly until fragrant. This takes a few minutes. Grind in a spice grinder with the onions and chillies until you have a fine powder. Mix with the remaining spices and salt.

Niter Kibbeh Recipe

You could of course use clarified butter for this, i.e. ghee, which saves the hassle of clarifying it yourself. You will need to use less butter or more spices though, as the recipe below allows for the loss of a bit during the clarification process.

250g butter (or just use 200g ghee to save arsing about clarifying it yourself)
Seeds from 6 cardamom pods, ground
Pinch fenugreek seeds, ground
Pinch nigella seeds, ground

If you do want to clarify the butter then melt it gently over a low heat, constantly skimming the scum from the surface. Once it is simmering, just keep removing all the scum until it looks clear. It takes ages, about 20-30 mins. Up to you. Strain it through a sieve and try to leave the white milky bits at the bottom behind in the pan. Stir in the spices.

Doro Wat Recipe

6 chicken thighs, skin removed
4 eggs
Juice of 1 lemon
1 level teaspoon salt
50g niter kibbeh (recipe above)
3 red onions, diced
3 cloves garlic, crushed
2 tablespoons berbere (recipe above)
1 teaspoon ground ginger
500ml chicken stock
Veg or other oil for frying

Hard boil the eggs, let them cool and peel them.

Heat a splash of oil in a frying pan and caramelise the onions slowly over a low heat. This will take about 40 mins to an hour. Stir them often and stop when they are sweet and caramelised.

Arrange the chicken in a dish and rub it with the lemon juice and salt. Leave for 30 minutes.

When the onions are done, add the niter kibbeh and let it melt. Add the berbere (yes it is a lot, don’t worry) the ground ginger and crushed garlic and cook out, stirring, for a few minutes.d

Pour in the chicken stock. Brush the marinade off the chicken pieces and add them to the pan too. Bring to the boil then reduce to a simmer, cover and simmer for 45 minutes. Remove the lid after this time and add the whole eggs. Simmer for another 10 minutes. Taste and season if necessary (depending on saltiness of chicken stock). Serve with white rice or (bastard) injera.


A proper late summer job, this. Everyone is trying to find something to do with marrows, because they’re everywhere and they’re massive and people are passing them around frantically lest they be eating marrow for breakfast, lunch and dinner.

“I’ve brought you a marrow!”

“Oh GOOD!”

*frantically hides 10 other gifted marrows*

Actually this year I’ve only been given the one, and it is splendid. I wanted to do something with it that ACTUALLY TASTED NICE though, you know? I just didn’t think it was possible, actually, which is why I defaulted, like I do every single year, to the idea of making marrow rum. Yes, you can make rum from marrows. I decided to ask Twitter what it was like, and then I remembered, I know someone who has actually made it. I would ask him. He made the below video in response.

And so yeah I decided not to make it *cough* this year. It would have to go into my lunch and dinner and so I made this frittata, which I wasn’t even going to bother telling anyone about but bloody hell it was delicious. The key I think is to cook the marrow so that it still has some bite, i.e. don’t let it go soft or worse, mushy or even worse, watery. The courgette flowers look gorgeous of course but when used like this rather than deep fried you can actually taste them. They have a really pleasant peppery flavour that is not really discernible when they’ve been stuffed with cheese and deep-fried, even though of course I do like things that are stuffed with cheese and deep fried because I am NORMAL. The basil is, well it’s basil and you know all about that – tasty, innit. So it’s all very high summer, yah? And I didn’t even pay for the courgette flowers like a knob this time! My friend Tai grew them in her garden.

So there is a way to cook a marrow that isn’t a) stuffing it or b) making a watery curry or stew or something.

I still have about 3 feet of it left of course. Any other bright ideas?

Marrow, Courgette Flower and Basil Frittata

1/3 marrow, diced (not too small, about the size of a er, dice, actually)
1 large onion, chopped
1 small red pepper, sliced
2 cloves garlic, crushed
6 or so courgette flowers, cleaned (wash them gently, pick out the stamens from inside and pluck off the hairy stalks)
Small handful basil leaves
6 eggs
Piece of cheddar that was lurking in the fridge that is about 2/3 the size of a playing card? Sorry. It’s cheese, don’t worry about it.
Olive oil
Sprinkle of Turkish chilli (optional)

In a frying pan (I use a skillet for this), heat a little olive oil and fry the onions, marrow and pepper quite vigorously to start off with to get a bit of colour on the veg then turn the heat down and cook until the marrow is beginning to soften but still has a nice bite. Add the garlic now and let it cook out for 5 mins or so, stirring often.

In a bowl, lightly beat the eggs with a fork so they break up. Grate in the cheese, add salt and pepper (generous amount – eggs need it) and the Turkish chilli if using and mix well.

Flatten out your veg in the frying pan and make sure all is evenly distributed. Pour the eggy mixture over evenly and press everything down so it is covered. Press the courgette flowers on top. Do the same with the basil leaves. Turn the heat right down, cover and cook until the frittata has set.

I was trying to find crab on a bank holiday Monday, so I was trying to find crab that wasn’t tinned and I had to go really out of my way, to a Waitrose. A Waitrose in Clapham. No one should have to do that.

I didn’t realise courgette flowers had so much of a flavour, actually, since I’d only ever eaten them stuffed with cheese and deep fried. I think they deserve slightly more delicate treatment to be honest. I filled them with the elusive crab meat and some itty bitty brown shrimps and fried them in a frying pan with just a touch of oil. Very good indeed with chilli and lemon on top.

Courgette Flowers Stuffed with Crab and Brown Shrimp Recipe

(makes enough stuffing for about 10 courgette flowers)

100g white crab meat
50g brown shrimp
1 tablespoon ricotta
1 red chilli, finely chopped
1/2 lemon

Mix the crab, shrimp and ricotta together and season. Stuff this mixture carefully into the flowers – do not overfill, it’s very tempting. In a frying pan, heat a little vegetable oil and gently fry the flowers until starting to colour on the outside. Eat with chilli, lemon and a glass of chilled white wine.

Oddly, this was the first time I’d ever made honeycomb. That’s some crazy right there. In case you’ve never made it, what happens is that you melt butter, sugar and golden syrup in a pan then bubble it furiously, before chucking in some bicarbonate of soda, which makes it go BATSHIT. It expands massively, frothing up into a giant golden Crunchie. Loads of fun.

Anyway it’s lush crumbled into this ice cream, with cherries and bourbon. Fruit, booze and honeycomb. Yes please.

Cherry, Bourbon and Honeycomb Ice Cream Recipe

250g cherries, pitted
150ml bourbon
225g caster sugar, plus 2 tablespoons
500ml double cream
500ml whole milk
6 large egg yolks

Honeycomb (recipes all over the internet)

In a saucepan, heat the cherries with the bourbon, 50 ml water and the 2 tablespoons sugar. Simmer until reduced by about a third and the cherries are coated in a syrupy liquid. Set aside and allow to cool.

Scald the milk and cream (this means heating it until almost but not boiling, basically when bubbles start to appear around the edge, you’re done). Whisk the egg yolks and 225g sugar together until they turn pale and start to thicken. Continue whisking, and add about 1/3 of the hot milk and cream mixture to the egg mix, then when it is incorporated, add the remaining mixture (again whisking all the time).

Pour the lot into a clean, heavy based pan and cook over a low-medium heat, stirring constantly, until the custard thickens and coats the back of a spoon. You can also test if it’s ready by drawing a line down the custard on the back of the spoon with your finger. If the line stays, it’s ready. A thermometer makes this much easier though. At 80 C it should be about right.

Put the custard aside in a bowl and add the cherries and most of the juice, reserving a little to drizzle over before serving. Cover by placing a layer of cling film or greaseproof paper directly on top of the custard, to stop a skin forming. Leave to cool completely.

To make the honeycomb, er, find a recipe on the internet like I did. They’re basically all the same. Once cool, break into pieces.

When the custard is well chilled, churn in an ice cream maker, stirring in some honeycomb pieces right at the end. Freeze for an hour or two before serving.

I’m patting myself on the back as I write this. It’s hard typing with one hand actually. Modest, huh? The truth is, this sandwich ended up being so brilliant because it was a joint effort between three people and don’t worry, comrades! You won’t go unacknowledged! It started because my boyfriend and I couldn’t stop thinking about the lobster roll at Burger and Lobster. I think about it A LOT. We don’t have time to go, though, you know what I mean? What with him opening a restaurant and me, with, well my own irons in the fire.

Managed to find time to buy lobsters though, didn’t we? Huh. Two live lobbys ready for the pot. They went into the freezer as per RSPCA instructions but when they came out were still pretty frisky. This, coupled with the fact they were too big for the pot but were already halfway in by the time we realised made for a rather traumatic experience; that’s me running the length of the flat with my t shirt pulled up over my face screaming ‘No no no no no no no no no!’ while someone else dealt with the situation in a calm and reasonable manner. Another irritating upshot of this kerfuffle was that we didn’t notice the roe on the tail of the female lobster. An obscene amount of roe in fact. The fishermen are supposed to throw these laden lobbys back but had obviously not noticed either, so we ended up cooking the roe. A shame.

Sorry dude…

Anyway that roe was definitely going into the mayo for extra lobster flavour regardless…but hang on a minute, we are definitely not done with this mayo just yet. Enter, the bisque. We cooked the shells down with a little onion and celery, reducing it good and proper until it was mega intense. The resulting roe + bisque enhanced mayo? I did a little dance. Once mixed with the meat this was the most lobstery-tasting lobster mixture I have ever had the pleasure of lobstering. I’ve taken advice on a method for perfectly cooking lobsters, too, which is to boil them in the pot for 3 minutes, then turn the heat off and leave them in there, lid on, for 7. Absolutely spot on.

I wanted brioche rolls but they were too hard to find in SE London and I sure as hell wasn’t making my own on a weeknight so we improvised with a loaf of white bread. We buttered it, heavily, before toasting it in a skillet on both sides.

This is the best lobster sandwich I have ever eaten. The triple lobster flavoured mixture is the absolute nuts. She may not have the looks but boy, she’s got the taste.

Ultimate Lobster Sandwich Recipe

(serves 2-4, depending on size of lobsters and level of greed)

2 lobsters
2 egg yolks
Vegetable oil, for making mayonnaise
1/2 teaspon Dijon mustard
Juice of 1/2 lemon
1 stick celery, finely chopped
1/2 small onion, finely chopped
4 slices of the kind of white bread described above
Butter (I used the kind with salt crystals in it)
Chives, to garnish

For the lobsters:

Put your lobsters in the freezer for 2 hours before you want to cook them. You don’t have to do this, and the evidence for them actually feeling any pain is inconclusive so hey, up to you.

Cook the lobsters by bringing two large pans of boiling water to the boil (or one massive one if you have it). Plunge them in and cover with lids. Cook for three minutes then turn the heat off and leave for 7 minutes longer. Remove them and set aside to cool.

When cool, extract the meat. I did this using a hammer, nutcracker and er, a chopstick. You may have the correct implements. I won’t go into detail here about how to get the meat out as we’ll end up with an essay – there are plenty of guides online if you Google it (I recently came across this brilliant video showing you how to get all the meat out of a lobster – check out the trick with the legs! http://lifehacker.com/the-best-way-to-get-all-the-meat-out-of-a-lobster-483432288). Reserve the shell bits.

For the bisque:

Put all shells into a large clean pan with a splash of vegetable oil plus the finely chopped celery and onion. Fry this for a bit, stirring occasionally. Add about a litre of water. Bring to the boil, then reduce to a simmer for half an hour. Strain and then reduce the strained liquid again, until intense and kick ass tasty. You don’t want much left as you’ll be adding it to the mayo. Consider it an intense little flavour bomb.

For the mayo:

Put the egg yolks in a clean bowl and whisk them together with the Dijon mustard. Whisk in the oil, adding a few drops at a time and making sure each bit of oil is fully incorporated before adding the next. As you whisk in more oil and the mayo starts to thicken, you can start adding it in very slightly larger quantities until you are steadily adding it in a thin stream. Do this is an electric mixer to save muscle pain/hassle. Add the bisque and lemon juice. Obviously if you are lucky enough to get roe than add it but chances are, you won’t. Whisk again and season with salt and pepper. You might want to thicken it slightly if it’s too thin at this point.

For the bread:

Cut and butter liberally. I mean LIBERALLY. Heat a skillet (or similar) and toast on both sides until golden brown (not too much).

Assembly:

Chop the lobster meat roughly (not too small, you want nice big chunks). Mix a little of the mayo with the lobster – do this a little at a time – you don’t want too much. Pile it onto the bread. Garnish with snipped chives. Seal with other piece of bread. REJOICE.

I really, really didn’t want to call this a salsa because…well I don’t really know. There’s just something a bit tossy about it. Anyway, relish wouldn’t work and neither would salad so here we are with salsa. I should’ve just called it THE BEST GRILLED MEAT ACCOMPANIMENT IN THE WORLD because it really is. Last night, we ate it with some BBQ chicken which I’d marinated in yoghurt and a load of spices that would compliment the fruit, like cardamom, cloves and chilli. Stuffed into a pitta with a bit of leafage and a yoghurt sauce thing = really bloody good.

The nectarines and onions are quick pickled, then mixed with mint and olive oil. Simple. It would also be wicked with pork and BBQ fish.

Pickled Nectarine Salsa Recipe

4 nectarines, stoned and diced (leave the skins on)
1/2 small red onion, finely chopped
Small handful mint leaves, finely shredded
120ml white wine vinegar
2 teaspoons sugar
1 tablespoon olive oil
Salt and pep

Put the chopped nectarine and onion in a bowl. In a separate bowl mix the vinegar and sugar until the sugar dissolves. Pour this mixture over the nectarine and onions, add salt and pepper and press down so all it submerged. Allow to pickle for 10 minutes then drain. You could reserve the liquid for pickling something else if you fancy. It tasty. Stir through the chopped mint and olive oil. At this point it will still taste rather astringent and not quite right, which is why you must allow it to sit for an hour or two before serving. It will transform.

I do love the word ‘spatchcock’. Oh come on. Aside from the juvenile pleasure, the giggles and unnecessary emphasis, it’s just such a satisfying word to say. Go on, say it. Say it out loud like you mean it.

It’s also, handily, a very useful and easy way of prepping a bird in order to ensure even cooking, particularly on the BBQ. I’m sure you already know this, but I had to say something useful and serious, otherwise this is just a post about a word that sounds funny. Here’s a vid if you’re not familiar with how to do it.

I made these three times before I was happy with the marinade. The first time – too orangey, the second time – too meh, the third time however…well if I hadn’t nailed it the third time I would have been worried. Pomegranate molasses makes a wonderfully sticky marinade with its exotic sweet and sour flavour, there’s orange juice too and then plenty of BOOM! spicing in the form of Turkish chilli flakes and cumin. I also used dried rose petals, which have always baffled me. In the bag they just smell kinda dusty. I didn’t get it. When ground up however, they did add a nice floral (duh) flavour, which I’d originally tried to achieve with orange blossom water (didn’t work – just tasted like bubble gum).

These were fabulous served with some grilled spring onions – just oil and sling ’em on the grill. A cucumber salad was refreshing, made with spring onions, parsley and sour cream. Oh and there was leftover dirty BBQ veg on the side.

The way to get the poussin tasting really good is to reserve half the marinade and brush it on as they are cooking. This makes sure you get plenty of that flavour on there, without it all slipping off a la marinade. Sticky, sweet, charred, spicy. Incredibly good, actually.

Pomegranate Molasses and Turkish Chilli Poussin Recipe

(serves 2)

2 poussins, spatchcocked

For the marinade:

4 cloves garlic, crushed
2 teaspoons Turkish chilli flakes
1 teaspoon cumin seeds
1 teaspoon dried rose petals
2 tablespoons pomegranate molasses (use a good one)
Juice of 1/2 small orange
1 teaspoon dark brown sugar
Splash of olive oil
Salt and pepper

Bash up the cumin seeds with the rose petals until you have something resembling a powder, then mix with all the other marinade ingredients. Season generously with salt and pepper. Cover the poussin with half the marinade, reserving the rest for brushing on top during cooking.

Cook on the BBQ until, well, cooked (depends on the size of your poussin really – mine took about 20 minutes), turning and brushing regularly with the marinade.

‘Dirty veg’. This isn’t some new dude food trend, but a pretty shit hot way of cooking vegetables on a BBQ. Cooking something ‘dirty’ basically means cooking it directly on the coals. I found this on a blog called Country Wood Smoke, which is written by a guy down in Devon who appears to be married to his BBQ. Actually I have many friends like that. Hang on, actually I’m a bit like that…

Get yourself some hardy-ish veg like peppers and courgettes and some onions, oil them up, salt and pepper them, then stick them directly in the coals once they’re ready for cooking (ie when the flames have died down and they are white/grey). Turn them occasionally until they’re charred in places all over. You think the courgette won’t cook, but it will. It’s also nice to do some more delicate veg, so once you’ve taken peppers et al off the coals and put them aside, get your er, BBQ wok (a wok with holes in) or, if like me, you don’t have one, a metal colander, and put that directly in the coals. Oil and season up some cherry toms and also some baby corn and put them in, tossing them about quite often, until they’re charred in places too. When all veg are done, chop them finely; the smoke and char flavour is just wonderful. What difference does it make cooking them in the coals rather than on the grill? Well they taste smokier, they cook in about 2 minutes flat and above anything else, it’s just really FUN.

Not quite cock rocket veg arrangement

We ate them wrapped with salsa, and some queso fresco, which is a Mexican cheese. The idea that you might not know it will sound ridiculous to any American or, indeed, Mexican readers (sure I have loads), but it’s really not a cheese that is available here. And now someone is making it in Peckham. I know. Gringa Dairy is under an arch on the Old Kent Road. This means there are now like, 3 reasons to love the Old Kent Road! There’s Gringa and Shu Castle and also the fireman in the window – you’ll know what the last reference is all about if you know the Old Kent Road. I can hear at least two of you shouting, ‘I know the fireman in the window!’

The cheese is a bit like feta, but less salty, more creamy and a little less crumbly. You could slice it, for example. It’s apparently a right ball-ache to get the cheese tasting the way it does in Mexico due to issues of climate and method. I can’t say I’ve tasted the original to compare but by gum it tastes just perfect with a bit of dirty veg of a summer’s eve. Give it a whirl. We also splodged on some sour cream plus green chillies (note to self – CHAR THOSE TOO). A squeeze of lime caramelised on the grill…

I don’t want to make some cliche about this being the best vegetarian BBQ food as if there’s nothing good for vegetarians to eat from the BBQ. It is, though.

Dirty BBQ Veg Recipe

(two of us managed to plough through this – disgraceful)

2 peppers
1 courgette
2 large red onions, peeled and quartered
Handful baby corn
Handful cherry toms
Handful garlic cloves, unpeeled
Green chillies
Olive oil

Oil up the veg and season with salt and pepper. As I said the peppers, courgette and onions can go directly in the coals, just move them around a bit – this is proper instinctive cooking you cavewoman, you. Once done, set aside then do the baby corn, chillies, tomatoes and garlic in a metal colander or BBQ wok, if you’re well organised and er, have one. Move them frequently. When all veg are charred, chop them up. They should still have nice crisp, charred bits on the outside, but will be soft inside.

Serve with tortillas/tacos, sour cream, salsa, queso fresco…wrap em up. The possibilities for variations on garnish are obviously many.

Onglet, or skirt steak, is a great cut of beef to cook on the BBQ; it has so much flavour and just needs a really quick grilling over high heat. Over cook it and you’ll find dinner now has the texture of a flip flop, but get it right and you’ll cut into juicy meat with a texture like butter. I gave it a bathing in a spicy, fruit based marinade which was pretty damn fine when slung into tacos. Here’s what to do:

1. Meet @markymarket at Chancery Lane tube to take receipt of a kg of onglet. You can’t miss him – he’ll stick out like a sore thumb wearing a white butcher’s coat and lugging a cool box. Contact him via his website or Twitter to place an order.

2. Gather some mates together for a hot and sticky summer evening BBQ. They will bring loads of interesting wine because they are ace.

3. Make the fruit marinade. I was originally going to use papaya; a great meat tenderiser. I didn’t though because I didn’t have one and also, papayas are expensive. SO expensive. What I did have was 1 very ripe mango and 3 apricots, the flesh of which was whizzed with grapefruit juice, garlic and scotch bonnet chilli. This makes a great table sauce too, so reserve some for later. Pour the sauce over the onglet and marinate for an hour. It will look like it’s covered in sick. It isn’t; that’s your delicious mango sauce, silly.

4. Grill the meat. Rest the meat. Slice the meat. Eat the meat. We piled it into tacos and topped with guacamole, salsa, and onions quick pickled in lime and orange juice.

A dollop of that mango sauce on top is most excellent, too…

Mango and Scotch Bonnet Marinated Onglet Tacos Recipe

(serves 4)

1 kg onglet (skirt steak)

For the marinade:

4 cloves garlic, peeled
Flesh of 1 ripe mango
Flesh of 3 apricots
Juice of 1 grapefruit
1 scotch bonnet chilli, deseeded or not is up to you
Splash olive oil
Salt and pepper

Get the onglet out of the fridge about 2 hours before you want to cook it. Whizz all the marinade ingredients in a blender and pour 3/4 over the onglet, reserving the other 1/4 for serving. Light your BBQ and wait until the flames have died down and the coals are nice and grey/white all over, you want the BBQ as hot as possible and that doesn’t mean flames. By which point your onglet should be ready.

Brush off excess marinade and season well on both sides with salt and pepper. Grill for 2 minutes, then flip and grill a further 2 minutes. Repeat this – so a further 2 minutes each side. This should give you pretty rare steak, but of course it depends on the thickness (you could also brush a little of the reserved marinade on while cooking, if you like. Don’t double dip the brush into the sauce you’re going to serve at the table, though). Let the meat rest for 10 minutes while you get everything else ready, then slice and serve with extras below.

For the guacamole:

I steal a trick from Thomasina Miers here and bash up a little onion and chilli first in the pestle and mortar, as well as mixing some in, which gives a really nice overall savoury flavour. Mix with the flesh of 2 avocados (roughly mashed, you want some texture), juice of 1-2 limes and a little more finely chopped onion and chilli. Finish with salt, pepper and coriander.

For the salsa:

Make a basic tomato salsa by seeding and finely chopping really ripe tomatoes, about 6, and mixing with half a small finely chopped red onion, a squeeze of lime juice, small handful chopped coriander leaves, and salt and pepper.

For the pickled onions:

Another trick nicked from Thomasina Miers, whose book ‘Mexican Cooking Made Simple’ is actually really bloody good. Cover finely sliced red onions with boiling water for ten minutes then drain. Squeeze in lime and orange juice, plus a finely chopped scotch bonnet chilli. Leave for a couple of hours. Makes a great condiment on loads of things, actually.

Tortilla/taco note: I have been e-mailed by a reader who pointed out I have ‘misrepresented’ tacos as I have actually used tortillas. Fact is, tacos are impossible to get hold of for me and also, I don’t like them. Too tough. So yes, I used tortillas and cut taco shapes from them. Apologies if this has offended anyone else. 

Don’t mention the heat don’t mention the heat don’t mention the heat arghhhhh it’s just been so freakin HOT. All the time I’m walking around in a fug of lethargy and sweat thinking, ‘be grateful it’s sunny be grateful it’s sunny be grateful be grateful be grateful’. It’s been really hot though. I haven’t had the oven on. At least not every day. What I did manage was to strain some yoghurt and chop a watermelon; a watermelon that had been in the fridge and so made a glorious respite in the form of my lunch. The cool, sweet melon on top of creamy labneh, tickled through with a little red onion and mint. A lazy trickle of olive oil. I managed to toast the pittas, by slotting them into the toaster and backing the hell away for 2 minutes.

I’d eat this again and again. It’s a lovely thing to have around at BBQs too; a good little starter or side with grilled meats. It’s actually really damn good wrapped up in a kebab.

Watermelon Salad with Labneh Recipe

(serves 4 as a side dish, or two as a starter)

500g full fat natural yoghurt
Salt
1 chunk watermelon, about 1.2-1.5kg (that’s not actually very big – heavy, innit)
1/2 red onion, very finely chopped
Handful mint leaves, finely chopped
Salt and pepper
Olive oil
Squeeze of lime juice
Toasted pitta, to serve

Make labneh as per this recipe.

Skin, seed and finely chop the watermelon flesh. Mix it with the finely chopped onion, mint and a squeeze of lime juice. Spread the labneh on a serving plate and season with salt and pepper. Pile the watermelon salad on top and add a drizzle of olive oil. Serve with toasted pitta.

Jammy Dodgers

Okay so I know I swear a fair bit on this blog but the title, it’s just so BIG, you know what I mean? Couldn’t bring myself to do it.

You may have gathered that I’m not much of a baker. Every so often however, needs must, or I feel I kind of want to perhaps make something because I know someone else will appreciate it. My colleague ABANDONED ME left this week, to go on to do something she has worked very hard for and to congratulate her I thought come on, Gravy, pull the stops out love, it’s time to get baking.

Jammy dodgers. They’re just cool, aren’t they? Old school, now, which obviously makes them doubly cool. How hard could it be?

Really bastard hard, as it turns out. Well, perhaps not for the rest of you, who turn out biscuit after perfectly golden biscuit but for me, a person who couldn’t even cook a vicky sponge without having a quick glance at the quantities first, well, it was a ball ache, to say the least.

Piping

I decided that none of the recipes online had enough butter in them, because it’s a good idea to start changing the ratios of baking recipes if you don’t know what you’re doing. When the mixture wouldn’t come together I flew into a panic and thought it might be a good idea to ask my friend (who used to be a pastry chef at a really famous and stupidly expensive restaurant) for advice. Turns out that by sheer luck the ratios weren’t far off, so I persevered.

Not content with doing just regular jammy dodgers, I decided I would dust the tops of mine with coconut. Except I couldn’t decide when this should be added. At the beginning? Halfway through? How would it stick? I decided to egg wash and sprinkle the coconut on halfway through. Why would anyone do that unless they are an utter imbecile? Obviously the egg wash cooked as soon as I brushed it on, what with the biscuits having been in the oven at 140C for the past 7 minutes. I mean, FFS. What is it that happens to my brain when it comes to baking? I blame the blind panic.

I started to put the wash on pre-baking, and the biscuits were looking better, at which point my pastry chef mate turned up. ‘They look good’ he said, commenting on the latest batch and, relatively, they did. On the way out, he stopped to assess the cooled biscuits and asked me if I had any jam.

Him: “How are you going to put the jam on there?”

Me: “Any which way I bloody can. Why is my wine glass empty?”

Him: “I’m going to get you a piping thing (yeah okay so he called it something else), I’ll be back shortly.”

Me: “You don’t need to do that; it doesn’t matter”

Him:”Yes, it DOES.”

And that is why he was a pastry chef and I stick to cooking things that don’t involve sugar.

He arrived with a pointy bag like a magician’s hat which I used to cack-handedly squirt jam onto the biscuits. Still, that’s baking out the way for another year, eh? And you know what? They were pretty damn good in the end. No idea how it happened. They’re soft, more like the spawn of a  jammy dodger and a melting moment than a regular dodger. That may well be down to the almonds and the entire pack of butter that I used. I’ve really no idea.

Jammy fuckers.

Jammy Dodgers Recipe

(makes approx 60 biscuits using a 4cm cutter. Well, it made 50 for me but it would have made 10 more if I’d not just abandoned the last batch)

250g butter, at room temp
100g caster sugar
325g plain flour (you may need a little more)
75g ground almonds
Half a jar strawberry jam
Desiccated coconut, for sprinkling
1 egg white

Put butter, sugar, almonds and flour into a food processor until it comes together into a ball. If the ball doesn’t come together, add a little more flour. Whack it in the fridge for an hour.

Preheat the oven to Gas 1/140C

Knead it a little bit until it’s smooth enough to roll out. Divide it into two equal pieces. Roll one piece out on a lightly floured surface until it’s about 1/2cm thick. Cut out as many circles as you can, re-rolling as necessary. Bake these for about 15 mins, or until golden. Leave to cool on a rack.

Roll out the second ball to the same thickness then use whatever means necessary to get a hole in the centre. I used the end of a sausage stuffer attachement. Just be resourceful. Doing it with a knife is a complete pain in the arse. Brush with egg white, sprinkle with desiccated coconut and cook for about 15 mins until golden. Allow to cool.

When the biscuits are cool, warm the jam a little in a saucepan, just until you can dip your finger in it and it is warm, not hot. Either spread or pipe your jam onto the bottom biscuits, and sandwich the coconut ones on top. Leave to set.

Sounds simple doesn’t it? Yeah.