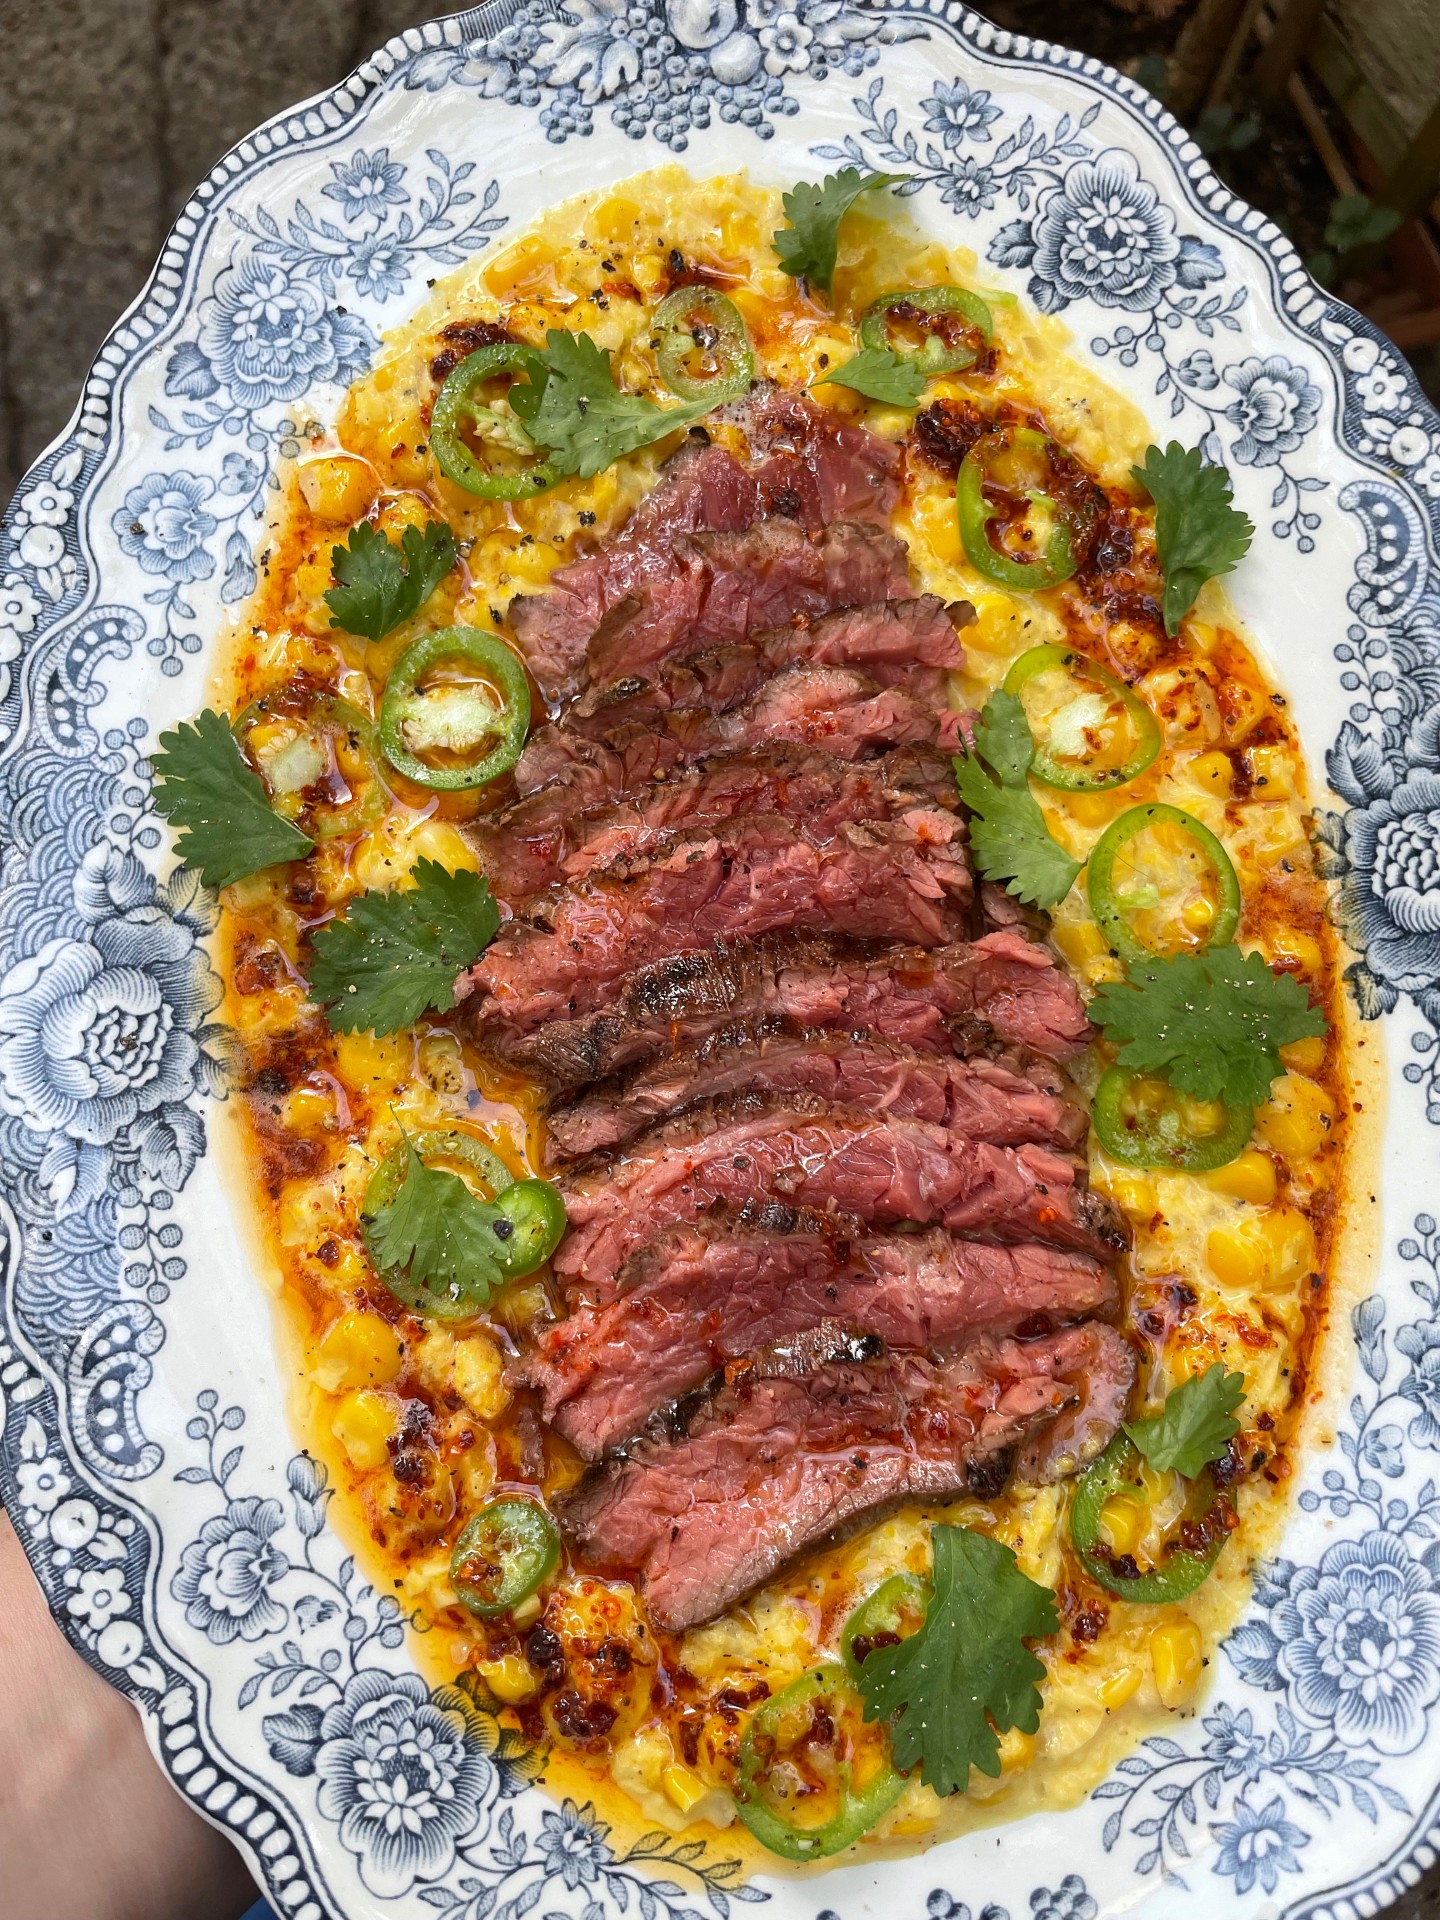
Bavette is easily my favourite cut of steak. It must be cooked rare, then well-rested and cut thinly against the grain or it will be tough. It’s this intrinsic gnarliness that gives it so much character though, and it has serious beefy oomph – no wonder it was once reserved as a butcher’s treat. Now, it’s more widely available, and this one came from Swaledale, who very kindly sent me a selection of their fantastic meat.

You may already know Swaledale as a supplier to restaurants, but you may not know that they also have an online shop for reg customers. I urge you to take a look because their meat is excellent – native breeds, fully traceable, whole-carcass, nose-to-tail butchery. This is how it should be done.

The pickling liquid used for the jalapeños is my standard brine, and it’s taken from my book Live Fire, published this year by Hardie Grant and available at all good bookshops and also that big online one. It’s packed with year-round recipes with indoor cooking instructions, so no excuses!

BBQ Bavette with Creamed Corn, Brown Butter and Pickled Jalapeños

Serves 2

180g bavette steak
4 tablespoons single cream
½ onion, finely chopped
2 x 198g cans sweetcorn, drained
70g butter
Handful coriander leaves
Oil, for cooking

Pickled jalapenos 

2 jalapeños (or green chillies), sliced thinly
150ml rice vinegar
350ml hot tap water
5 tablespoons caster sugar
2 tablespoons fine sea salt

Make the pickled jalapeños by combining the rice vinegar, hot tap water, sugar and salt and stirring until the salt and sugar have dissolved. Add the jalapeños or green chillies and set them aside.

Light a barbecue for direct cooking.

To make the creamed corn, add a small dash of oil to a frying pan over medium heat and soften the onion gently for about 10 minutes. 

To cook the steak, season it really well with sea salt and place it directly over the coals. Cook for a few minutes on each side – exact cooking times will depend on the thickness and shape of the steak. A thicker piece might take 4-5 minutes on each side. Set aside to rest for 10 minutes.

Add 50ml water to the corn, then turn down the heat to low and cook gently for 10 minutes. Add the cream and season with salt and pepper, then simmer for a minute more. Purée half of the creamed corn – this is easiest using a stick/hand blender if you have one. 

Place the butter in a small saucepan and cook over medium-low heat until it turns brown and nutty.

Slice the steak thinly and serve on top of the creamed corn. Top with brown butter, pickled jalapeños and coriander.


I love using pickle brine in dressings as it adds gently spiced acidity and some sweetness. Here, it finds a way into all the frilly, charred leaves of the cabbage, their bitter edges a pleasant contrast. Plump prawns make this feel special, and I’d definitely add some potatoes or buttered brown bread to bulk it out, if in the mood.

Charred Sweetheart Cabbage with Prawns and a Pickle Brine Dressing

1 sweetheart cabbage, quartered
350g raw, shell-on prawns (around 12 prawns)
Generous sprinkle of Urfa chilli
A wedge of lemon

Pickle Brine Dressing

2 tablespoons dill pickle juice from a jar (I used Mrs Elswood)
1 tablespoon strained pickling spices from the jar
½ shallot, very finely chopped
2 tablespoons extra virgin olive oil
1 tablespoon white wine vinegar
Light a barbecue for direct cooking.

Combine all the dressing ingredients in a clean lidded jar or bowl and shake or whisk to combine.

Rub the cabbage with a little neutral oil and season with salt. Grill over direct heat for 6-8 minutes on each side, or until nicely charred. You can take this quite far, as the inside leaves will stay soft and tender.

Coat the prawns in oil too, then grill for a minute on each side, or until fully pink and cooked through.

Separate the charred cabbage leaves, remove the root and arrange them on a plate. Add the prawns, dressing, Urfa chilli and a big squeeze of lemon juice. Serve.

These wings have it all: smoky meat, crisp skin and a killer dressing of aromatic citrus, sweet-tart tamarind and fragrant lime leaves. Toss together with fresh herbs, chilli and pickles and you will find yourself unable to stop eating them.

Grilled Chicken Wings with a Grapefruit, Tamarind and Lime Leaf Dressing

(serves 2)

600g chicken wings, jointed
Small handful mint leaves
Small handful coriander leaves
1 red chilli, very finely sliced

Tamarind, Grapefruit and Lime Leaf Dressing

100ml pink grapefruit juice (1 pink grapefruit)
1 teaspoon tamarind paste
6 lime leaves, torn
½ teaspoon fish sauce
1 clove garlic, peeled and smashed with the side of a knife
2 teaspoons caster sugar

Quick Pickled Shallots

2 small shallots, peeled and sliced into thin rings
50ml rice vinegar
120ml tap-hot water
2 teaspoons caster sugar
1 teaspoon sea salt


Light the barbecue for indirect cooking with the coals positioned in the centre (leaving a ring around the outside with no coals).

Combine the rice vinegar, sugar and salt with the tap-hot water and stir until the sugar and salt have dissolved. Add the shallot rings and set aside.

Place the grapefruit juice, sugar, lime leaves and garlic in a small saucepan and bring to a simmer. Cook for a few minutes, then remove the lime leaves and garlic and discard them. Set the liquid aside while you cook the wings.

Rub the chicken wings with a little neutral oil and season with salt. Place on the barbecue in a ring around the coals – they should be nice and close to the coals so that they cook slowly but are not over direct heat.

Cook the wings gently for 20-30 minutes, or until crisp all over and cooked through. You can move them closer to the coals as they burn down, and give them a final crisping and charring over direct heat.

While the wings are cooling a little bit, add the fish sauce and tamarind to the grapefruit juice and return to heat to reduce by half – this will only take a couple of minutes on high heat.

Pour the hot dressing over the wings and add the sliced red chilli, herbs and pickled shallots. Toss to combine and serve.

Those of you who follow me on Instagram will know that I often make minced lamb kebabs like these, using a simple combination of flavourings. Non-negotiables include pul biber and Urfa chilli flakes (which I love for their mild heat and sun-roasted flavour), finely chopped parsley stalks and lots of garlic.

The ‘relish’ is basically a combination of very slowly cooked onions and fennel, which both caramelise over 45 minutes to an hour in the pan. I add some very finely chopped preserved lemon peel at the end and it transforms the mixture into something fragrant that makes a good accompaniment for grilled meats and seafood.

Basic Lamb Kebab Recipe (makes 6 small kebabs)

500g lamb mince
1 teaspoon ground cumin (toasted and freshly ground if possible)
1 teaspoon ground coriander (ditto)
Pinch cinnamon
2 teaspoons fennel seeds, toasted and roughly crushed
1 tablespoon pul biber
2 teaspoons Urfa chilli flakes
5 cloves garlic, crushed
2 tablespoons finely chopped parsley stalks

Fennel and Preserved Lemon Relish (serves 6)

Oil, for cooking
Large slice of unsalted butter
2 bulbs fennel, trimmed, cored and thinly sliced
2 onions, trimmed and thinly sliced towards the root
About 1 tablespoon finely chopped dill
½ preserved lemon, rind only, finely chopped – use a whole one if the lemon is small
1-2 tablespoons lemon juice

To serve

Flatbreads (see my floofy flatbread recipe here)
Natural yoghurt
Pickled chillies

Heat a generous splash of oil in a large frying pan and add the onion and fennel with a large pinch of salt. Cook gently on the lowest heat for around 45 minutes to an hour, stirring regularly. The vegetables should be a deep golden colour (darker than those in the picture above!)

Combine the minced lamb with all the other kebab ingredients and some salt and mix really well with your hands. Shape into 6 small log-shaped kebabs.

When the fennel and onions are nearly cooked, light a barbecue for indirect cooking (these could also be cooked under a hot grill or in a griddle pan).

Place the kebabs over direct heat and cook for around 5 minutes each side, or until just cooked through – they can be moved to the cooler side of the barbecue to finish cooking if you find they are causing too much flare up.

When the fennel and onions are very caramelised, add the preserved lemon rind, lemon juice, some more salt and the dill. Mix well and serve with the kebabs, flatbreads, yoghurt and pickled chillies.

Carrots are one of those vegetables I’ve never felt particularly excited about. They’re essential as a sweet foundation in mirepoix, in stock and in one of my favourite cakes but I just feel generally quite bored by them. I do not often think of a carrot as a starting point to a dish and get excited.

And yet. There are ways of cooking carrots that make them more interesting and it will come as no surprise that I think they are best cooked over live fire. The real trick here though is marinating them. I let these sit overnight in a bath of olive oil, spices and garlic, although a few hours would be fine. They’re then grilled until tender and charred in places before meeting a plate of cold (so crucially cold!) strained yoghurt and some mustard seeds and curry leaves, made shiny and aromatic with hot butter.

We ate this with some grilled garlic and coriander naan – a recipe I’ve been working on. That was a complete meal really – no meat or fish necessary – and I never thought I’d be saying that about a plate of boring old carrots.

Grilled Marinated Carrots, Strained Yoghurt and Curry Leaves Recipe

500g carrots, peeled and cut into quarters lengthways
4 cloves garlic, peeled and crushed or grated
3 tablespoons lime juice
2 teaspoons cumin seeds
2 teaspoons coriander seeds
2 cardamon pods, crushed and seeds removed
4 tablespoons neutral oil e.g. groundnut

For serving

Strained yoghurt or other thick, cold yoghurt for serving (around 250g should do it)
A good knob of butter (about 25g), or ghee
Good handful fresh curry leaves
2 teaspoons brown mustard seeds

Toast the cumin and coriander seeds in a dry pan over medium heat until fragrant, then grind or crush to a powder with the cardamom seeds. Mix the spices with all the other ingredients for the carrot marinade in a dish large enough to hold the veg in a shallow layer.

Cook the carrots in boiling water for a few minutes, then drain. Add them to the marinade with some salt and mix well. Leave overnight or for a few hours.

Prepare the barbecue for direct cooking. Cook the carrots on it, until cooked through and lightly charred – around 15-20 minutes depending on size.

Spread the yoghurt onto a serving plate and top with the carrots. Melt the butter or ghee and add the mustard seeds and curry leaves – when the mustard seeds start to pop, pour the mixture over the carrots, sprinkle with some more salt, and serve.

This is the third of three recipes developed in partnership with Parmigiano Reggiano

I had no idea how prominently pizza would feature in my lockdown experience. I used to frequent my local pizzeria (Theo’s in Camberwell) at least once a week for a bubble-crusted beauty topped with scotch bonnet ‘nduja, or anchovies, olives and capers. Occasionally, I’d go classic and order a Margherita, but I’d always have a plate of mortadella and pickled chillies to start and finish by swiping the last piece of dough through a pool of their famous chilli sauce.

When the pizzeria closed I was left pining along with so many others, missing their own regular haunts. Photos of homemade attempts (good and bad) appeared on Instagram as we all tried to recreate a slice or eight of our favourite carbohydrate.

Then one day, Theo’s reopened for delivery! Even better, my boyfriend, recently unemployed thanks to the virus, began delivering pizzas to the local hospital for them, as part of a public donation scheme. Soon, we had a steady supply not only of pizza but of *free* pizza. We found our happy place amid the Corona-chaos.

One evening my boyfriend called me during his shift; he’d come off the bike thanks to a nasty pothole, flown over the handlebars and broken his collarbone (and three ribs for good measure). His pizza delivering days were over, but at least he’d been right outside the hospital when it happened.

Someone else delivers the pizzas now, and although we still order them, I’ve also started making some at home, as a kind of make-peace-with-pizza activity. They’re great cooked on the barbecue where temperatures are high, but I wanted to crack an indoor version, just because.


It’s cooked in a cast-iron frying pan, which can get suitably hot before it’s popped under the grill to brown the top. It has a bubbly crust, crisp bottom and soft insides and I’m very happy with it. It’s topped with creme fraiche, spiked with a generous amount of garlic, which is creamy yet fresh, and somehow lighter than cheese but with a comparable mouthfeel. Almost like a pizza that learnt to self dip.

The lack of mozzarella also makes way for plenty of Parmigiano Reggiano to finish, which is grated over at the end so it stays fluffy. Interestingly, any Parmigiano Reggiano which is sold pre-grated must take place in the area of origin, which is admirable dedication to protecting PDO status. I promise I’m only grating mine for personal use, officer. I’d love to visit the region one day and see the cheese being made; it’s produced in only a small area of Northern Italy including the provinces of Parma, Reggio Emilia, Modena, Mantua to the right of the river Po and Bologna to the left of the river Reno, over a surface area of approximately 10,000km. Specific enough for ya? Thankfully, there are no restrictions on area of consumption.

Garlic Creme Fraiche, Mushroom and Parmigiano Reggiano Pizza Recipe

Makes 2 pizzas

250g ‘00’ flour
1 teaspoon dried yeast
½ teaspoon salt
Large pinch sugar
160ml water
500ml creme fraiche
3 cloves garlic, grated or crushed
250g mushrooms, thickly sliced
Big knob of butter
A couple of tablespoons fresh thyme leaves
Plenty of Parmigiano Reggiano

Mix the flour, yeast, sugar and salt, then add the water and mix until you have a dough. Knead very briefly until just smooth, then cover and allow to rest overnight at room temp.

The next day, tip the dough onto a lightly floured surface, divide into two balls, cover loosely and leave for about an hour.

Combine the garlic, creme fraiche and a couple of teaspoons of thyme leaves in a bowl, seasoning with salt and pepper.

Melt the butter in a frying pan over medium heat and add the mushrooms. Cook, with minimal stirring for 5-10 minutes, or until there’s no liquid left and the mushrooms have started to colour. Stir the mushrooms, season, then set aside.

Heat a cast-iron frying pan/skillet over medium-high heat for 5 minutes. Preheat your grill to medium.

Use your hands to stretch one ball of dough into a pizza shape, leaving it a bit thicker at the crust.

Place the dough into the frying pan and cook for a minute or so until the top begins to dry out. Add your creme fraiche and mushrooms. Cook for a couple of minutes more, then add a little more thyme, a good grating of Parmigiano Reggiano and pop under the grill under starting to turn golden in places.

Garnish with plenty more Parmigiano Reggiano and serve.

A quick hello from me today, to share this recipe for turmeric fishcake bánh mì with lemongrass pickled fennel (as promised on Instagram).

I’m a huge fan of the bánh mì as you’ve probably gathered from the number of recipes on this site (grilled pork bánh mì; turmeric fish bánh mì; SPAM mì; crab num pang) because I think it demonstrates what a great sandwich is all about, which is lots of contrasting flavours and textures.

Here, the fishcakes are fragrant with galangal, fresh turmeric and lime leaves and the sliced beans add pops of crunch. There’s acidity from pickled vegetables, an absolute truck tonne of herbs and one of my favourite bánh mì additions: sweet chilli sauce. It’s there for sweetness – I garnish with extra chilli for actual heat.

Spicy, crunchy, fragrant, sour, sweet and just a little creamy with mayo. The bánh mì is brilliant because it’s endlessly variable, and I see it as a lifelong project.

Recipe: Turmeric Fish Cake Bánh Mì

There are quite a few ingredients here but you could easily leave something out if you can’t find it or leave a comment and I will reply with thoughts! As I said, this is a sandwich to play around with.

This makes 12-14 fish cakes, which is enough for 3-4 banh mi (depending on the size of your baguettes). 

For the fish cakes 

500g skinless white fish
40g rice flour
1 tablespoon fish sauce
1 teaspoon sesame oil
4 cloves garlic
1.5 inches fresh turmeric root, peeled and grated (or use a teaspoon of ground turmeric)
60g green beans, sliced 1cm thick
8 lime leaves, finely chopped
1 inch galangal, grated
Pinch salt
Vegetable or groundnut oil for frying

For the lemongrass pickles 

1 bulb fennel, finely sliced
1 carrot, peeled and cut into fine strips or grated
200ml rice vinegar
100ml water
80g caster sugar
8g sea salt
1 star anise
1 slice galangal (or ginger if you can’t find it)
2 lemongrass stalks, outer casing removed and bashed
A few white peppercorns
A few Szechuan peppercorns (optional but good)

To make the banh mi

Baguettes
Mayonnaise
Sweet chilli sauce
Herbs (Thai basil, mint, coriander)
Cucumber
Birdseye chilli

Make the pickle by combining all the ingredients except the vegetables in a saucepan. Bring the mixture to the boil to dissolve the sugar and salt then pour over the vegetables. Set aside.

Make the fish cakes by combining all the ingredients except the green beans and vegetable oil in a blender and blending to a fine paste. You want this mixture to appear ‘bouncy’. Stir in the beans.

Heat a frying pan and fry off a small piece of the fish cake mix to check the seasoning. If you’re happy, shape the fish cakes into balls then flatten into little cakes.

Fry the fish cakes in a couple of tablespoons of vegetable or groundnut oil – they won’t take long, a few mins each side, depending on thickness.

Assemble the bánh mì by stuffing everything into a baguette!

This is the second of three recipes produced in partnership with Parmigiano Reggiano

Lockdown has got me thinking about the cumulative power of small things; the way that all the behaviours we perform on a day to day basis stack up to equal our wellbeing. Something as small as smoothing on moisturiser after a shower; getting a haircut; buying an ice cream; shopping for ingredients without a list; taking the first sip of a cold pint; hugging a mate; wearing new shoes.

Quality of life is notoriously hard to measure, primarily because it’s subjective. We will likely agree on many measures of this fuzzy metric but many are specific to the individual. We all have different vulnerabilities, take pleasure in different activities and feel the holes left by people and places in different ways. Right now I feel a bit like I’m rushing to plug an emotional leak only for another one to spring up in its place.

This is related to minestrone, I promise. The Italian classic is itself an accumulation of small parts, adding up to a comforting whole. It’s also quite variable, although as far as I understand it the ingredients Italians argue about most are the beans and pasta. I’m sure most would also be horrified at my changing the veg and serving the soup with what basically equates to garlic bread but as I said, it’s each to their own right now. I’m going with what makes me happy and so should you.

Parmigiano Reggiano is, of course, non-negotiable. I’ve always kept old rinds in the freezer ready for soup-making because there’s tons of flavour there for the taking. The rind simmers, softens and leaks its umami into the broth. Recently, I saw Rosie Mackean frying hers to caramelise it before simmering and I thought it was genius, so that’s what I’ve done with this recipe. I’d recommend – as she does – keeping the rind back as a chef’s treat.

The distinctive, dotted rind of Parmigiano Reggiano can be eaten as there’s no wax used to cover it; the outside is hard purely due to its reaction with the air. As a PDO product there are many regulations governing its manufacture, of course; strict feeding regulations for the cattle which produce the milk; a minimum period of maturation and a regional restriction which denotes that all stages of production must occur in Parmigiano Reggiano’s area of origin in northern Italy.

Will I emerge from this strange period matured like a fine cheese, or with a touch of rot around the edges? It’s the little things that are likely to preserve my whole.

Minestrone Soup with Parmigiano Reggiano Recipe

Serves 4

1 large onion, diced
2 ribs celery, diced
5 cloves garlic, peeled and crushed or grated
1 medium potato, diced the same size as the onion
1 tin cannellini beans, drained and rinsed
120g (or thereabouts) spring greens or sweetheart cabbage (ribs removed and finely sliced)
1 bunch asparagus (around 16 spears, trimmed and cut into 1 inch lengths)
75g small pasta shapes
600ml good chicken or vegetable stock
1 rind of Parmigiano Reggiano
100g pancetta, diced and fried until crisp
Olive oil, for frying

For the garlic butter toast

I don’t think you need a recipe to tell you how to mash garlic and parsley into butter and spread it onto toast, so I’ll leave that one with you.

Add a glug of oil to a nice large saucepan and gently cook the onion and celery until soft but not coloured, around 5-10 minutes. Add your rind of Parmigiano Reggiano, dotted side up and let it caramelise on the bottom of the pan for a few minutes.

Add your garlic and cook gently, stirring, for a few minutes more. Add your potato and cook for a few minutes longer, then add the beans and stock along with 400ml water.

Bring to the boil then taste and season with salt and pepper. Let all this bubble away for 15 minutes or so, to let that cheese rind infuse.

Add your pasta shapes and the stalk ends of the asparagus and cook for 2 minutes before adding the asparagus tips and cabbage.

Garnish with crispy pancetta and the garlic toast.

This recipe is the first of three produced as part of a paid partnership with Parmigiano Reggiano.

Turns out lying around on the sofa isn’t all that great for your mental health, then. Who knew? People need purpose, which is usually what employment brings. It’s the same with cleaning your living space or doing some exercise – those tasks we put off generally make us happier in the long run.

Creating something is nourishing – be it a painting or a plate of food – and keeping things simple maximises the chances of positive reward. Even the most straightforward cooking, like mashing potatoes or boiling an egg to plomp on top of instant noodles can be the difference between a good day and a forgettable one.

I know there are lots of you who enjoy cooking but aren’t interested in spending hours over it, or queueing outside a specialist shop on the off chance they’ll have the right ingredient. I wanted to come up with some simple recipes that still have big flavour, as you know I don’t do timid when it comes to cooking.

This brings me to Parmigiano Reggiano, who I’m working with again because I love their product but also because it’s a particularly useful cheese to have around right now – it keeps for ages and adds lots of umami, even in small amounts. The intensity comes from the minimum maturation period of 12 months (fun fact: it has the longest ageing period of any PDO cheese) and it can mature for up to 48 months, by which time it has a strong, spiced flavour. It’s incredible to think that something so flavourful is made from just three ingredients: raw, unpasteurised milk, rennet and salt.

I’ve used it here in scones, which as we all know are so simple a child can make them. In fact, the success of scones really lies in not getting involved with them too much at all, barely handling the mix before cutting. I’ve kept the flavour simple by adding chives to the cheese and topping with chilli butter, but you could add nigella seeds or dried herbs maybe, depending on what you have in the cupboard. They’re light, crumbly and properly comforting with a big, deeply-brewed mug of tea.

Parmigiano Reggiano and Chive Scones with Chilli Butter Recipe

Makes 12-14, depending on size

450g plain flour
4 teaspoons baking powder
120g cold butter
1 teaspoon salt
200g Parmigiano Reggiano, finely grated
300ml milk
3 tablespoons chopped chives
1 teaspoon English mustard powder
1 egg, beaten, for glazing

For the chilli butter

Butter
Chilli flakes

Preheat the oven to 220C (fan) and grease two baking trays.

Combine the flour, baking powder, salt and mustard powder in a mixing bowl.

Grate the butter into the mixture (this is easiest if you hold it using a piece of the packet, so it doesn’t melt in your hand), then rub it in using your fingertips until the mixture resembles crumbs.

Add the chives and grated Parmesan and mix well.

Make a well in the centre and pour in the milk, bringing the dough together until just combined – it should still look shaggy. Don’t handle it any more than necessary.

Tip the dough onto a very lightly floured work surface and gently pat it into a rectangle around 2cm thick.

Use either a circular cutter or something round such as a glass to cut circles (or use a knife to make squares if you prefer).

Place on the baking trays and brush with the beaten egg. Bake for 12-15 minutes, until golden. Place on a wire rack to cool a little – they’re good when they’re still slightly warm.

Make the chilli butter by mashing the two ingredients together, to taste. Spread on the still warm scones!

Regular readers will know that I’ve been writing a PhD for a long time. Like, 8 years long. Maybe 9? I can’t bring myself to work it out. Now that I’m on the home straight it means a lot of time spent in the house, at my desk, working on something which doesn’t earn me any money and probably never will. It is of such little value to me right now that I have a joke with a pal about the uses we can find for my thesis in its physical form. Could it crush a cardamom pod, for example? I’m confident it could obliterate a grape but I wouldn’t trust it to hammer a nail.

The reason I’m telling you this is that the lack of a) time and b) money mean I’m trying to cook more thriftily. The other day I even retrieved the dusty basket at the top of the spice cupboard and found a big bag of split black lentils, and we all know that one of the best things to make with lentils is dhal.

The whole urad dal need to soak overnight, which is why the split kind is handy. They take half an hour to soak and then an hour to simmer (this would be even faster with a pressure cooker but I couldn’t be bothered getting it out). I also found some aubergines in the fridge and a lovely thing to do with dhal is blacken aubergines as if making baba ganoush, then add the flesh to the lentils. It’s more faff but makes the dhal really smoky and creamy.

This is one of the best bowls of lentils I’ve ever made, so I’ve stashed some in the freezer for future me to find. You should know that the garnishes are very important – do not underestimate the combined efforts of chillies fried in butter + cold creamy yoghurt.

Smoky Aubergine and Black Lentil Dhal Recipe

This is quite a large amount of lentils, so make sure you have a saucepan that can hold them before you begin. The dhal will serve 6 easily with flatbread, naan, chapattis etc.

2 aubergines (the larger they are, the smokier the dhal)
500g split black lentils (urad dhal)
1 teaspoon cumin seeds
1 teaspoon coriander seeds
A few cloves
A large pinch of mace
Seeds from 5 cardamom pods
10 curry leaves
1 cinnamon stick
1 onion, finely diced
5 cloves garlic, peeled and crushed
1 litre stock
Sliced red and green chillies, to garnish
Butter
Natural yoghurt
Coriander
Vegetable or groundnut oil, for cooking (yes you could use ghee but I finish this with butter, so it’s up to you)

Cover the split lentils with cold water and set aside to soak for half an hour.

Place the aubergines directly on a low flame on the hob and let them blacken, turning occasionally until they’re black all over and starting to burst and collapse. If you don’t have a gas hob, you can do this under a grill. Set aside to cool a bit, then scrape out the flesh and chop it.

Grind the cumin seeds, coriander seeds, cloves, mace and cardamom to a powder in a coffee/spice grinder or pestle and mortar.

Heat a few tablespoons of vegetable/groundnut oil in a large saucepan over medium heat and add the curry leaves and cinnamon stick. Cook for a few mins, stirring.

Add the onion and garlic and continue to cook, stirring to prevent them burning. When they’re golden, add the spices and cook for a couple of minutes more, stirring so they don’t catch.

Add the lentils and stock and give everything a good stir. Bring to the boil then reduce to a simmer and cook for 1 hour, or until the lentils are tender but still have a bite. Season with salt.

I like my dhal a bit creamy, so I blended half the lentils at this point. It’s up to you. You can also add a little water for a looser consistency.

Add the chopped aubergine and check again for seasoning.

Melt a large chunk of butter and gently sizzle the sliced chillies in it. Drizzle this on top of each bowl of dhal along with a spoonful of yoghurt and some chopped coriander.

There’s only so many times a woman can see kale pasta on Instagram before she is compelled to make it. I think this recipe trend has come to us from the US, like avocado toast and using Brussels sprouts in literally everything. I predict the broccoli ‘grilled cheese’ will soon take over. You wait.

Part of kale pasta’s appeal is the wacky colour but it also reflects the fact that we’ve swung from despising and mistreating cruciferous veg to appreciating their bold, iron-rich flavour. I’m also desperate for greens at this time of year when so much focus has been on sweet gnarly roots like carrots and parsnips.

Spring is coming and this is the kind of cheerful bowl that bridges a seasonal gap. I wanted to garnish it with salted ricotta but that’s quite hard to find around these parts so I subbed in grated halloumi which did a pretty fine job. You’re likely to want about 50% more of it than you see in this photo. At least, I did.

Rigatoni with Kale, Walnuts and Halloumi Recipe

(makes enough for 500g pasta)

250g kale, ribs removed
3 cloves garlic
75g Parmesan, grated
70g walnuts
4 tablespoons extra virgin olive oil
4 tablespoons lemon juice
Black pepper
Halloumi, to garnish

Bring a large pan of water to a boil and put the kale in it. Bring back to the boil, cook for 30 seconds, then drain.

Toast the walnuts in a dry pan, moving them around over medium heat until they smell delicious. Take care not to burn them.

Add the kale to a blender with the garlic, Parmesan, walnuts, olive oil and lemon juice. Add lots of black pepper and check for seasoning – you might want a bit of salt but bear in mind the halloumi will be salty.

Serve stirred through hot pasta with a splash of the pasta water for silkiness and top with grated halloumi.

Sorry about the basic recipe title but ‘conchiglioni rigati stuffed with sprouts, greens and ricotta in a three-cheese sauce’ just seemed ridiculous, and my brain is on holiday until January 2nd.

I made this with the aim of using up all the Christmas cheese. Just when I thought we were finished I found a whole wedge of Colston Bassett, a substantial nub of Cheddar and a hefty slice of Mrs Kirkham’s lurking, so I’ve combined them with two more types of cheese to make this gigantic pasta bake. Believe it or not, we still have cheese leftover.

I had to use some finely sliced Brussels sprouts because this has been the year of #sproutcontent, particularly on my Instagram feed, and I’m chuffed that so many of you have made my sprout kimchi recipe. I combined them with cavolo nero, spinach and ricotta and stuffed the mixture into shells which were baked in the sauce, with more cheese on top for luck.

This was impossible to resist hot and bubbling from the oven, despite the fact that rich food fatigue is definitely setting in. To that end, make sure to eat it with a sharply dressed salad which will counterpoint some of the richness.*

*help you eat more pasta bake.

Super Cheesy Stuffed Pasta Shells Recipe

Approx 30 large pasta shells (conchiglioni rigati)
150g sprouts, finely sliced
7 large cloves garlic, crushed
200g spinach
200g cavolo nero, leaves stripped from stalks
500g ricotta
Butter, for cooking
A few pieces of blue cheese, such as Colston Bassett or Stichelton
Parmesan, for grating on top

For the bechamel

1 litre milk (I used semi-skimmed)
1 onion, peeled and quartered
2 bay leaves
10 peppercorns
70g plain flour
100g butter
100g blue cheese such as Colston Basset or Stichelton, crumbled
100g cheddar, grated

Heat the milk gently with the onion, bay leaves and peppercorns – stirring – until it begins to simmer, then turn off, cover and set aside for 20 minutes or so.

In the meantime, wash the spinach and cavolo nero and place in a saucepan. Put a lid on and gently heat until wilted. Drain, then run under cold water until cool. Place in a clean tea towel and squeeze out as much water as possible. Chop finely.

Heat a knob of butter in a pan and gently cook the sprouts and garlic until softened and smelling great. Combine with the spinach and cavolo nero. Add the ricotta and mix well. Season with salt and set aside.

Cook the pasta shells in boiling salted water until just half cooked (they will continue cooking in the oven later). Run under cold water to cool them down. Stuff each with some of the greens and ricotta mixture. Set aside in a bowl.

To finish the bechamel, strain the milk and add back to the pan. Add the flour and butter and heat on a medium heat, whisking all the time until nice and thick. Melt in the cheese and taste – add salt if necessary. Cover and set aside.

Preheat the oven to 180C.

Cover the base of a large ovenproof dish with the bechamel. Arrange the pasta shapes on top, stuffing side up. Crumble the remaining blue cheese on top and cover with grated Parmesan. Bake for 20-25 minutes until bubbling and beginning to golden. Finish under the grill for 5 minutes to brown the top (watch carefully!).

Serve with a sharp green salad.