This is the third of three recipes developed in partnership with Parmigiano Reggiano

I had no idea how prominently pizza would feature in my lockdown experience. I used to frequent my local pizzeria (Theo’s in Camberwell) at least once a week for a bubble-crusted beauty topped with scotch bonnet ‘nduja, or anchovies, olives and capers. Occasionally, I’d go classic and order a Margherita, but I’d always have a plate of mortadella and pickled chillies to start and finish by swiping the last piece of dough through a pool of their famous chilli sauce.

When the pizzeria closed I was left pining along with so many others, missing their own regular haunts. Photos of homemade attempts (good and bad) appeared on Instagram as we all tried to recreate a slice or eight of our favourite carbohydrate.

Then one day, Theo’s reopened for delivery! Even better, my boyfriend, recently unemployed thanks to the virus, began delivering pizzas to the local hospital for them, as part of a public donation scheme. Soon, we had a steady supply not only of pizza but of *free* pizza. We found our happy place amid the Corona-chaos.

One evening my boyfriend called me during his shift; he’d come off the bike thanks to a nasty pothole, flown over the handlebars and broken his collarbone (and three ribs for good measure). His pizza delivering days were over, but at least he’d been right outside the hospital when it happened.

Someone else delivers the pizzas now, and although we still order them, I’ve also started making some at home, as a kind of make-peace-with-pizza activity. They’re great cooked on the barbecue where temperatures are high, but I wanted to crack an indoor version, just because.


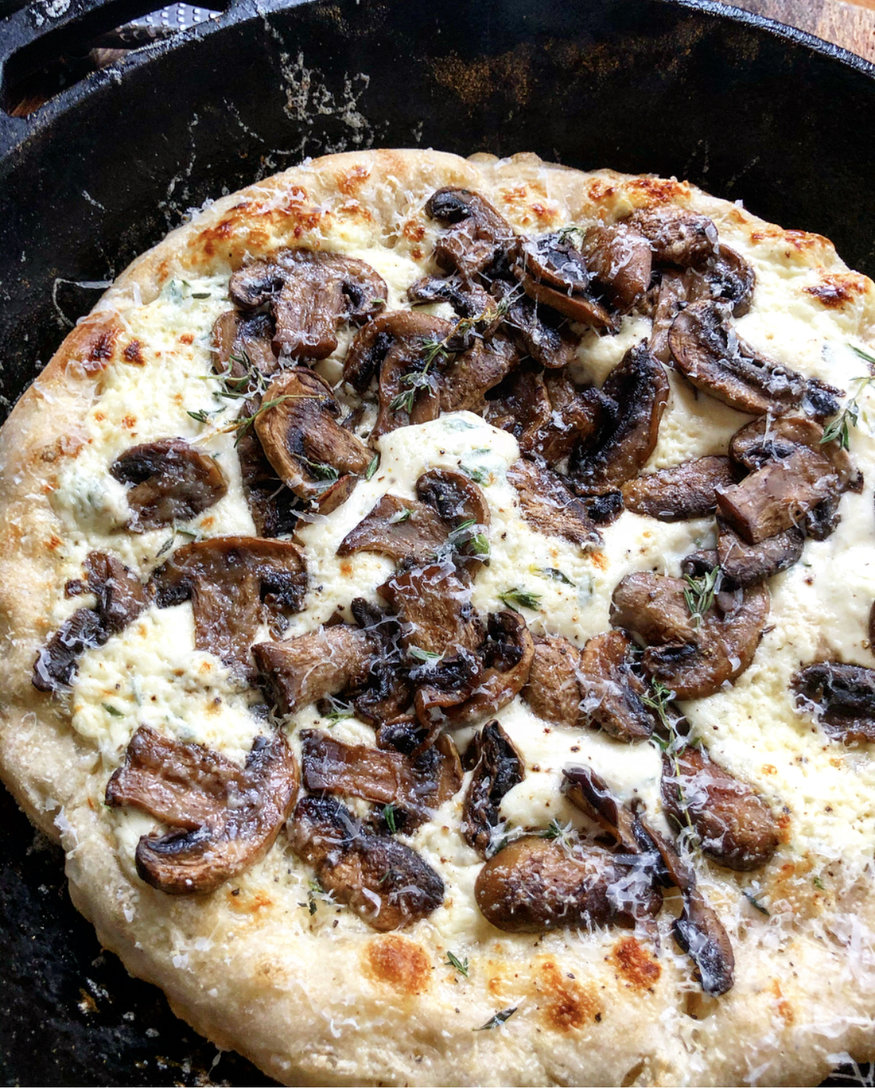
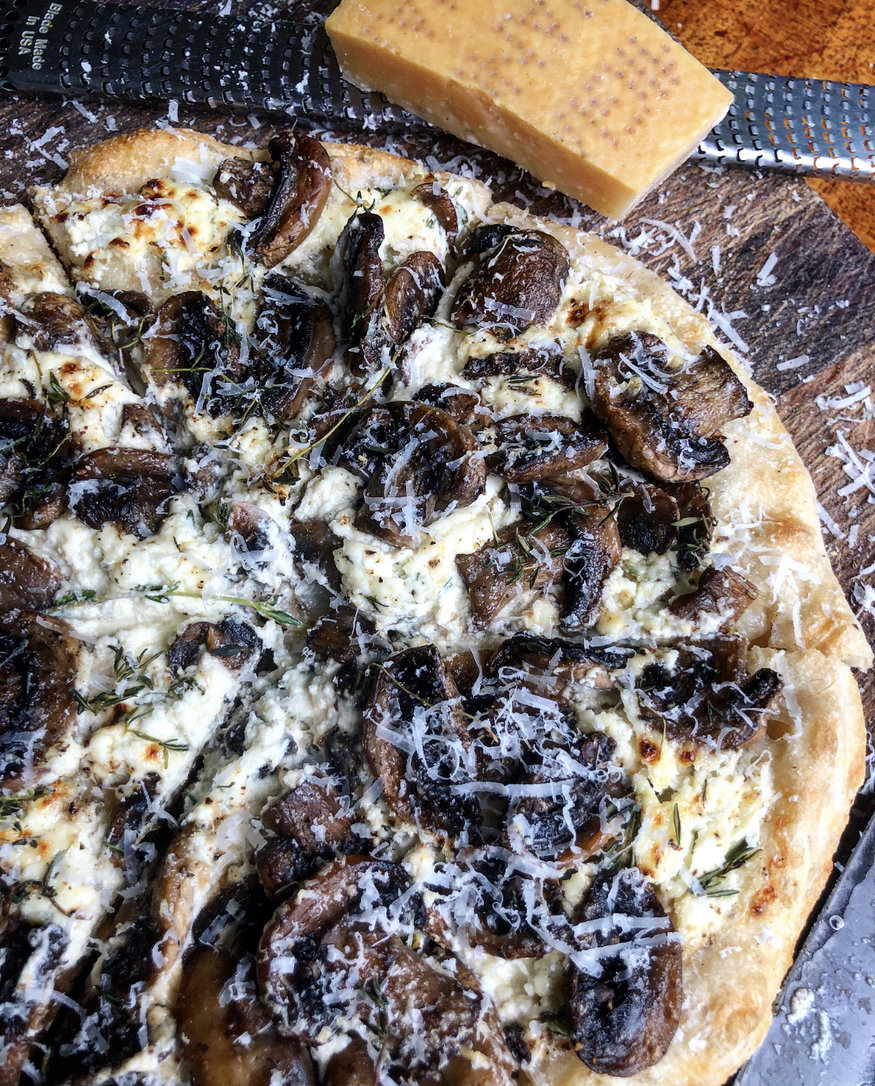
It’s cooked in a cast-iron frying pan, which can get suitably hot before it’s popped under the grill to brown the top. It has a bubbly crust, crisp bottom and soft insides and I’m very happy with it. It’s topped with creme fraiche, spiked with a generous amount of garlic, which is creamy yet fresh, and somehow lighter than cheese but with a comparable mouthfeel. Almost like a pizza that learnt to self dip.

The lack of mozzarella also makes way for plenty of Parmigiano Reggiano to finish, which is grated over at the end so it stays fluffy. Interestingly, any Parmigiano Reggiano which is sold pre-grated must take place in the area of origin, which is admirable dedication to protecting PDO status. I promise I’m only grating mine for personal use, officer. I’d love to visit the region one day and see the cheese being made; it’s produced in only a small area of Northern Italy including the provinces of Parma, Reggio Emilia, Modena, Mantua to the right of the river Po and Bologna to the left of the river Reno, over a surface area of approximately 10,000km. Specific enough for ya? Thankfully, there are no restrictions on area of consumption.

Garlic Creme Fraiche, Mushroom and Parmigiano Reggiano Pizza Recipe

Makes 2 pizzas

250g ‘00’ flour
1 teaspoon dried yeast
½ teaspoon salt
Large pinch sugar
160ml water
500ml creme fraiche
3 cloves garlic, grated or crushed
250g mushrooms, thickly sliced
Big knob of butter
A couple of tablespoons fresh thyme leaves
Plenty of Parmigiano Reggiano

Mix the flour, yeast, sugar and salt, then add the water and mix until you have a dough. Knead very briefly until just smooth, then cover and allow to rest overnight at room temp.

The next day, tip the dough onto a lightly floured surface, divide into two balls, cover loosely and leave for about an hour.

Combine the garlic, creme fraiche and a couple of teaspoons of thyme leaves in a bowl, seasoning with salt and pepper.

Melt the butter in a frying pan over medium heat and add the mushrooms. Cook, with minimal stirring for 5-10 minutes, or until there’s no liquid left and the mushrooms have started to colour. Stir the mushrooms, season, then set aside.

Heat a cast-iron frying pan/skillet over medium-high heat for 5 minutes. Preheat your grill to medium.

Use your hands to stretch one ball of dough into a pizza shape, leaving it a bit thicker at the crust.

Place the dough into the frying pan and cook for a minute or so until the top begins to dry out. Add your creme fraiche and mushrooms. Cook for a couple of minutes more, then add a little more thyme, a good grating of Parmigiano Reggiano and pop under the grill under starting to turn golden in places.

Garnish with plenty more Parmigiano Reggiano and serve.

This recipe is the first of three produced as part of a paid partnership with Parmigiano Reggiano.

Turns out lying around on the sofa isn’t all that great for your mental health, then. Who knew? People need purpose, which is usually what employment brings. It’s the same with cleaning your living space or doing some exercise – those tasks we put off generally make us happier in the long run.

Creating something is nourishing – be it a painting or a plate of food – and keeping things simple maximises the chances of positive reward. Even the most straightforward cooking, like mashing potatoes or boiling an egg to plomp on top of instant noodles can be the difference between a good day and a forgettable one.

I know there are lots of you who enjoy cooking but aren’t interested in spending hours over it, or queueing outside a specialist shop on the off chance they’ll have the right ingredient. I wanted to come up with some simple recipes that still have big flavour, as you know I don’t do timid when it comes to cooking.

This brings me to Parmigiano Reggiano, who I’m working with again because I love their product but also because it’s a particularly useful cheese to have around right now – it keeps for ages and adds lots of umami, even in small amounts. The intensity comes from the minimum maturation period of 12 months (fun fact: it has the longest ageing period of any PDO cheese) and it can mature for up to 48 months, by which time it has a strong, spiced flavour. It’s incredible to think that something so flavourful is made from just three ingredients: raw, unpasteurised milk, rennet and salt.

I’ve used it here in scones, which as we all know are so simple a child can make them. In fact, the success of scones really lies in not getting involved with them too much at all, barely handling the mix before cutting. I’ve kept the flavour simple by adding chives to the cheese and topping with chilli butter, but you could add nigella seeds or dried herbs maybe, depending on what you have in the cupboard. They’re light, crumbly and properly comforting with a big, deeply-brewed mug of tea.

Parmigiano Reggiano and Chive Scones with Chilli Butter Recipe

Makes 12-14, depending on size

450g plain flour
4 teaspoons baking powder
120g cold butter
1 teaspoon salt
200g Parmigiano Reggiano, finely grated
300ml milk
3 tablespoons chopped chives
1 teaspoon English mustard powder
1 egg, beaten, for glazing

For the chilli butter

Butter
Chilli flakes

Preheat the oven to 220C (fan) and grease two baking trays.

Combine the flour, baking powder, salt and mustard powder in a mixing bowl.

Grate the butter into the mixture (this is easiest if you hold it using a piece of the packet, so it doesn’t melt in your hand), then rub it in using your fingertips until the mixture resembles crumbs.

Add the chives and grated Parmesan and mix well.

Make a well in the centre and pour in the milk, bringing the dough together until just combined – it should still look shaggy. Don’t handle it any more than necessary.

Tip the dough onto a very lightly floured work surface and gently pat it into a rectangle around 2cm thick.

Use either a circular cutter or something round such as a glass to cut circles (or use a knife to make squares if you prefer).

Place on the baking trays and brush with the beaten egg. Bake for 12-15 minutes, until golden. Place on a wire rack to cool a little – they’re good when they’re still slightly warm.

Make the chilli butter by mashing the two ingredients together, to taste. Spread on the still warm scones!

This is a recipe I’ve developed as part of a paid partnership with Parmigiano Reggiano.

It’s only in recent years I’ve begun to throw myself into seasonal cookery as part of my plan to reclaim Christmas as something more my own, rather than focusing on all the aspects I don’t enjoy (see: the whole religious festival thing, the stress, tinsel). Obviously, the social side is fun, and it’s nice to have a break – even if I didn’t bloody choose to have one thankyouverymuch – but for me, it’s about trying to enjoy myself in non-traditional ways and not get annoyed with gaudy lights and forced participation.

I’ve chosen to buy a non-traditional tree, for example. I was always whining that I didn’t like the green pointy variety, so why did I ever consider buying one? Mine’s a willowy silver number covered with food-themed baubles and a crab on top instead of an angel. So there.

Please don’t for a moment think I am judgemental about the ways in which others enjoy Christmas because nothing could be further from the truth. I think there is a lot of pressure at this time of year to do things a certain way, and what I’m trying to say is that it’s helped me a lot to find my own path.

Food can become oddly competitive too, which is a shame because it’s arguably the best thing about Christmas {insert caveat about family time here}. Over the years I’ve developed some recipes which have become firm favourites (these sausage rolls with whisky caramelised onions for example) and some which are popular newcomers (looking at you, Brussels sprout kimchi).

I think one thing we can all agree on is that it’s necessary to ensure a steady stream of snackage, and these croquettes are a perfect little bite. They’re just mashed potato, bacon, Brussels and plenty of Parmigiano Reggiano made into balls and deep-fried, and you could easily swap in some leftover ham or other greens if you felt like it.

The Parmigiano Reggiano brings moreish savouriness and depth of flavour, plus it’s very handy to have around at this time of year – try grating it onto puff pastry and twisting into straws before baking for the easiest last-minute party snack for example, or use as a filling for palmiers with anchovy. It would be great in some miniature tartlets with crab as a smart starter, or try adding to stuffing for a savoury note that will keep people guessing.

The most important thing is not to stress, and I think one of the nicest ways of hosting at Christmas is to invite people round, tell them to bring their own bottles, make a big pile of literally just one snack and have them dig in. These are cute and filling enough to keep everyone satisfied and you don’t have to faff about with multiple tasks. They work nicely with a quick n’ dirty dip made with mayonnaise, a touch of yoghurt, chives, garlic and more Parmigiano Reggiano. Dive in, kick back and try not to worry about what on earth you’re going to buy that cranky old uncle you don’t particularly care for.

Parmigiano Reggiano, Bacon and Brussels Sprout Croquettes Recipe

Makes 25-30 croquettes, depending on size

700g potatoes for mashing such as Maris Piper
2 egg yolks, plus 2 whole eggs for coating
100g grated Parmigiano Reggiano
120g Brussels sprouts, stalks removed and finely shredded
240g bacon (8 thin rashers), large pieces of fat removed and finely diced
Flour, for coating
Breadcrumbs, for coating
Oil, for frying

Cook the potatoes in salted water, then mash them until very smooth.

Add the bacon to a hot, dry frying pan and cook until just beginning to crisp, then add the sprouts and stir well. Cook, stirring, just until the sprouts have softened.

Mix mashed potatoes, Parmigiano Reggiano, sprouts, bacon and some salt and pepper. Taste for seasoning, then add the yolks and mix well.

Roll into walnut-sized balls and chill for at least 2 hours.

When you’re ready to cook the croquettes, cover one plate with flour, another with beaten egg and another with breadcrumbs. Using one hand for dry ingredients and one for wet, coat each ball in flour, then egg, then crumb.

Heat oil for deep frying to 180C. Turn an oven on low (50C or thereabouts).

Cook the croquettes in batches of 4 or 5, turning often, until golden brown all over (2-3 minutes should do it).

Drain on kitchen paper and transfer to the oven to keep warm while you cook the rest.

For the dip, I just mixed few tablespoons of mayo with a couple of yoghurt, a squeeze of lemon, a clove of garlic and plenty of grated cheese. Garnish with a few chives and you’re all set.


Duck and Endive Salad with Pickled Walnut Dressing Recipe

Serves 2

2 duck breasts (weighing around 230g each), skin scored lightly in a criss-cross pattern
250g stale sourdough bread, torn roughly into crouton-sized chunks
The cloves from a half a bulb of garlic, separated but unpeeled
Olive oil
2 pickled walnuts
1 tablespoon red wine vinegar
1 shallot, cut into fine rings
2 red chicory, leaves separated
4 large handfuls watercress


Preheat the oven to 180C.

Place the sourdough chunks into a roasting tray and add the garlic, 3 tablespoons of olive oil and some salt and pepper. Mix well and cook for around 25 minutes, turning once, or until golden and crisp.

Place the shallot rings into a bowl of iced water.

Make the dressing by smooshing 3 cloves of the now-roasted garlic with a pinch of salt, the pickled walnuts, 2 tablespoons of extra virgin olive oil and 1 tablespoon good red wine vinegar. Shake in a jar to emulsify (or use your preferred method).

Season the skin of the duck breasts and place them in a cold cast iron skillet or other heavy based pan. Turn the heat on low-medium and let them slowly heat up for 5 minutes or so. Turn the heat up to medium and cook for another 5 minutes then turn over and cook for a few minutes more. Cooking time will depend on the exact size and heat but this should give you crisp golden skin and pink flesh. Allow to rest for 5 minutes.

Mix the salad leaves with some of the dressing and the croutons and arrange on two plates. Arrange the duck slices and some of the shallot rings on top, then drizzle with a little more dressing and sprinkle with crunchy salt. You may feel like adding a further dribble of olive oil – I did.

This recipe was developed as part of a paid partnership with Marks & Spencer.

I used to find the festive season quite difficult. It raised my anxiety levels which, to be honest, are pretty much consistently set to gnarly anyway. I know some people have a terrible time at Christmas but I think many of us have a sort of mid-level stressy time. I’ve learned to enjoy myself more by employing a cluster of coping strategies and one of them is taking a deep-dive into the festive food pool.

Entertaining a group of pals is part of the fun but I think we’ve all been in a situation where that too becomes more of a hair-pulling exercise than the free and easy social event it should be. I’ve definitely come a cropper thanks to an overly ambitious menu, spending the whole morning freaking out when I should be prepping a relaxed lunch with a glass in my hand. It is very easily done.

So this recipe is all about serving something a little bit different without giving yourself too much to do. I know it seems daunting baking something in a salt crust but it’s just a case of timings which I’ve already worked out for you. To remove any element of doubt use a probe thermometer – you can poke right through the crust with no issues.

M&S got in touch asking me to create a recipe using ingredients from their food hall as they’ve just opened a branch near me in East Dulwich. We’ve all done a mad dash around one on the way home from work but I was amazed at how much they stock after having a good root around for ingredients. I should say however that the fillet of beef I’ve used here needed to be ordered in advance via their website as it’s larger than the fillet steak they normally keep in store, so do bear this in mind as it took a few days to arrive.

Why cook something inside a salt crust at all? Well, it’s fun and dramatic at the table as you crack it open and the fragrant steam puffs forth. Whatever flavours you choose to rub onto the meat are trapped inside and the salt from the crust seasons everything beautifully. You’re probably more familiar with cooking fish this way but it’s fun to try with meat, I think, and I’ve had great success with a salt crusted leg of lamb too.

I rubbed the beef with dried mushrooms and pepper but you could use a combination of woody herbs like rosemary and thyme or pretty much anything, to be honest. I await your reports of freeze-dried raspberry rubbed beef with great anticipation. On the side, I served some potatoes roasted simply with lots of olive oil and salt (parboil, lightly squish and roast with 6 tbsp oil and 2 tsp salt at 180C for 20 minutes) plus buttered greens, carrots and prepared horseradish from a jar. We drank M&S Delacort champagne while cooking, which is impressively rich and biscuity for £35 – it’s great value and would also go very well with my crab vols-au-vent. With the beef, we drank a Gigondas from Perrin Pere et Fils (also from M&S) –  a wintry wine with spicy red fruit and plenty of body yet soft tannins which won’t fight against the fillet.

So there we go – maximum impact, minimal stress. What will I salt crust next?

Salt Crusted Fillet of Beef Recipe

You will need a probe thermometer for this recipe.

250g plain flour
200g rock salt
5 egg whites
1 x 750g fillet of beef
5g dried porcini mushrooms (not from M&S)
12 black peppercorns

Preheat the oven to 200C fan/220C no fan and put a baking tray in there to heat up.

Make the crust by mixing the egg whites, salt and flour. When smooth (apart from the rocks of salt) wrap in cling film and put in the fridge for 20 minutes.

Remove the beef from the fridge (don’t let it come to room temp first). Heat a little oil in a heavy-based skillet or frying pan and sear the beef really well on all sides to get a nice brown crust on it because you won’t get the browning from pan cooking as usual.

Wrap the beef in foil then set it aside for 15 minutes. Blitz the porcini mushrooms and peppercorns to a powder and rub it all over the meat.

Roll out the salt crust, remove the foil from the beef and lay it on top then wrap the salt crust around it, sealing the edges. Make sure the seal is on the bottom.

Remove the baking tray from the oven and put the beef on it. Cook for 18 minutes then probe it – you are looking for a temperature of 46C for rare meat (obviously pop it back in if it hasn’t reached that temperature). Once it is 46C remove it from the oven and let it sit until it’s 50C, around 4 minutes. Carve it right away at the table as the beef will keep on cooking inside if you don’t.

Pork and venison sausage rolls

This is the first of two sponsored posts in partnership with Vitamix, who have just launched the new Ascent Series. 

How do you guys feel about Christmas? We’re supposed to love this time of year. My Instagram feed has been saturated with baubles and bristly trees for a couple of weeks now as people get carried away on an avalanche of boozing, socialising and eating.

Festive food is definitely the highlight of the season. Pork pies, pickles, mince pies and trifle. Christmas, for me, is a time to celebrate traditional British food. I like to emerge in January, whiffing faintly of Silton and mulling spice, like a crumpled party napkin discarded among the glitter of the staff Christmas party. The feasting needs to be full throttle – even paper hats should feel snug come the new year.

A lot of Christmas food is about pork and you know it. Stuffing, pigs in blankets, pork pies and of course, sausage rolls. Some of the most popular recipes of all time (ALL TIME!) on Food Stories are these sausage rolls with whisky caramelised onions and this very quick and easy ‘cheats’ version, to use the language of today’s food magazines.

Pork and venison sausage rolls

This recipe sounds like it’ll take an age to make as it involves mincing two types of meat and grinding spices but guess what? Yup, the Vitamix does all that for you. I’ve worked with Vitamix before, you may recall, and the reason I’m doing it again is that these blenders are genuinely brilliant. They are the nuts. They will blend just about anything and they take a lot of work out of a lot of recipes. I use mine constantly, even when they’re not paying me to do it.

These sausage rolls are an excellent variation on the traditional pork, with the gorgeous wintry flavour of venison but enough pig in there to keep the mix nice and fatty. I’ve added a gentle hum of mace, juniper and white pepper and a batch of sweet, golden onions, caramelised with sherry to really tick those jingle boxes. Festive AF.

Pork and Venison Sausage Rolls with Sherry Onions Recipe

Makes around 24. These are perfect served with a blob of English or Dijon mustard.

400g pork belly, trimmed of excess fat, skin and bone
500g venison haunch, skinned
4 onions, peeled and sliced
25g butter
2 generous pinches good sea salt
2 pinches of mace, ground
1 teaspoon ground white pepper
12 juniper berries, ground
2 teaspoons fresh thyme leaves
175ml Amontillado sherry
2 packs of ready-rolled puff pastry
2 eggs, beaten lightly with a fork (to glaze)

Roughly dice the pork belly and venison haunch, then pop in the freezer while you get the onions going.

Slice the onions, and cook gently with the butter (and a drop of oil) until golden, taking care not to burn them. They’ll need regular stirring, even on the lowest heat. Once they’re nicely caramelised (around half an hour), add the sherry, turn the heat up a little and cook until the liquid has evaporated. When the onions are done, spread them out on a plate to cool, then chop roughly.

In the Vitamix, process the cooled meat in handfuls on setting No. 3, until it looks like sausage meat.

Mix the spices, thyme, salt and onions well into the meat. Remove a teaspoon or so and fry it in a pan to check the seasoning.

Preheat the oven to 200C/Gas 6.

Divide the meat mixture into four. Unwrap the pastry sheets and divide each lengthways into two pieces. Make a sausage of meat down the centre of each strip of pastry, then brush one edge with the beaten egg, fold over and seal. Cut into two-inch lengths or whatever you fancy.

Use scissors to snip the tops if you like (I just think this looks nice), put on a baking tray and glaze with egg. Bake for 15-20 minutes or until golden and cooked through. Serve with mustard.